How to Create a WordPress Custom Dashboard for Yourself or Clients
- Category : WordPress
- Posted on : Jan 29, 2019
- Views : 2,966
- By : Radcliff S.

Want to create a WordPress custom dashboard at your site?
You might want to create a more customized experience for your clients or third-party users (like freelance writers or bloggers). Or, you could be working on your own site and just looking for a way to create a more streamlined admin experience that matches your workflows.
No matter why you want to create a WordPress custom dashboard, this post is going to help you out. In it, you’ll learn how to customize all aspects of the WordPress dashboard, including how to:
We’ll start off by showing you how to use an all-in-one plugin that does a little bit of everything. Then, we’ll share some more niche tools to more deeply handle the specific customization areas we mentioned above. Let’s start customizing!
Fair Warning Regarding Performance
Before we dive into the tutorial, it’s important to remember that heavily customing your WordPress dashboard may result in slower back-end performance (or in some cases, it may load faster depending on what you’re doing). This will typically only impact those that are logging into your site, not the front-end. The front-end of your site should be serving primarily from WordPress cache.
As with everything WordPress, it’s important to test before and after. Or better yet, make these changes first in a staging environment before rolling it out to your production site. This is especially important if you have guest bloggers or clients logging into the back-end of your site on a daily basis. The speed of your WordPress dashboard is important, and a lot of times it’s overlooked when it comes to performance optimization.
White Label CMS Plugin: An All-In-One Tool for a WordPress Custom Dashboard
The free White Label CMS plugin is a good all-in-one solution that will let you quickly customize most aspects of the WordPress dashboard. Here’s an example of what you can use it to build:
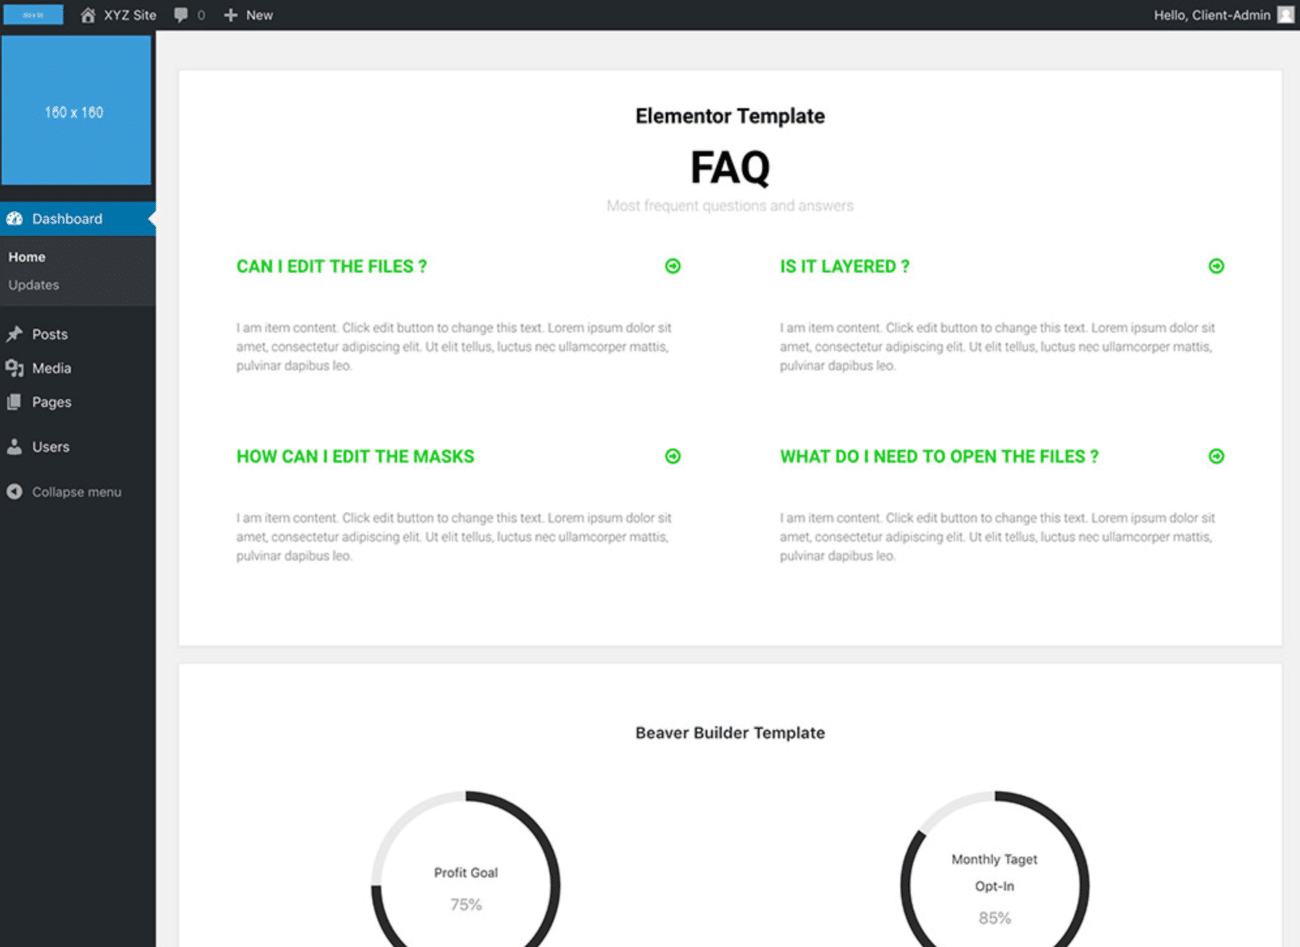
This plugin is marketed as a solution for developers to create a more custom-looking dashboard for clients, but it can also be valuable if you’re working on your own site, as well.
In total, it can help you:
- Replace the generic WordPress branding with your own
- Customize the WordPress login page
- Add your own custom dashboard widget welcome panel
- Include your own RSS feed as a dashboard widget
- Hide menu items from the sidebar or top toolbar
- Disable the WordPress toolbar
Here’s how to use it…
Step 1: Run Setup Wizard
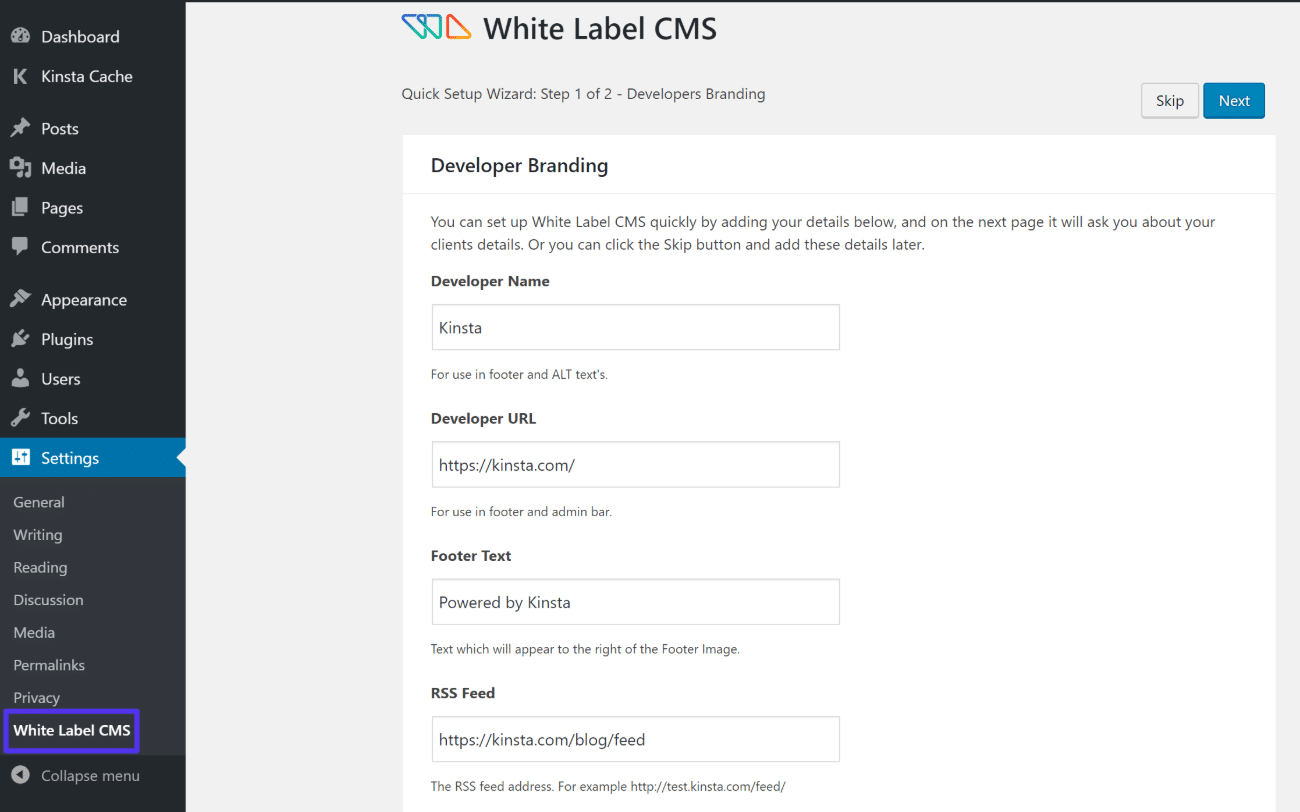
Once you install and activate the plugin, head to Settings → White Label CMS to run the setup wizard.
First, you’ll be able to enter your own information to replace the default WordPress branding:
Then, on the next page, you can add your client’s information (if applicable):
Step 2: Customize Other Branding
Once you finish the setup wizard, you’ll unlock the full settings area, which gives you access to lots of other settings.
In the Branding tab, you can configure settings that will let you:
- Choose which parts of the generic WordPress branding to hide
- Replace it with your own branding if desired
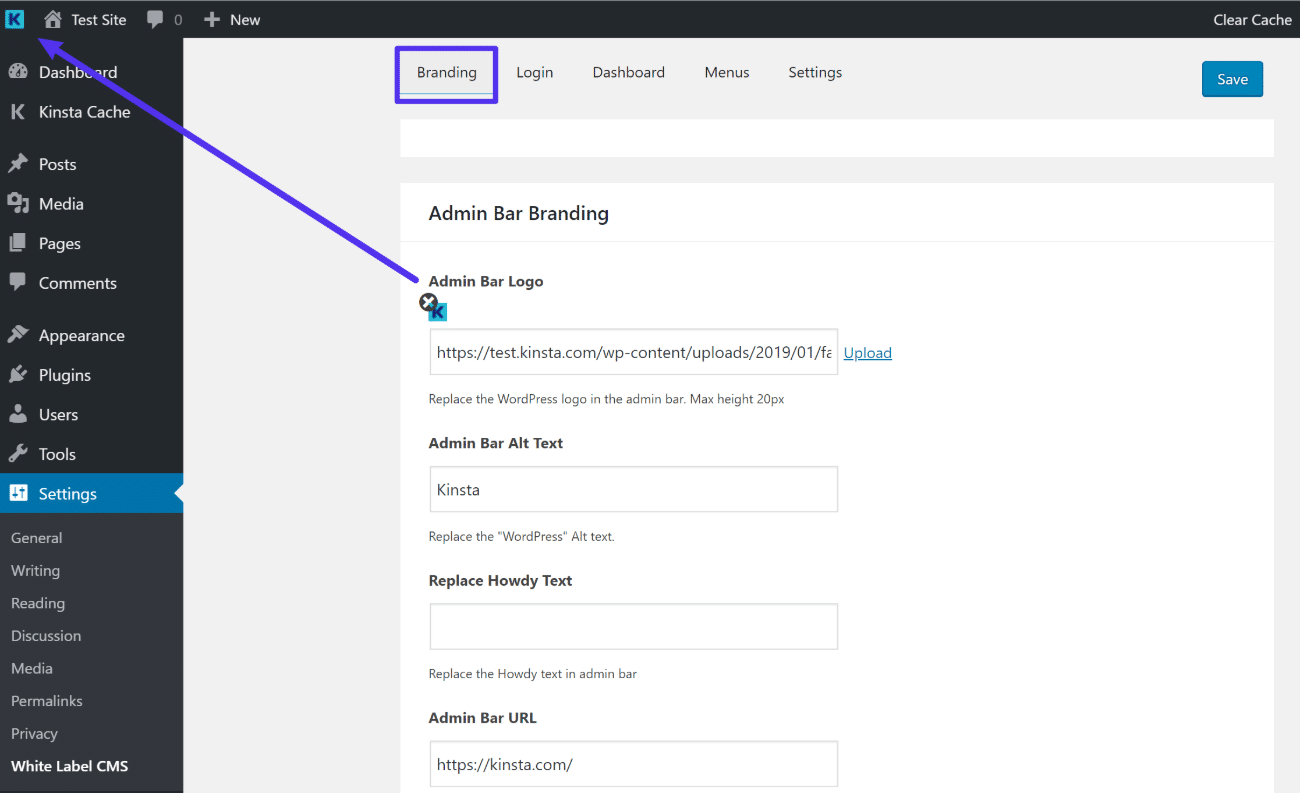
For example, if you scroll down to the Admin Bar Branding section, you can add your own logo to replace the WordPress logo in the top-left corner of the interface.
Here’s what it looks like after replacing it with the Host SEO favicon:
Step 3: Customize Login Page
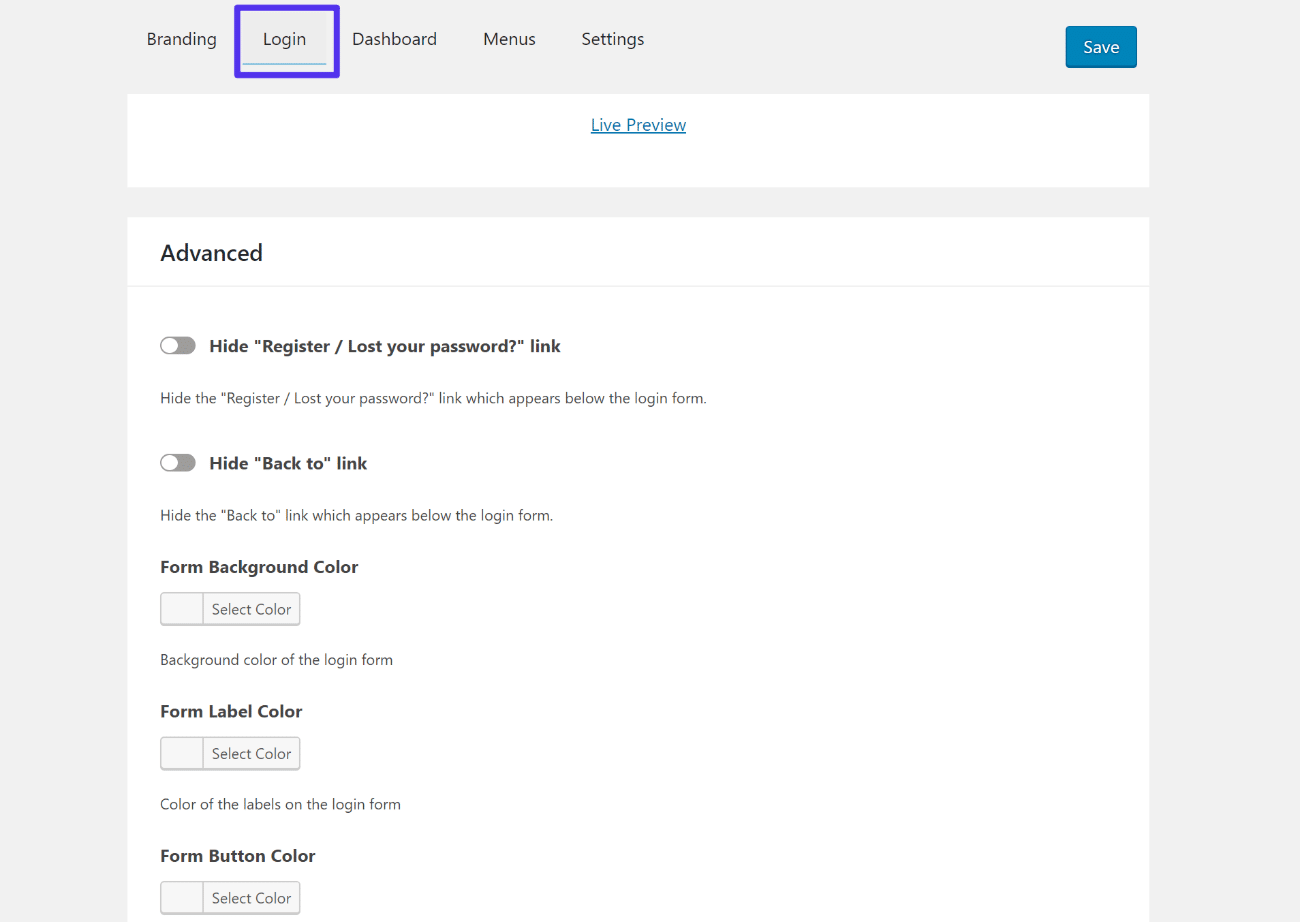
Once you’re finished with the branding settings, you can go to the Login page tab to customize the WordPress login page.
Beyond adding your own logo and/or background image, you can also:
- Hide the register/forgotten password link
- Hide the “back to” link
- Change colors for various parts of the form
Step 4: Add Custom Dashboard Widgets
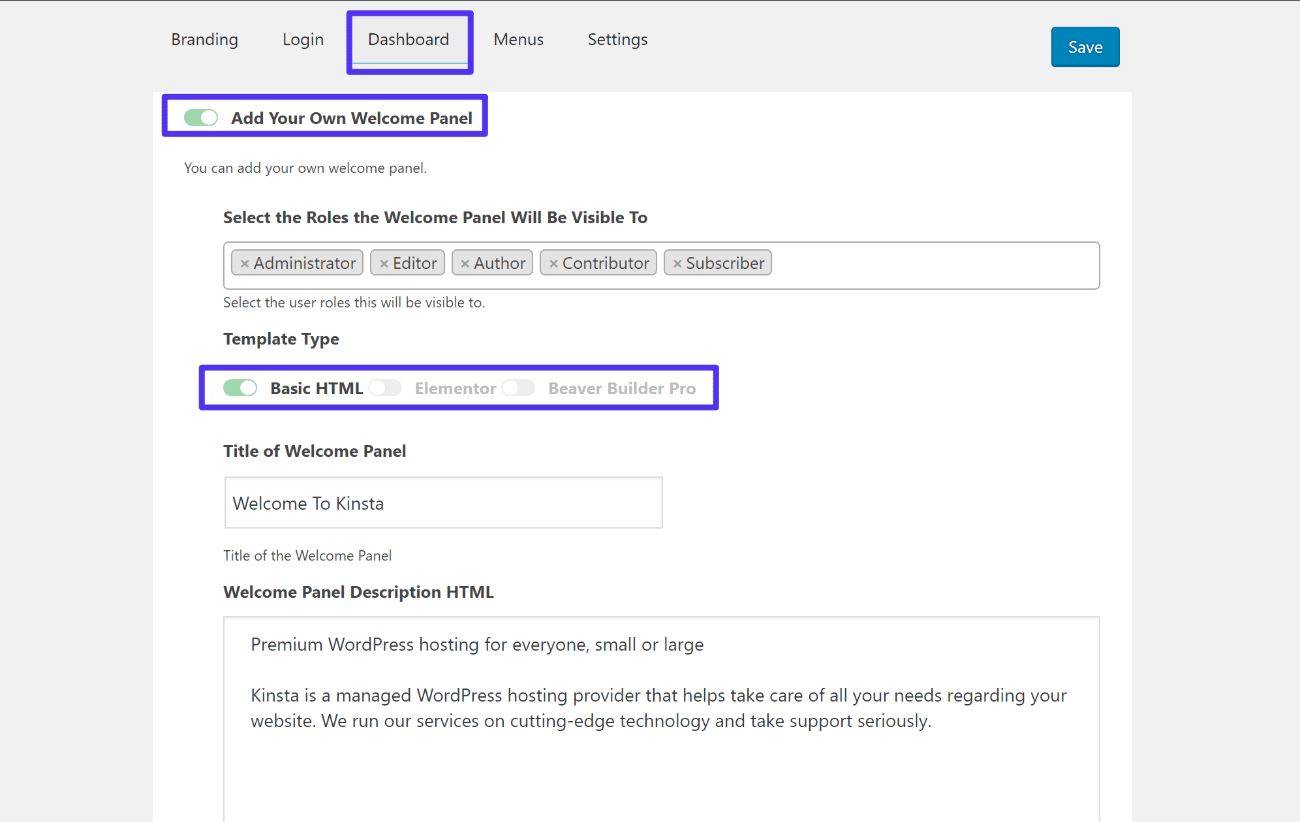
If desired, the Dashboard tab lets you add custom dashboard widgets that will appear on the main WordPress dashboard page.
Here’s an example of what that might look like:
You can also add your own HTML, which lets you include images and videos. Or, you can even use an Elementor or Beaver Builder Pro template if you have one of those page builder plugins installed:
Step 5: Customize Sidebar Menu and Toolbar
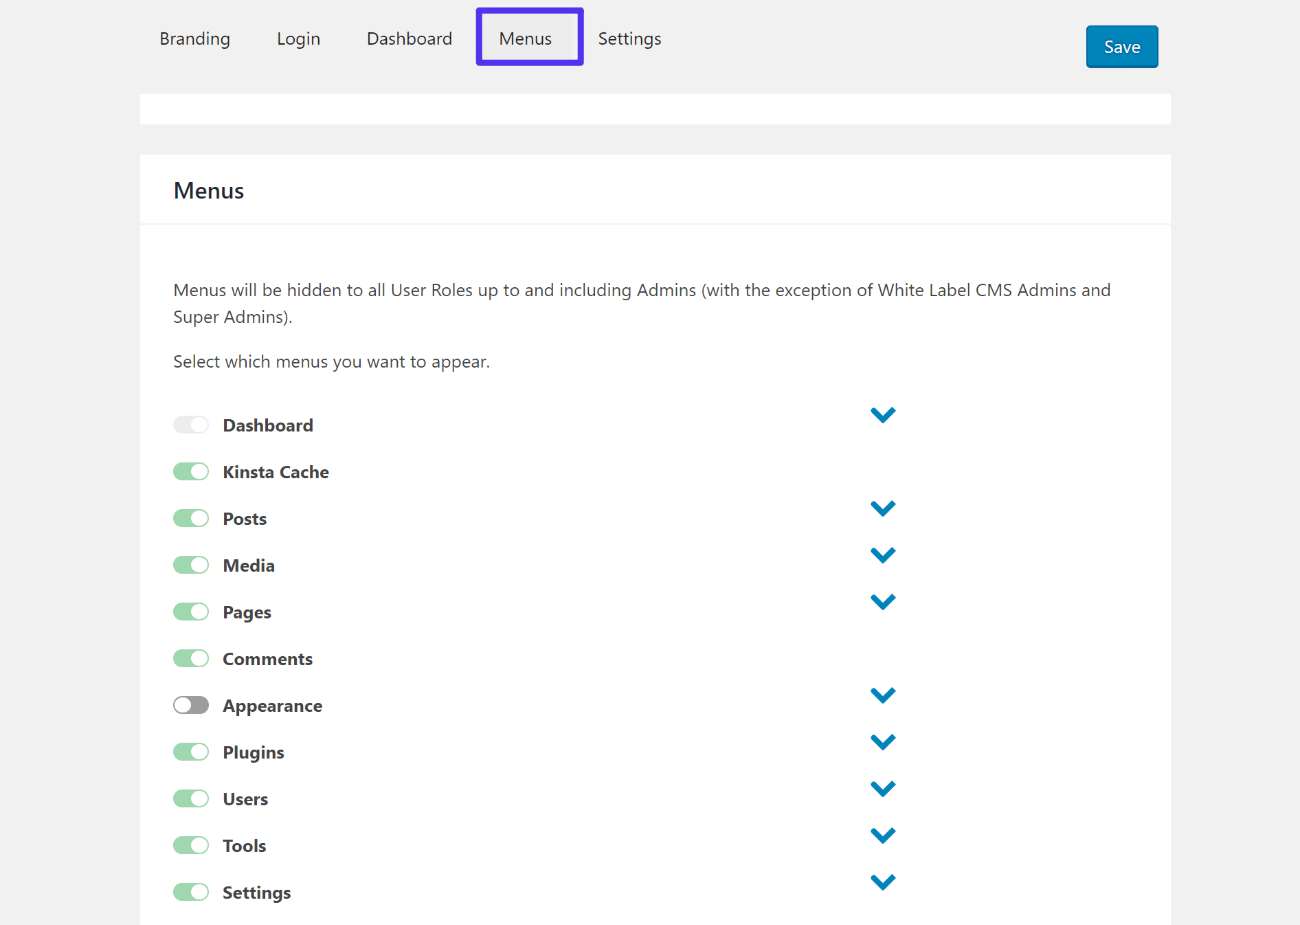
If you have a lot of plugins active on your site, the WordPress dashboard sidebar and toolbar can start to get a little crowded.
To help you fix that, the Menus tab lets you hide certain menu items from other users. All you need to do is toggle them on or off as needed:
And that’s a quick introduction to how to customize the WordPress admin dashboard using a single all-in-one tool.
Now, we’ll cover some more detailed plugins that target specific areas of the dashboard.
How to Customize WordPress Admin Menu: Add, Remove, or Rearrange Menu Items
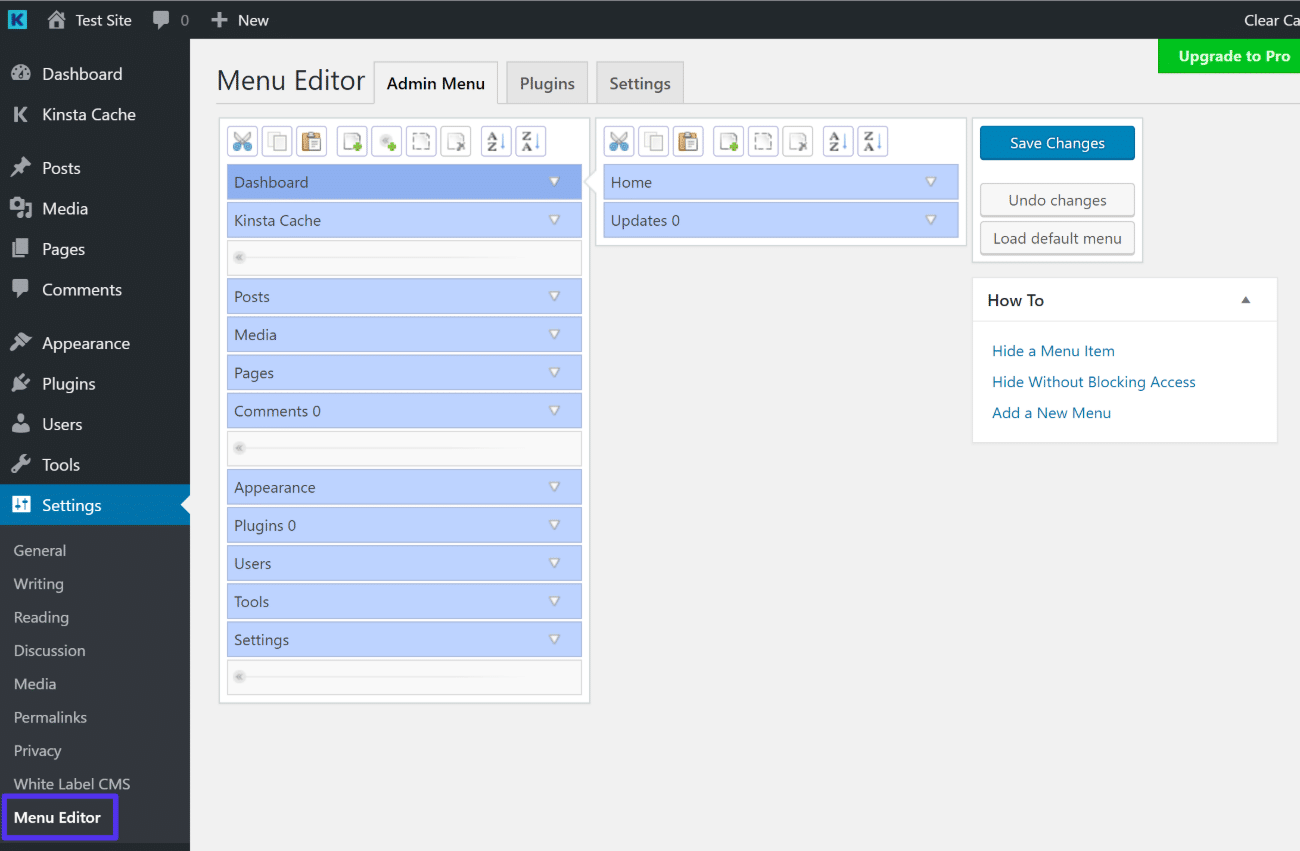
If you’re specifically interested in customizing the WordPress dashboard sidebar menu, you can use a dedicated plugin called Admin Menu Editor.
This freemium plugin will let you:
- Change the names for menu items and add your own icons, CSS classes, etc.
- Re-organize the menu items, like creating a new parent category.
- Create custom menu items that link to custom URLs.
To get started, install and activate the plugin from WordPress.org. Then, you can head to Settings → Menu Editor to customize your dashboard menu:
How to Create New Custom Dashboard Widgets
If you want more flexibility to create custom dashboard widgets or a custom welcome panel, you can use the free Dashboard Widgets Suite plugin.
This plugin lets you customize the number of columns in the dashboard, as well as add new dashboard widgets for:
- Custom notes
- RSS feeds
- Social media
- Lists
- Other WordPress widgets
- System info
- Debug log
- Error log
To get started, install and activate the plugin from WordPress.org. Then, go to Settings → Dashboard Widgets to configure the plugin.
In the General Settings tab, you can change the number of columns and choose which user role(s) can see the widgets. Then, you can use the other tabs to enable and configure the specific widgets:
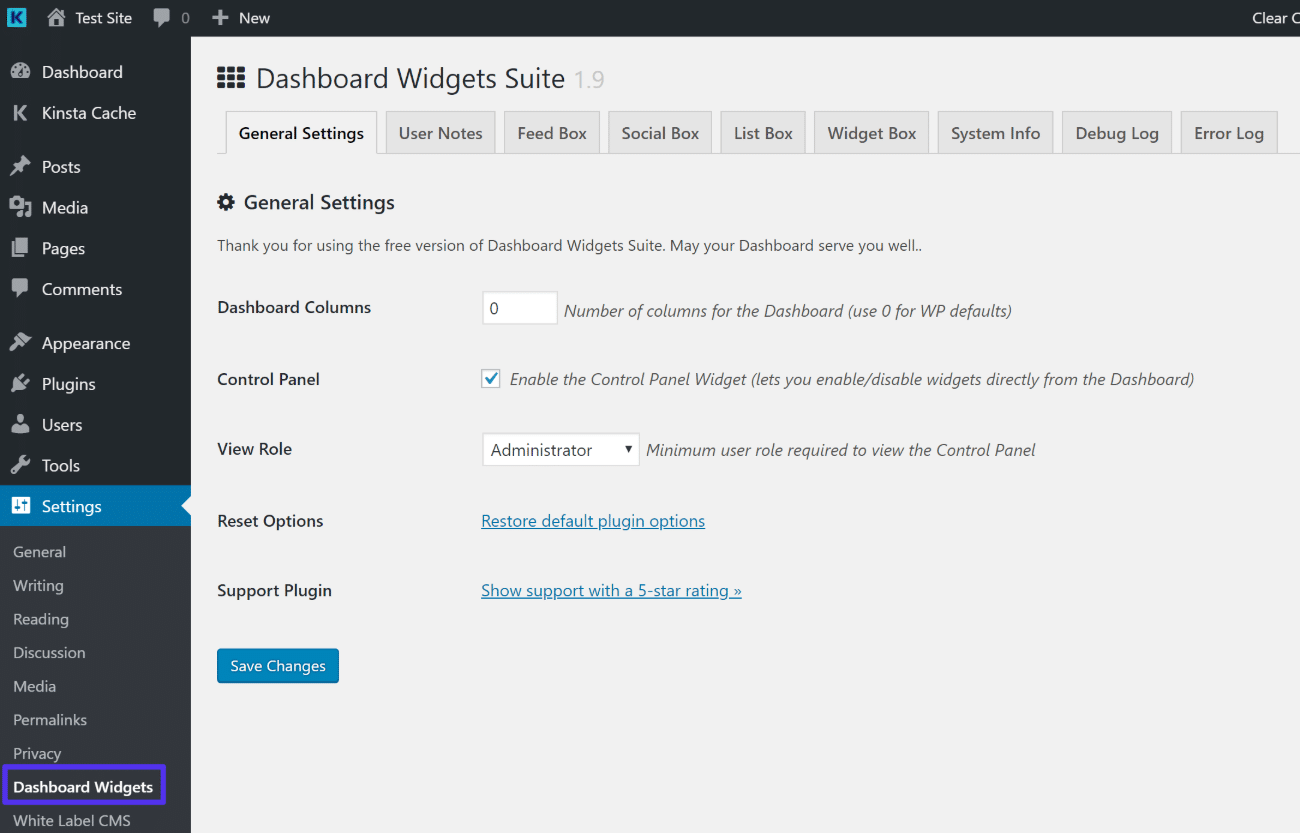
Then, you can go to your Dashboard area and rearrange your new widgets as needed:
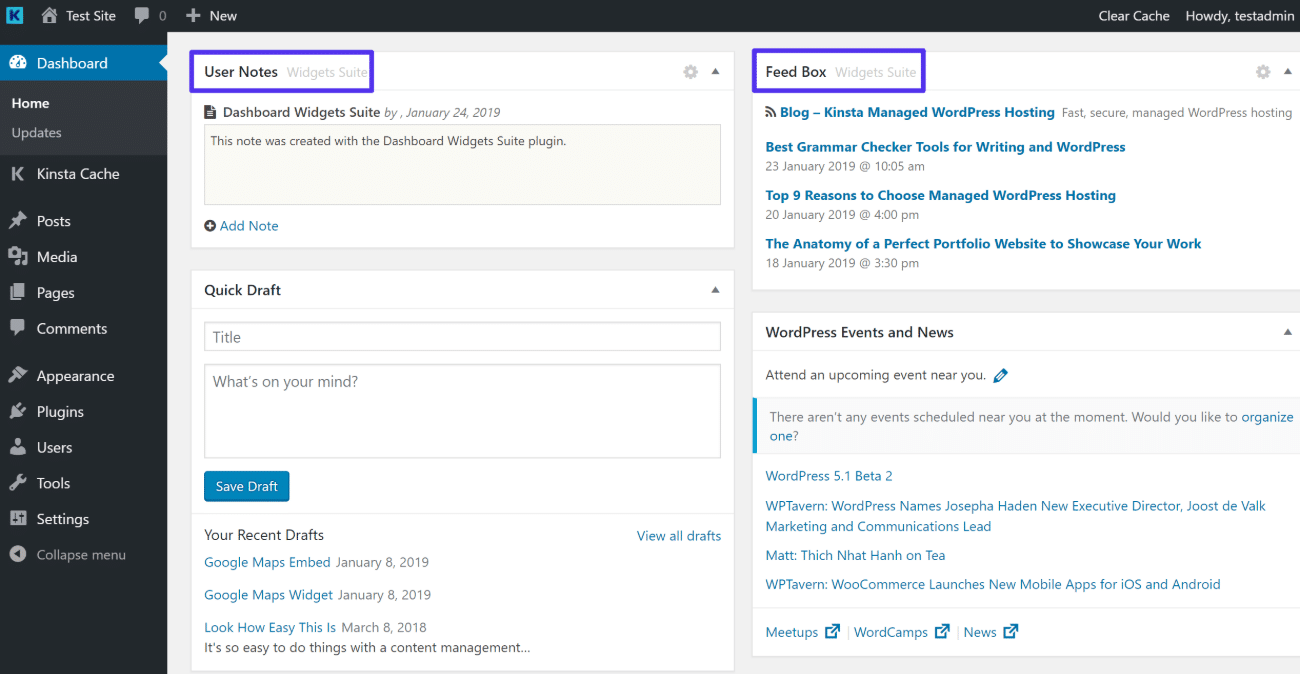
How to Add New Columns to the WordPress Post or Page List
By “post or page list”, we mean the admin page that lists all of your posts, pages, or custom post type items.
One way to control this area is to use the native Screen Options settings:
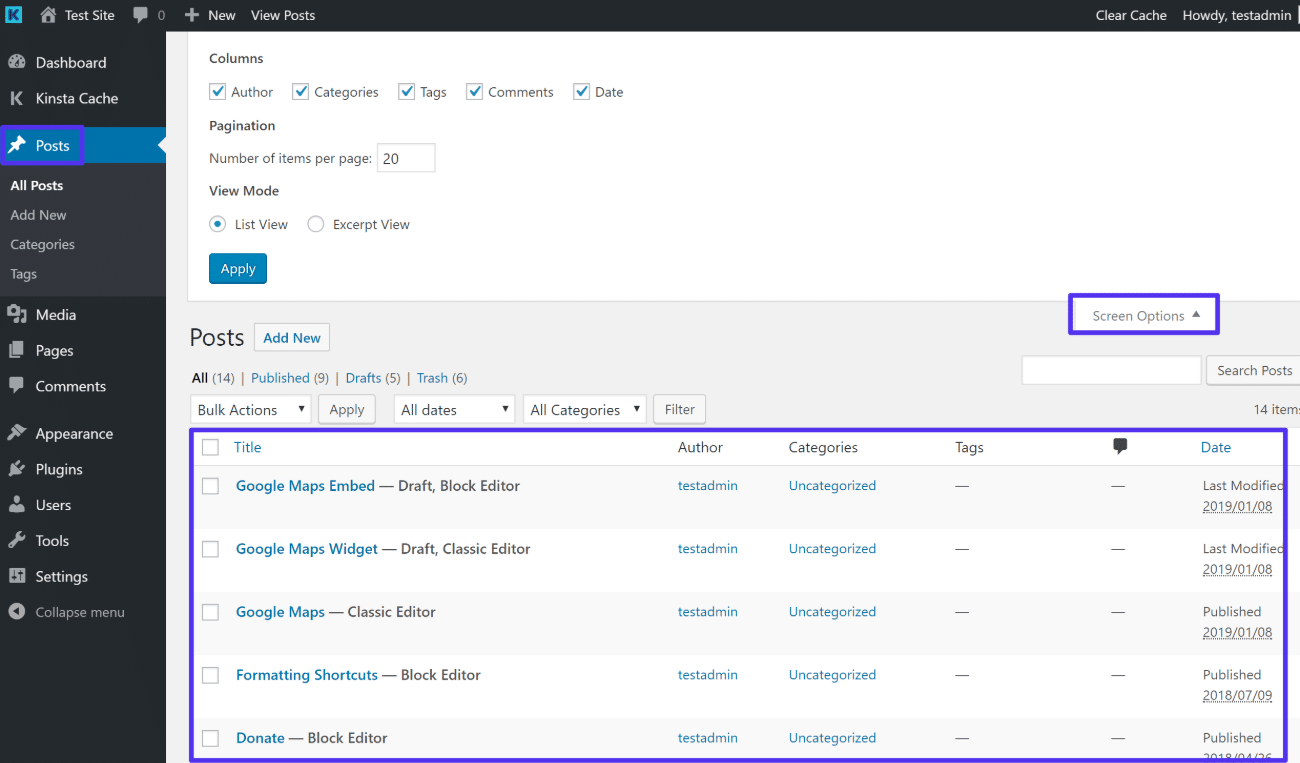
For more flexibility, though, you can use the free Admin Columns plugin.
Once you install and activate this plugin, you can go to Settings → Admin Columnsto add new columns or remove/rearrange existing columns.
The free version of the plugin includes columns for everything from the featured image to the estimated reading time of a post:
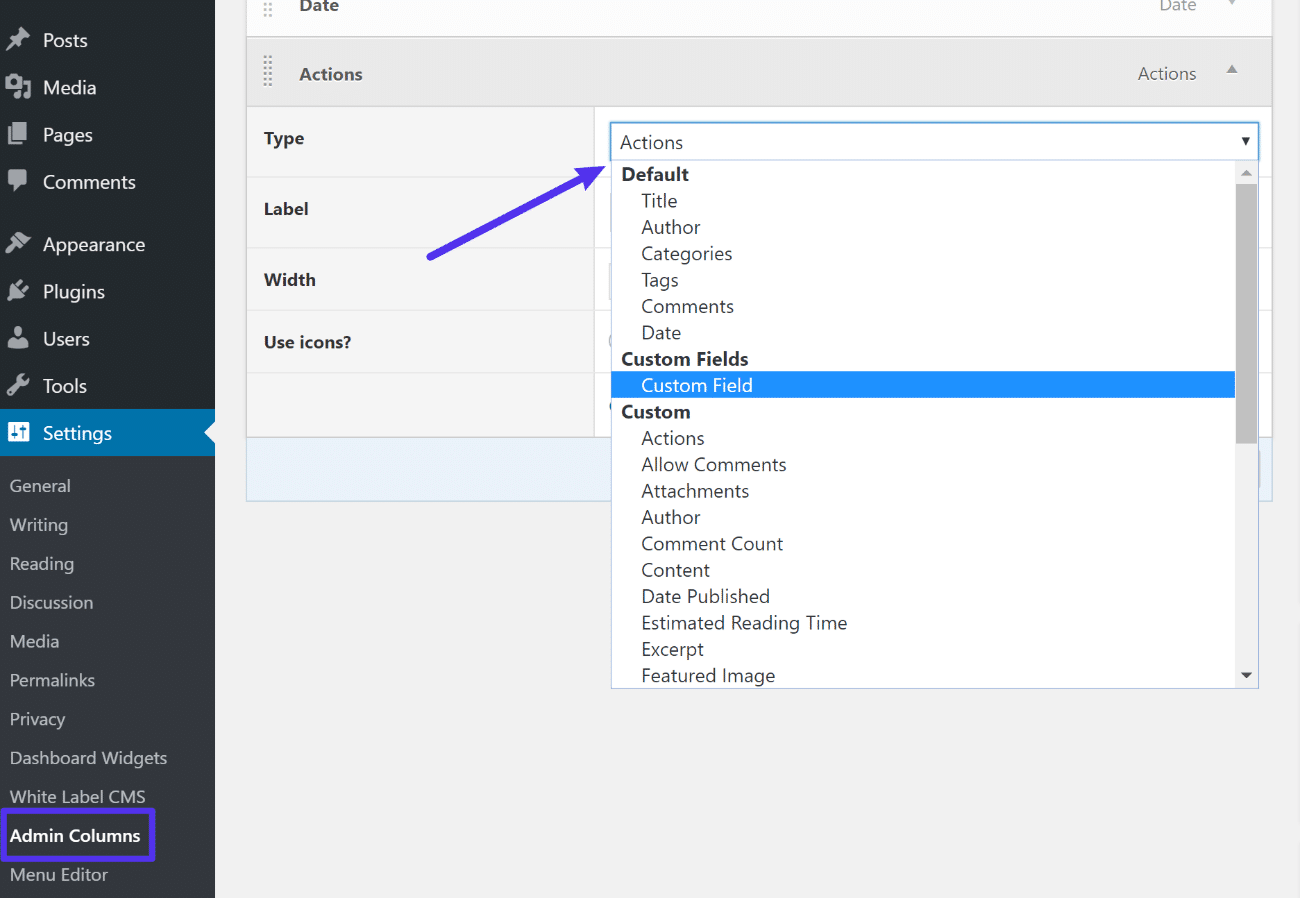
If you’re using something like Advanced Custom Fields, you’ll also be able to include your custom fields as their own columns.
WordPress Admin Theme Plugins – Get a New Look
WordPress admin themes are not “themes” in the true WordPress sense of the word. Rather, they’re plugins that act as a theme for your back-end dashboard area.
Unlike the methods above, they aren’t changing the underlying layout or functionality of your WordPress dashboard area. Instead, they just give you a new look.
Here are some of our favorites…
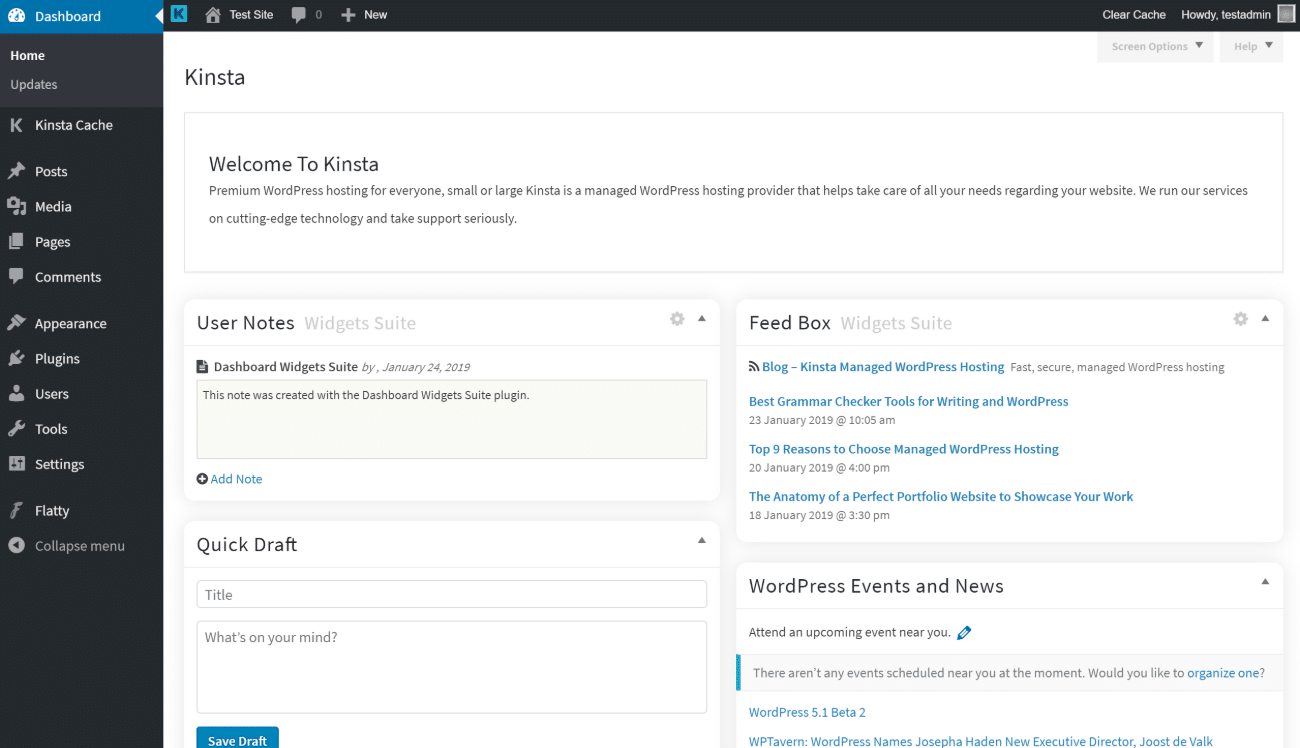
Flatty
The Flatty admin theme applies flat design principles to your WordPress admin dashboard. It also gives you some basic white-labeling functionality, as well.
Here’s what your dashboard will look like immediately after activating the plugin:
Aquila Admin Theme
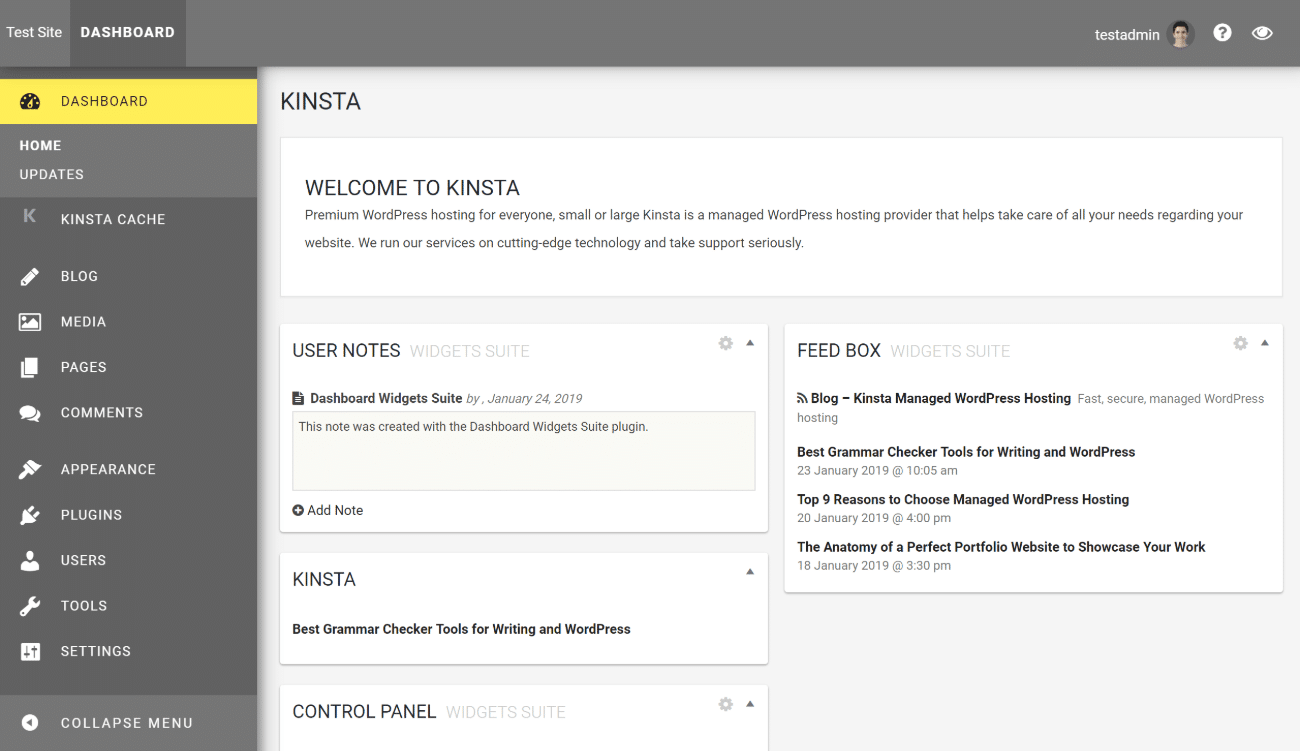
Whereas Flatty adds flat design principles, Aquila adds a nice material design look to your admin dashboard. It also gives you some additional options to customize menu items, branding, and widgets.
Here’s what your dashboard will look like immediately after activating the plugin:
Kodeo Admin UI
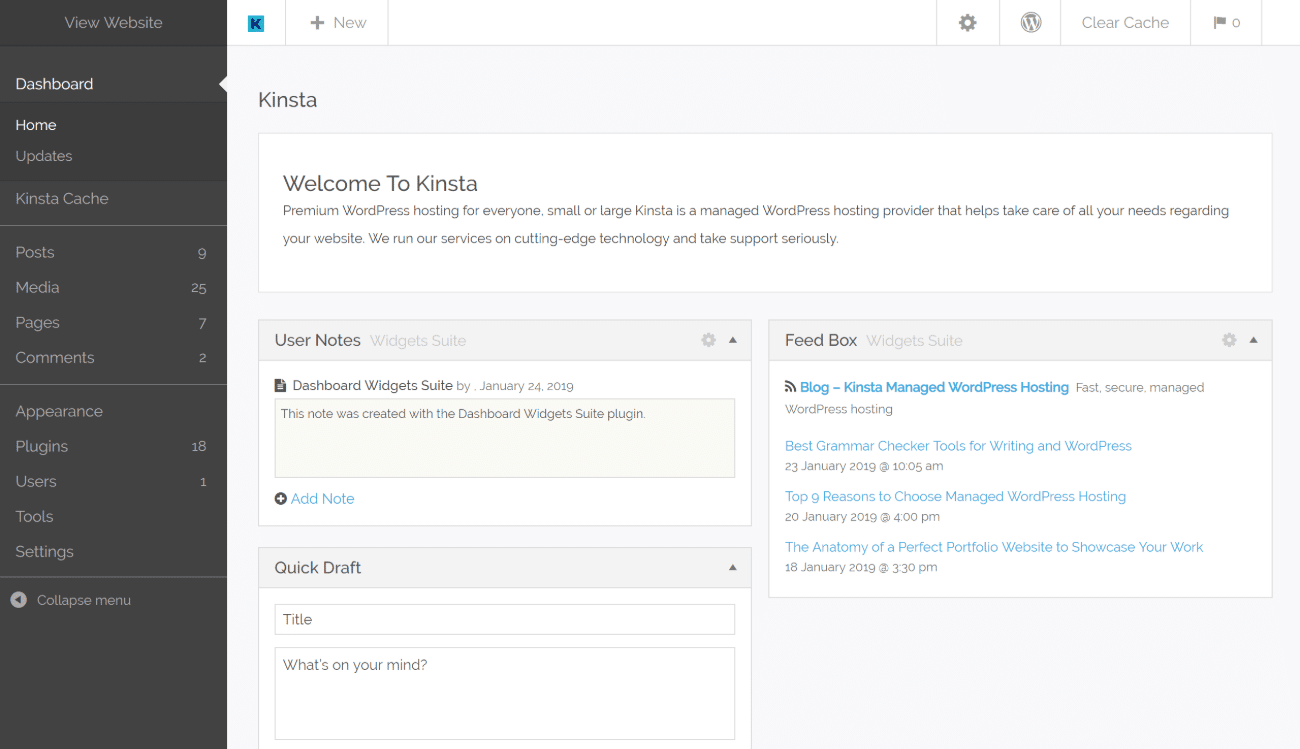
Kodeo Admin UI reskins your entire admin UI, including buttons in the Classic WordPress editor.
Here’s what your dashboard will look like immediately after activating the plugin:
How to Customize the WordPress Login Page
Finally, while it’s not technically part of your admin dashboard, your WordPress login page still plays an important role in getting people into the dashboard in the first place.
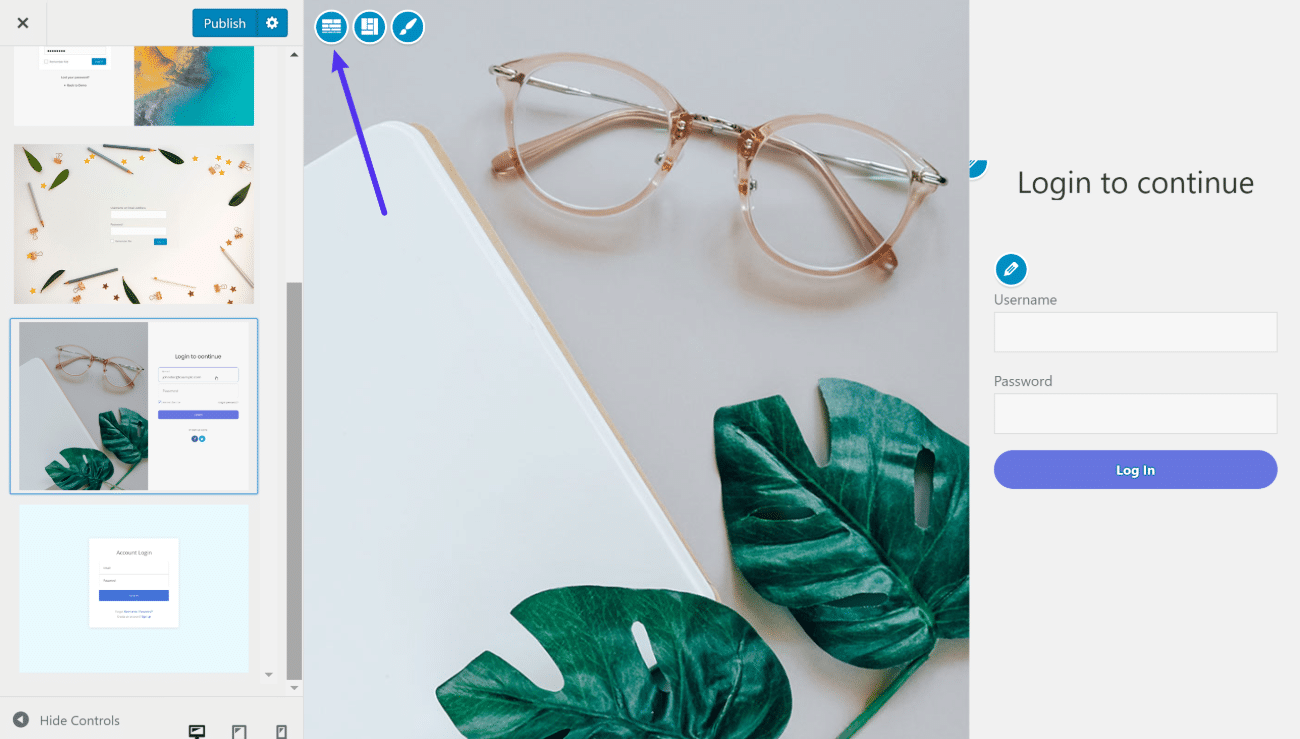
There are several quality plugins to help you customize your WordPress login page, but Custom Login Page Customizer makes a good starting point because it lets you visually customize your login page using the native WordPress Customizer.
Once you install and activate the plugin, you can click on the new Login Customizermenu item to open the WordPress Customizer.
Here, you’ll see a live preview on the right and a variety of customization options on the left:
If desired, you can simply customize the default layout. Or, if you want to make bigger changes, you can apply a completely new template and then customize things from there:
Create a Customized WordPress Admin Dashboard Today!
For an all-in-one solution to customize most areas of the WordPress admin dashboard, the free White Label CMS plugin makes a good starting option.
Then, if you decide you’d like more functionality to customize a specific area of your WordPress admin dashboard, you can also find a number of feature-specific customization plugins, including:
- Admin Menu Editor to customize the WordPress admin menu
- Dashboard Widgets Suite to add new custom dashboard widgets
- Admin Columns to add new columns to the post list
- WordPress admin themes to completely change your dashboard’s style
- Custom Login Page Customizer to customize the WordPress login page
Do you have any other questions about how to create a WordPress custom dashboard? Let us know in the comments section!
Categories
Subscribe Now
10,000 successful online businessmen like to have our content directly delivered to their inbox. Subscribe to our newsletter!Archive Calendar

| Sat | Sun | Mon | Tue | Wed | Thu | Fri |
|---|---|---|---|---|---|---|
| 1 | 2 | |||||
| 3 | 4 | 5 | 6 | 7 | 8 | 9 |
| 10 | 11 | 12 | 13 | 14 | 15 | 16 |
| 17 | 18 | 19 | 20 | 21 | 22 | 23 |
| 24 | 25 | 26 | 27 | 28 | 29 | 30 |
| 31 | ||||||
Recent Articles
-

Posted on : Jul 25
-

Posted on : Jul 07
-

Posted on : Apr 07
-

Posted on : Mar 19
Optimized my.cnf configuration for MySQL 8 (on cPanel/WHM servers)
Tags
- layer 7
- tweak
- kill
- process
- sql
- Knowledge
- vpn
- seo vpn
- wireguard
- webmail
- ddos mitigation
- attack
- ddos
- DMARC
- server load
- Development
- nginx
- php-fpm
- cheap vpn
- Hosting Security
- xampp
- Plesk
- cpulimit
- VPS Hosting
- smtp
- smtp relay
- exim
- Comparison
- cpu
- WHM
- mariadb
- encryption
- sysstat
- optimize
- Link Building
- apache
- centos
- Small Business
- VPS
- Error
- SSD Hosting
- Networking
- optimization
- DNS
- mysql
- ubuntu
- Linux