Dissecting the WordPress TinyMCE Editor
- Category : WordPress
- Posted on : Sep 25, 2018
- Views : 3,060
- By : Edgardo D.

This is the second part of two posts dedicated to WordPress editors. The first post was all about WordPress text editor, while in this post we will dissect the WordPress TinyMCE editor, and we will bend it to our will. Follow along below as we will show you how to:
- Add custom styles to WordPress TinyMCE editor
- Activate hidden buttons
- Enhance WordPress TinyMCE editor with existing plugins
- Develop custom WordPress TinyMCE plugins
- Use a free WordPress plugin to add styles and buttons to TinyMCE
WordPress TinyMCE editor
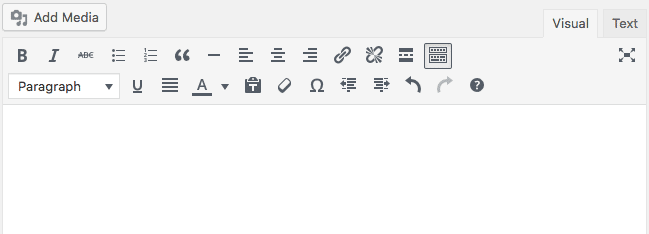
By default, WordPress the TinyMCE editor provides two rows of buttons to create, edit and format post content. The first row (the primary toolbar) includes styling and formatting functionalities. Additional controls allow to add, edit and remove anchors, add the <!–more–> tag, activate the distraction-free mode. All these buttons should look pretty familiar to anyone with basic knowledge of a word processor.
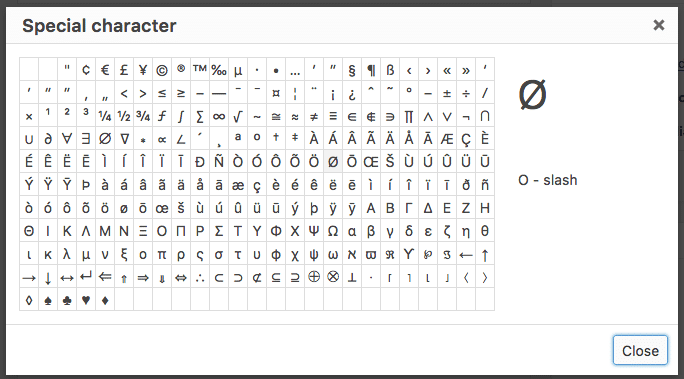
The Toolbar Toggle button toggles the Advanced editor toolbar (the second row of buttons), which provides a pulldown menu of text elements (paragraph, headings and preformatted text), more styling controls, and some additional features (Paste as text, Clear formatting, Special characters, Undo and Redo) that come in handy in many ways.
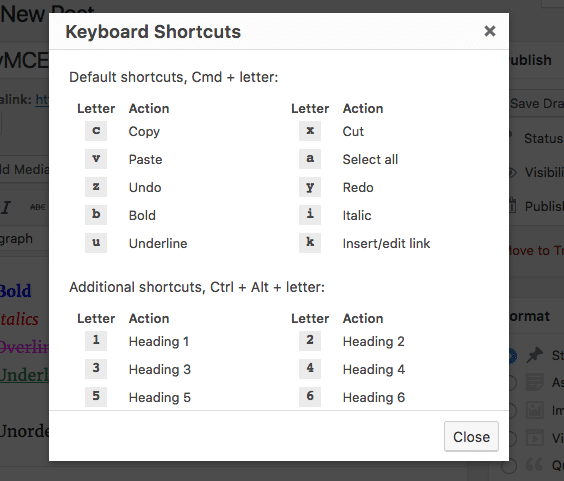
Finally, the question mark button provides a list of keyboard shortcuts which improve the user writing experience.
Now add and style your content into the visual editor, then switch to the text editor. You’ll find the corresponding HTML structure as WordPress will preserve your input when switching from visual to text mode.
Default primary and advanced toolbars provide a good number of functionalities which can be extended with additional buttons and controls. Many of these buttons are available out of the box in TinyMCE, and we just need to activate them to put them in action. Moreover, we can add a good number of advanced functionalities by installing one or more of the existing plugins.
And if all these buttons are not enough, we can enhance the editor with your coolest functionalities, by developing custom plugins.
That being said, let’s start diving from the easiest and most common usage of the API.
Adding custom styles to WordPress TinyMCE editor
Assume you need to provide an easy way to add custom styles into post content from TinyMCE. It’s a two step procedure:
- first, we need to activate a hidden pulldown menu named Styleselect,
- then we have to define each style we want to add to the Styleselect menu.
We can accomplish the first task by filtering the array of TinyMCE buttons. The default toolbar shows one or two rows of buttons, but we can enable up to four toolbar rows thanks to the following filters:
- mce_buttons filters the primary toolbar buttons (the first row), which is always visible;
- mce_buttons_2 filters the advanced toolbar buttons (the second row), which can be toggled on/off by the user;
- mce_buttons_3 inactive by default;
- mce_buttons_4 inactive by default.
We can hook a callback function to one of these filters to show/hide existing buttons, like the Styleselect pulldown menu. The following function enables the menu in the second row:
function my_mce_buttons_2( $buttons ) {
array_unshift( $buttons, 'styleselect' );
return $buttons;
}
add_filter( 'mce_buttons_2', 'my_mce_buttons_2' );
The array_unshift PHP function prepends the styleselect element to the front of the $buttons array.

Now that the button has been activated, we can register our custom styles by filtering an array of TinyMCE configuration parameters through the tiny_mce_before_init filter.
Consider the following function:
function my_tiny_mce_before_init( $mceInit ) {
$style_formats = array(
array(
'title' => 'PHP',
'block' => 'code',
'classes' => 'language-php'
)
	);
$mceInit['style_formats'] = json_encode( $style_formats );
	return $mceInit;
}
add_filter( 'tiny_mce_before_init', 'my_tiny_mce_before_init' );
The style_formats element is a JSON encoded array of elements. Each element sets the configuration parameters of a single menu item. The function above replaces default styles with a single custom element which wraps the selected text in a code.language-php element.
In our example, we set three properties for a single menu item:
- title: the title for the menu item;
- block: the block element to produce;
- classes: space separated list of CSS classes to apply to selection.
We added the code element as block, so that it will be applied only once to the full selection. Adding it as inline element would apply the code tag to each selected line.
We can add more items and group them by category, as shown in the following example:
function my_tiny_mce_before_init( $mceInit ) {
$style_formats = array(
array(
'title' => 'Code language',
'items' => array(
array(
'title' => 'PHP',
'block' => 'code',
'classes' => 'language-php'
),
array(
'title' => 'CSS',
'block' => 'code',
'classes' => 'language-css'
),
array(
'title' => 'HTML',
'block' => 'code',
'classes' => 'language-html'
)
)
)
	);
$mceInit['style_formats'] = json_encode( $style_formats );
return $mceInit;
}
add_filter( 'tiny_mce_before_init', 'my_tiny_mce_before_init' );
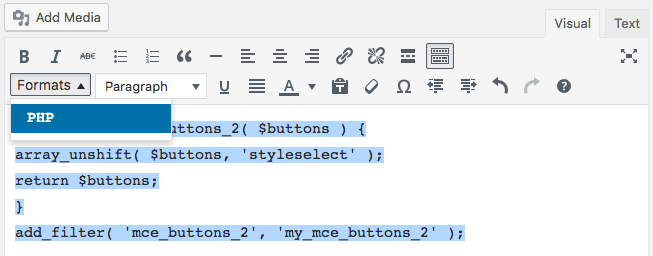
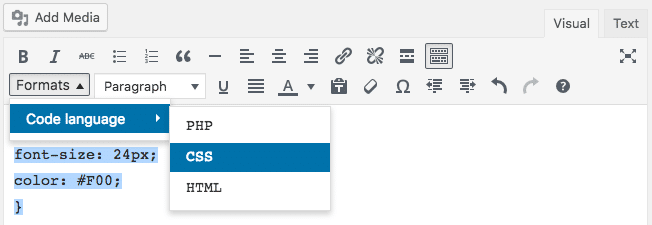
The style_formats element is a multi-dimentional array of parameters. In this example, we’ve added a first level item (Code language) and three sub items (PHP, CSS, HTML). The image below shows the resulting menu.
TinyMCE applies the styles to the selected elements, but is not aware of these styles, so they won’t be applied to the content in the editor. If a real-time preview is needed, we’ll have to register a custom stylesheet with the add_editor_style()function:
/**
 * Registers an editor stylesheet for a custom theme.
 */
function my_theme_add_editor_styles() {
add_editor_style( 'css/my-editor-style.css' );
}
add_action( 'admin_init', 'my_theme_add_editor_styles' );
This function registers a stylesheet that will be used by WordPress TinyMCE to style content into the editor.
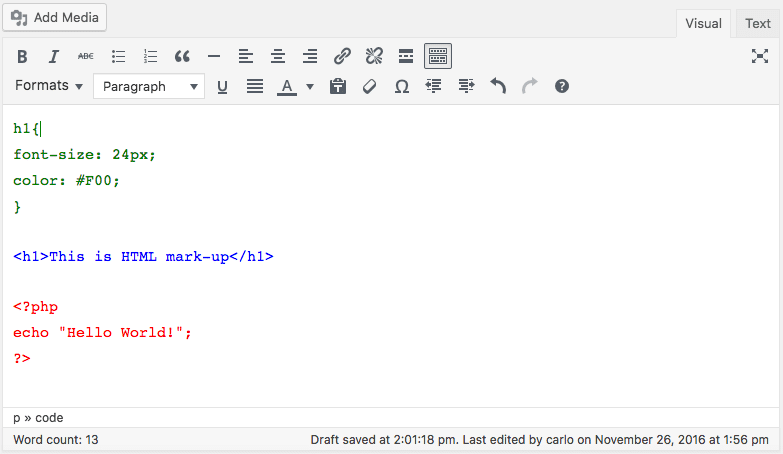
As an example, let’s suppose we’d like to apply different colors to PHP, CSS and HTML code. To accomplish this task, we’ll add the following declarations into css/my-editor-style.css stylesheet:
.language-php{ color: red; }
.language-css{ color: green; }
.language-html{ color: blue; }
TinyMCE will produce the output shown in the following image.
Enabling WordPress TinyMCE hidden buttons
We can add buttons to the visual editor in several ways. In many cases we are not required to build a custom button because TinyMCE provides a good number of hidden buttons we can easily activate.
One of these buttons is the Styleselect dropdown menu, but we have a long list of inactive buttons we can activate by filtering the arrays of buttons through one of the mce_buttons_{n} filters (see TinyMCE docs for the full list of available buttons).
Consider the following example:
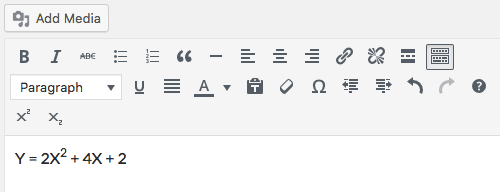
function my_mce_buttons_3( $buttons ) {
	$buttons[] = 'superscript';
$buttons[] = 'subscript';
return $buttons;
}
add_filter( 'mce_buttons_3', 'my_mce_buttons_3' );
The callback function above adds the superscript and subscript elements to the end of the array $buttons.
Here is a list of hidden buttons available in WordPress TinyMCE:
- cut
- copy
- paste
- hr
- formatselect
- fontselect
- fontsizeselect
- styleselect
- subscript (previously sub)
- superscript (previously sup)
- backcolor
- newdocument
If none of these buttons suits our needs, we can provide the editor with more functionalities, thanks to a good number of official plugins.
Enhancing the visual editor with TinyMCE plugins
Suppose your goal is to include the TinyMCE Table button into the visual editor through a WordPress plugin.
First, you have to download the Dev Package from TinyMCE website. Unpack the zip file and get the plugin.min.js file from /js/tinymce/plugin/table folder.
Create the following folders in /wp-content/plugins:
- /wp-content/plugins/tinymce-example-plugin/
- /wp-content/plugins/tinymce-example-plugin/mce/table
When you’re done, create a new tinymce-example-plugin.php file into the plugin root folder, and upload the plugin.min.js file into the table folder (see the image below).

Now add the following lines into tinymce-example-plugin.php:
<?php
/**
 * @package TinyMCE_example_plugin
 * @version 1.0
 */
/*
Plugin Name: TinyMCE example plugin
Plugin URI: http://wordpress.org/extend/plugins/#
Description: This is an example plugin
Author: Your Name
Version: 1.0
Author URI: http://yourdomain.com/
*/
In order to include the Table button into the WordPress TinyMCE editor we just need two filters:
mce_buttons adds new buttons to TinyMCE primary toolbar (we can use any of mce_buttons_{n} filters, depending on the row where the button has to be shown)
mce_external_plugins loads an external TinyMCE plugin.
Here is the code of the plugin file:
function example_plugin_register_buttons( $buttons ) {
   $buttons[] = 'table';
return $buttons;
}
// add new buttons
add_filter( 'mce_buttons', 'example_plugin_register_buttons' );
function example_plugin_register_plugin( $plugin_array ) {
   $plugin_array['table'] = plugins_url( '/mce/table/plugin.min.js', __FILE__ );
   return $plugin_array;
}
// Load the TinyMCE plugin
add_filter( 'mce_external_plugins', 'example_plugin_register_plugin' );
The first function adds a new button to the primary toolbar, while the second function loads a plugin from the specified URL. The plugins_url() function retrieves the absolute URL to the specified file under the plugin directory (read more on the Codex).
Now we can save the file and activate the plugin. The image below shows the enhanced toolbar.

That’s all. Following the same procedure, we can add any existing TinyMCE plugins to the WordPress visual editor.
You can download the plugin .zip file, or view the PHP code of this example on Gist.
Building a TinyMCE plugin
Finally, we can build our TinyMCE custom plugin. Suppose you want to add a button to allow users to wrap the selected content in the following tags:
<pre><code>Selected text</code></pre>We can even decide to add a CSS class to the <code> tag, to provide support for Prism code highlighter. We need to:
- register a custom TinyMCE button and plugin in a WordPress plugin;
- develop the TinyMCE plugin;
We already know how to register a plugin and add a button in WordPress TinyMCE:
function example_plugin_register_buttons( $buttons ) {
$buttons[] = 'prism';
return $buttons;
}
// add new buttons
add_filter( 'mce_buttons', 'example_plugin_register_buttons' );
function example_plugin_register_plugin( $plugin_array ) {
$plugin_array['prism'] = plugins_url( '/mce/prism/plugin.js', __FILE__ );
return $plugin_array;
}
// Load the TinyMCE plugin
add_filter( 'mce_external_plugins', 'example_plugin_register_plugin' );
This is exactly the same code as the previous example, with the only difference that now we’re are registering a custom plugin named prism.
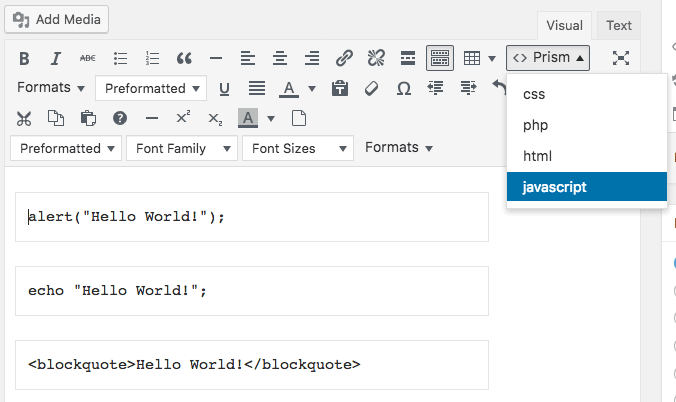
Now let’s create the following plugin.js file:
(function() {
var languages = ['css', 'php', 'html', 'javascript'];

	tinymce.PluginManager.add( 'prism', function( editor ){
var items = [];

		tinymce.each( languages, function( languageName ){
			items.push({
				text: languageName,
				onclick: function(){
var content = tinyMCE.activeEditor.selection.getContent();
					editor.insertContent( '<pre><code class="language-' + languageName + '">' + content + '</code></pre>' );
}
});
});

		editor.addButton( 'prism', {
			type: 'menubutton',
			text: 'Prism',
			icon: 'code',
			menu: items
		});
});
})();
This code is also available on Gist.
It’s not in our goals to dive into TinyMCE APIs, and you’ll find all you need to know in TinyMCE docs for developers.
This file should be placed in /mce/prism/ subfolder of our plugin directory. The JS function iterates among the elements of the languages array and pushes a new object into the items array for each language. The addButton method creates the Prism menu button, and adds a menu item for each element of the items array.
Save, upload and refresh, and your gorgeous dropdown menu button will pop up in all its beauty.
Any further information on how to develop TinyMCE plugins can be found in the online documentation for developers.
TinyMCE Advanced plugin for WordPress
If you’re not a developer, you can enhance the visual editor as well. TinyMCE Advanced is a free WordPress plugin which brings the functionalities of fifteen TinyMCE plugins to the default visual editor.
Thanks to TinyMCE Advanced users will add, remove, rearrange buttons on the four rows of the editor toolbar. In addition, the plugin provides an option to enable a menu above the toolbar.
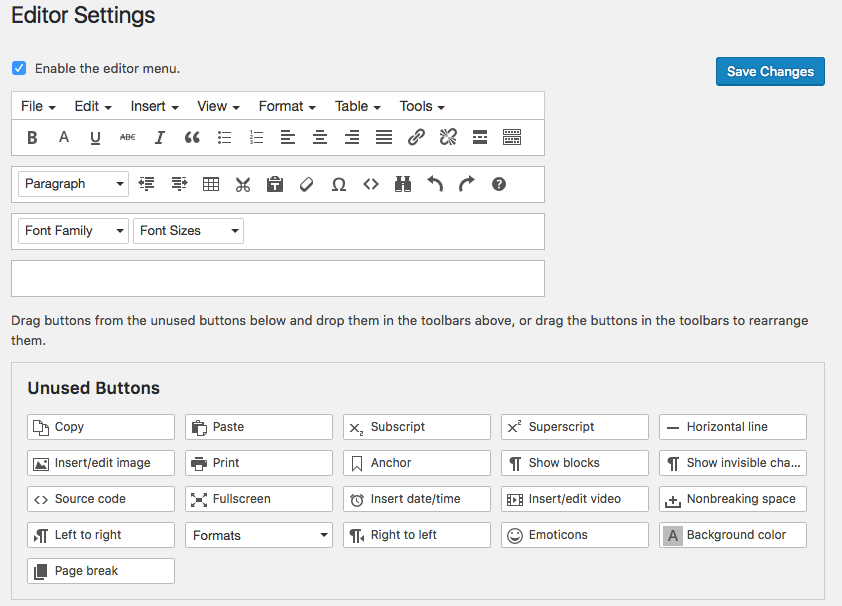
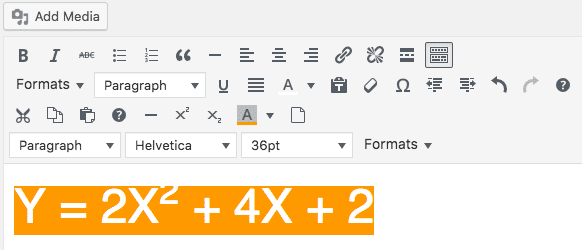
From the plugin options page we can enable several advanced features, like the Table button, the Font Family and Font Size menus, the Show blocks and Show invisible characters buttons.
Other options allow users to determine the editor that will be affected by new settings, and more.

Conclusions
TinyMCE API provides a lot of stuff to play with. We can activate hidden functionalities or register external plugins. And if none of the available features is enough for us, we can have fun with the API and build custom extentions. Do you have any further ideas to enhance the WordPress TinyMCE editor?
Categories
Subscribe Now
10,000 successful online businessmen like to have our content directly delivered to their inbox. Subscribe to our newsletter!Archive Calendar

| Sat | Sun | Mon | Tue | Wed | Thu | Fri |
|---|---|---|---|---|---|---|
| 1 | 2 | 3 | ||||
| 4 | 5 | 6 | 7 | 8 | 9 | 10 |
| 11 | 12 | 13 | 14 | 15 | 16 | 17 |
| 18 | 19 | 20 | 21 | 22 | 23 | 24 |
| 25 | 26 | 27 | 28 | 29 | 30 | 31 |
Recent Articles
-

Posted on : Jul 25
-

Posted on : Jul 07
-

Posted on : Apr 07
-

Posted on : Mar 19
Optimized my.cnf configuration for MySQL 8 (on cPanel/WHM servers)
Tags
- layer 7
- tweak
- kill
- process
- sql
- Knowledge
- vpn
- seo vpn
- wireguard
- webmail
- ddos mitigation
- attack
- ddos
- DMARC
- server load
- Development
- nginx
- php-fpm
- cheap vpn
- Hosting Security
- xampp
- Plesk
- cpulimit
- VPS Hosting
- smtp
- smtp relay
- exim
- Comparison
- cpu
- WHM
- mariadb
- encryption
- sysstat
- optimize
- Link Building
- apache
- centos
- Small Business
- VPS
- Error
- SSD Hosting
- Networking
- optimization
- DNS
- mysql
- ubuntu
- Linux