WP Job Manager – An Amazing WordPress Job Board Plugin
- Category : WordPress
- Posted on : Aug 28, 2018
- Views : 3,236
- By : Radcliff S.
These days, more people than ever before are heading online to find employment. Why not tap into the ever-growing online talent pool by turning your website into a fully functional job board? It’s the perfect way to hook-up those in need of talent with the people with skills to offer.
Today we want to show you how you can easily turn any WordPress website into a job board using WP Job Manager, an amazing free WordPress job board plugin. Perfect for corporate WordPress sites, HR departments, or job directory listing sites.
WP Job Manager has an impressive 100,000+ active installs, a 4.5 out or 5-star rating, and is currently maintained and developed by the awesome team over at Automattic. Ready to learn? Then let’s dive straight in.
Getting Started With WP Job Manager
You can download the free WP Job Manager plugin from the WordPress directory or search for “WP Job Manager” under “Plugins → Add New.” Click on “Install Now” and then activate it.

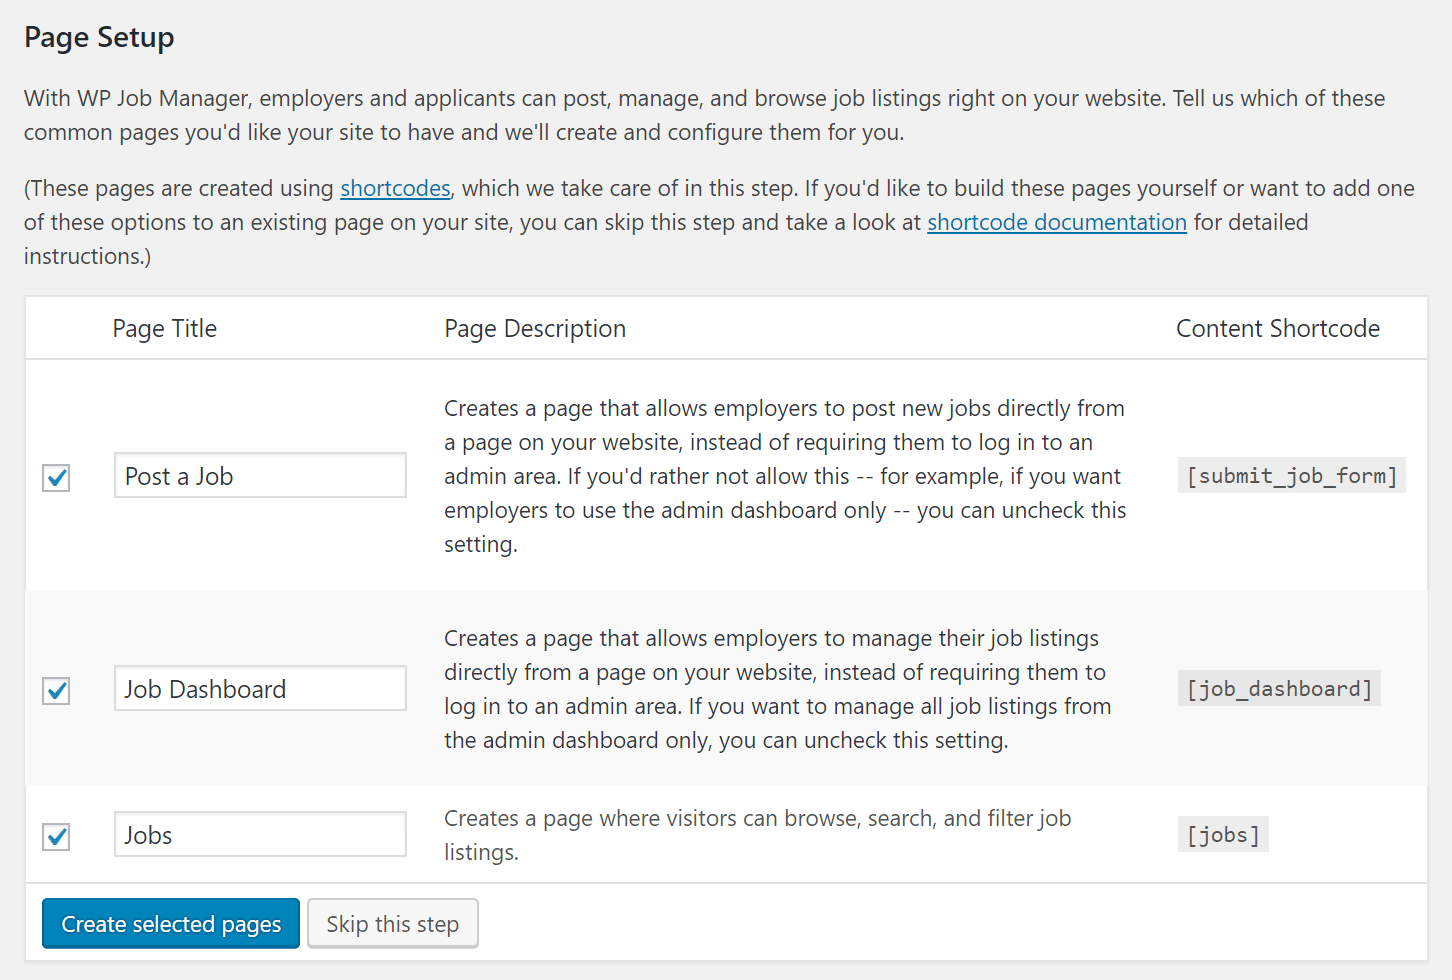
To help first-time users, WP Job Manager supports a fantastic quick-installation wizard. The wizard is a three-step process, so be sure to follow it through to the end.

The wizard automatically adds the three pages your job board needs:
- Post a Job: Creates a page that allows employers to post new jobs directly from a page on your website, instead of requiring them to log in to an admin area. If you’d rather not allow this — for example, if you want employers to use the admin dashboard only — you can uncheck this setting.
- Job Dashboard: Creates a page that allows employers to manage their job listings directly from a page on your website, instead of requiring them to log in to an admin area. If you want to manage all job listings from the admin dashboard only, you can uncheck this setting.
- Jobs: Creates a page where visitors can browse, search, and filter job listings.
Configuring WP Job Manager
In just seconds, the quick-installation wizard will have your job board ready for use – for the moment, though, it’s completely empty. Before you start using it, though, let’s make sure it’s properly configured.
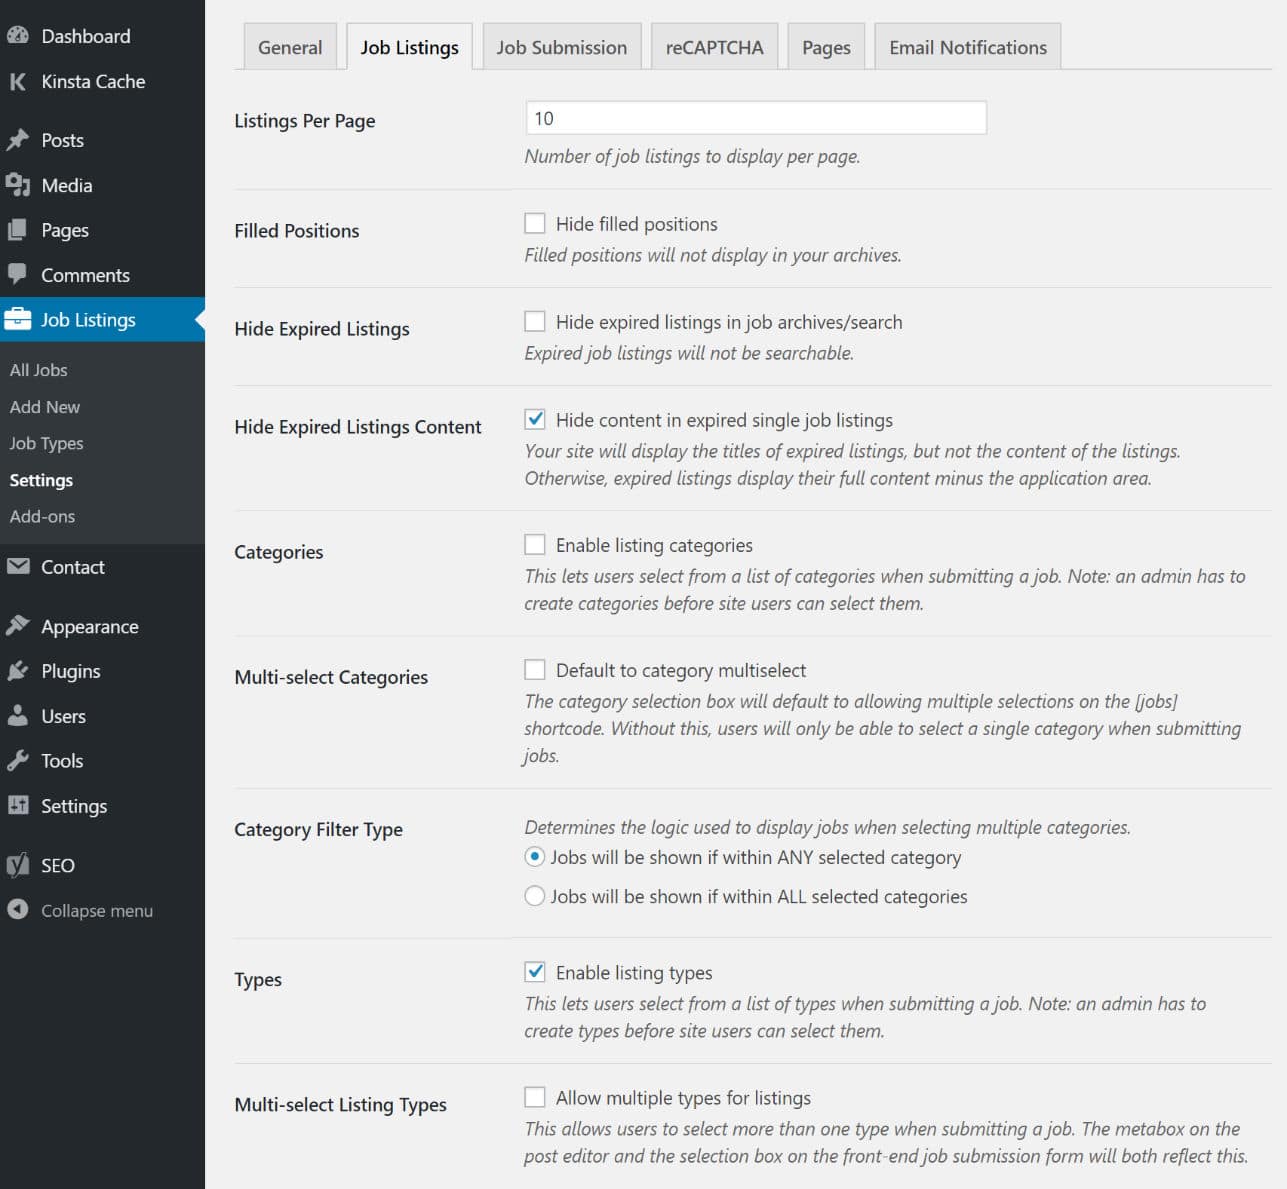
You’ll notice the plugin has added a new Job Listings item to your WordPress menu. Go there, then click Settings.
On this screen, you’ll see three tabs: Job Listings, Job Submission, and Pages – you won’t need to touch the Pages tab if you’ve used the quick-installation wizard.
Activating one of the many settings is as easy as ticking a checkbox and hitting the Save Changes button.
The most important fields sits behind the Job Submission tab. Here you choose whether you want to accept job listings from guests, or if you want to force recruiters to create an account – the plugin adds a new user role, Employer.
Now, before you let visitors loose on your job board, I recommend configuring the categories your listings will be split between. This is done from the Job Listings → Job Types screen.
There are five ‘job types’ created by default: full-time, part-time, temporary, internship, and freelance. These should be sufficient for most, unless you want to split your jobs differently – for example, by industry.
Adding a new job type is easy, though; just type the name and slug, then click Add New Job Type.

Posting a Job
You can post jobs on your shiny new job board using the WordPress back-end or front-end.
Let’s start by looking at how to post a job using the WordPress back-end. From your dashboard, navigate to Job Listings → Add New.
Create a title for your job, then write a description using the default WordPress editor.
Below the editor, you’ll see a metabox, which allows you to specify all the important job details. This includes the company name, job location, and the email address to send applications to. Using this metabox – titled Job Data – you can also mark a job as featured (making it sticky) and set an expiry date.

To the right of the editor, you can assign a category to your job, too, using the Job types metabox.
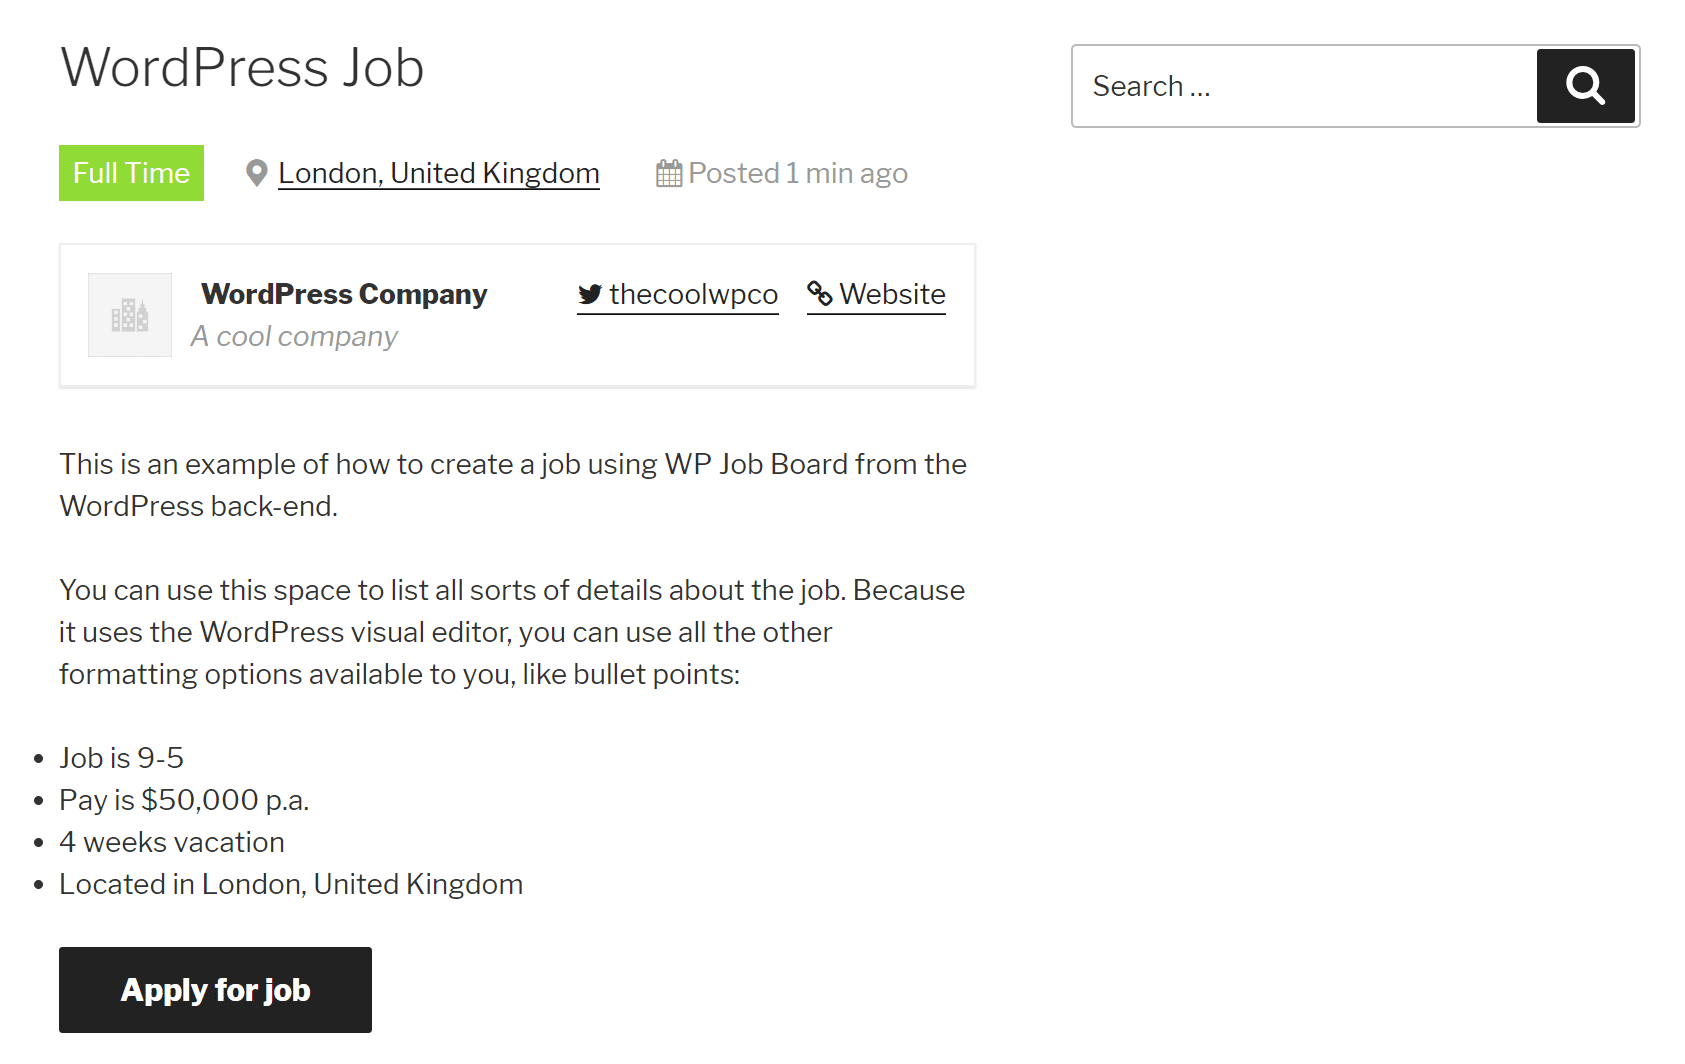
When you’re done, hit publish to automatically post the job to your board. See the screenshot below for my example job posting – it’s relatively simple, but looks clean and professional.
As I have already mentioned, WP Job Manager also allows recruiters to post a job from the front-end of your website – in other words, the live version of your site. This is done via the Post Job page which was created during the installation process.
The fields are exactly the same, the only difference is the aesthetics.
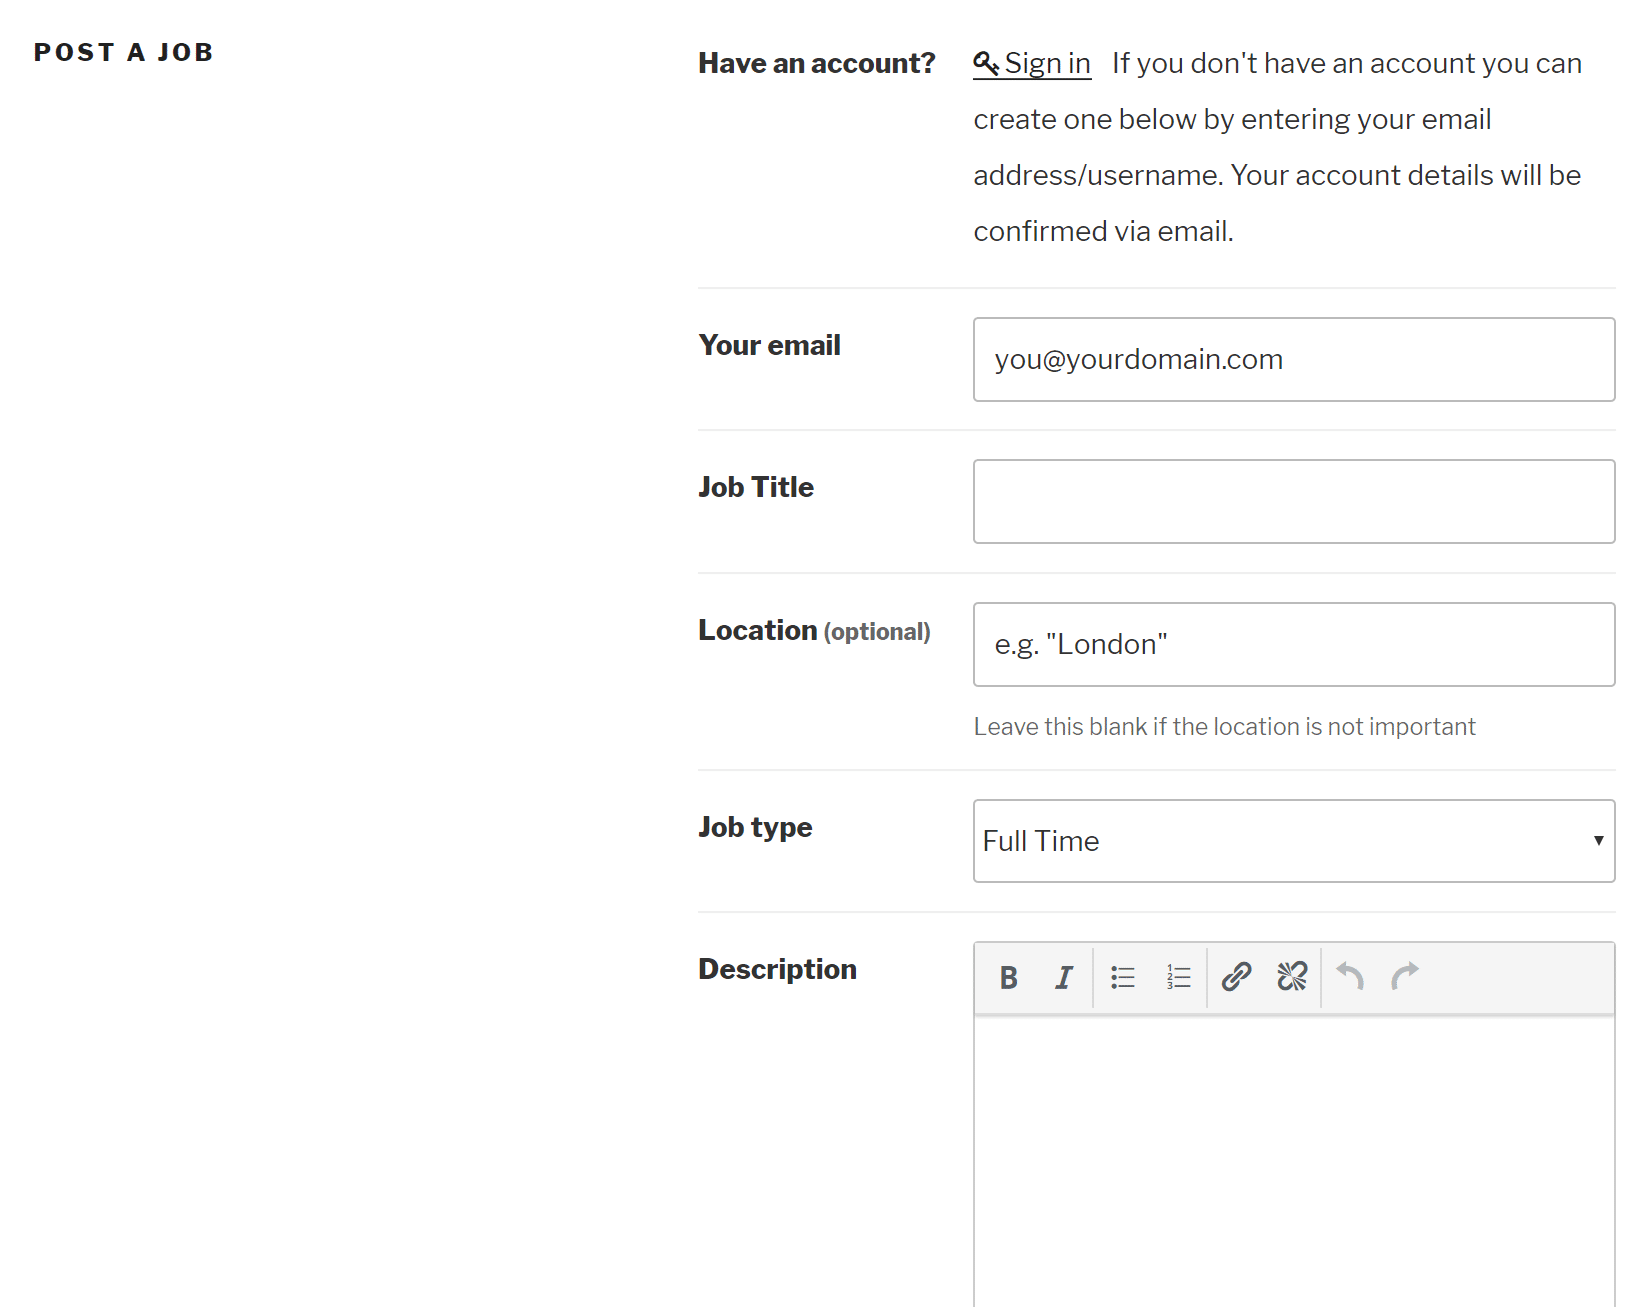
To ensure there are no mistakes, recruiters can Preview their listing before hitting the Submit Listing button.
And that’s all there is to posting jobs – yup, it’s that easy!
Applying for Jobs
The application process takes place on the front-end of your website.
The plugin supports an intuitive filter to help visitors find the most suitable jobs quickly. Visitors can find out more information about a particular listing by clicking on it.

An Application button sits at the bottom of each job listing. When clicked, this will reveal where job hunters should send their application to. (It’s possible to allow direct applications using a premium extension – we’ll get to that later.)

Managing Job Listings
Recruiters can manage their listings from the back- and front-end.
This allows recruiters to change job details, expiry dates, and mark jobs as filled.
On the back-end, this is done by clicking through to Job Listings → All Jobs, then clicking the job you want to edit.
On the front-end, recruiters can manage their job listings using the Job dashboard page created by the wizard – recruiters need to login to access their listings.

WP Job Manager Widgets
Recruiters and job hunters can start using your job board from the moment you’ve installed the plugin on your website. To get the most from it, however, you need to make sure it’s accessible.
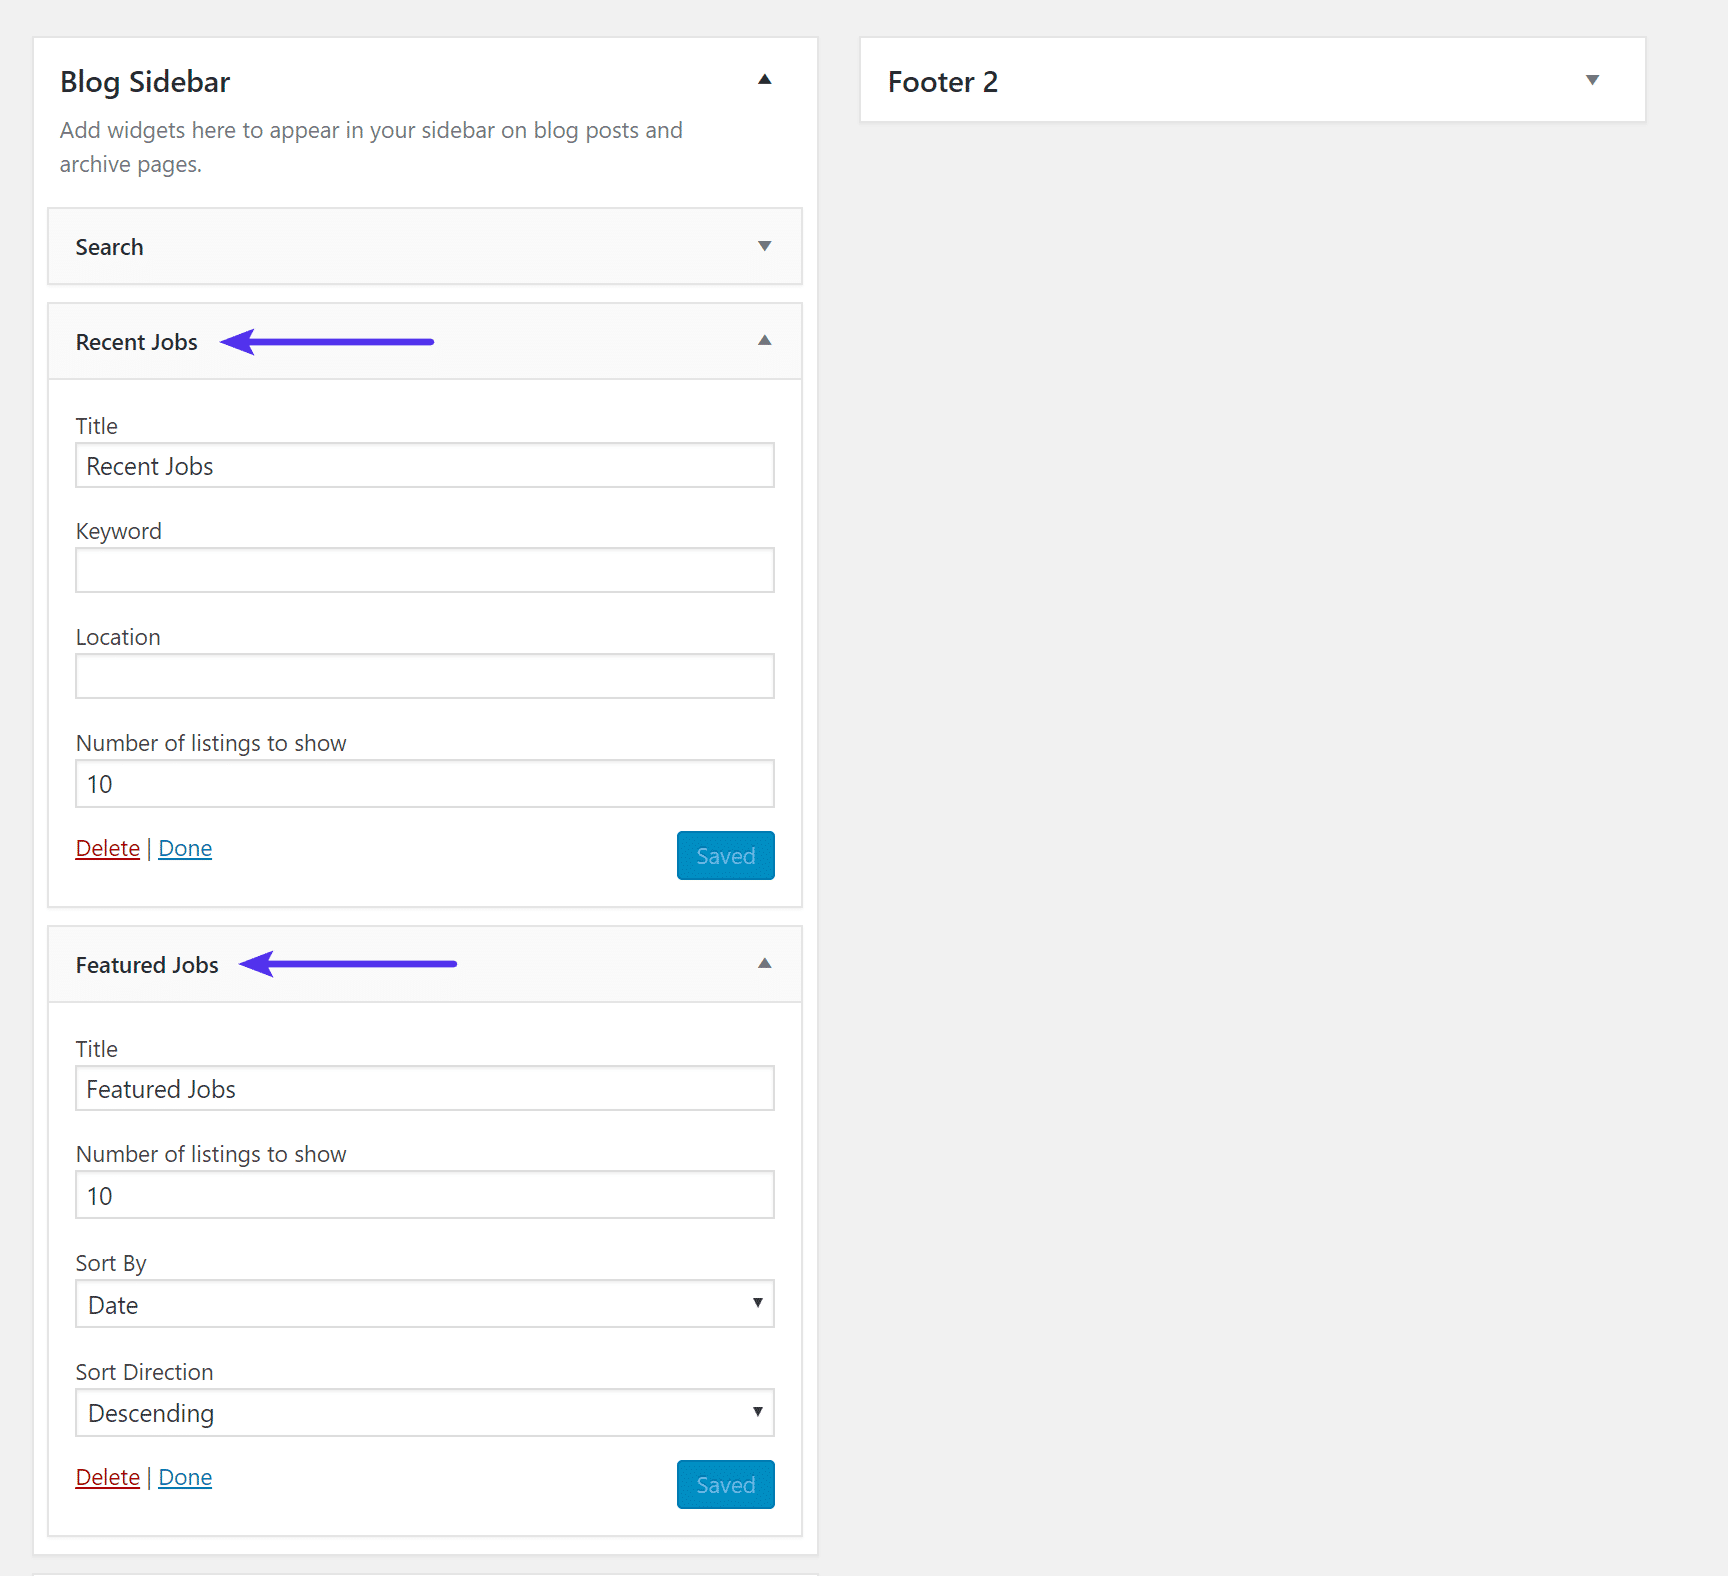
At the very least, make sure you add the most important pages – the ones created by the wizard during installation – to your navigation menu. To further aid navigation, WP Job Manager also supports two widgets:
- Featured jobs
- Recent jobs
You can add these to any of your website’s widget areas by navigating to Appearance → Widgets then using the familiar drag-and-drop interface.
WP Job Manager Premium Add-ons
The core WP Job Manager plugin is free to use, which makes it an awesome WordPress job board plugin solution. But if you want more from the plugin, you can install one of 50+ premium add-ons. All add-ons are individually priced between $16 and $39 – there are also some free add-ons.
You can access the add-ons by going to Job Listings → Add-ons.
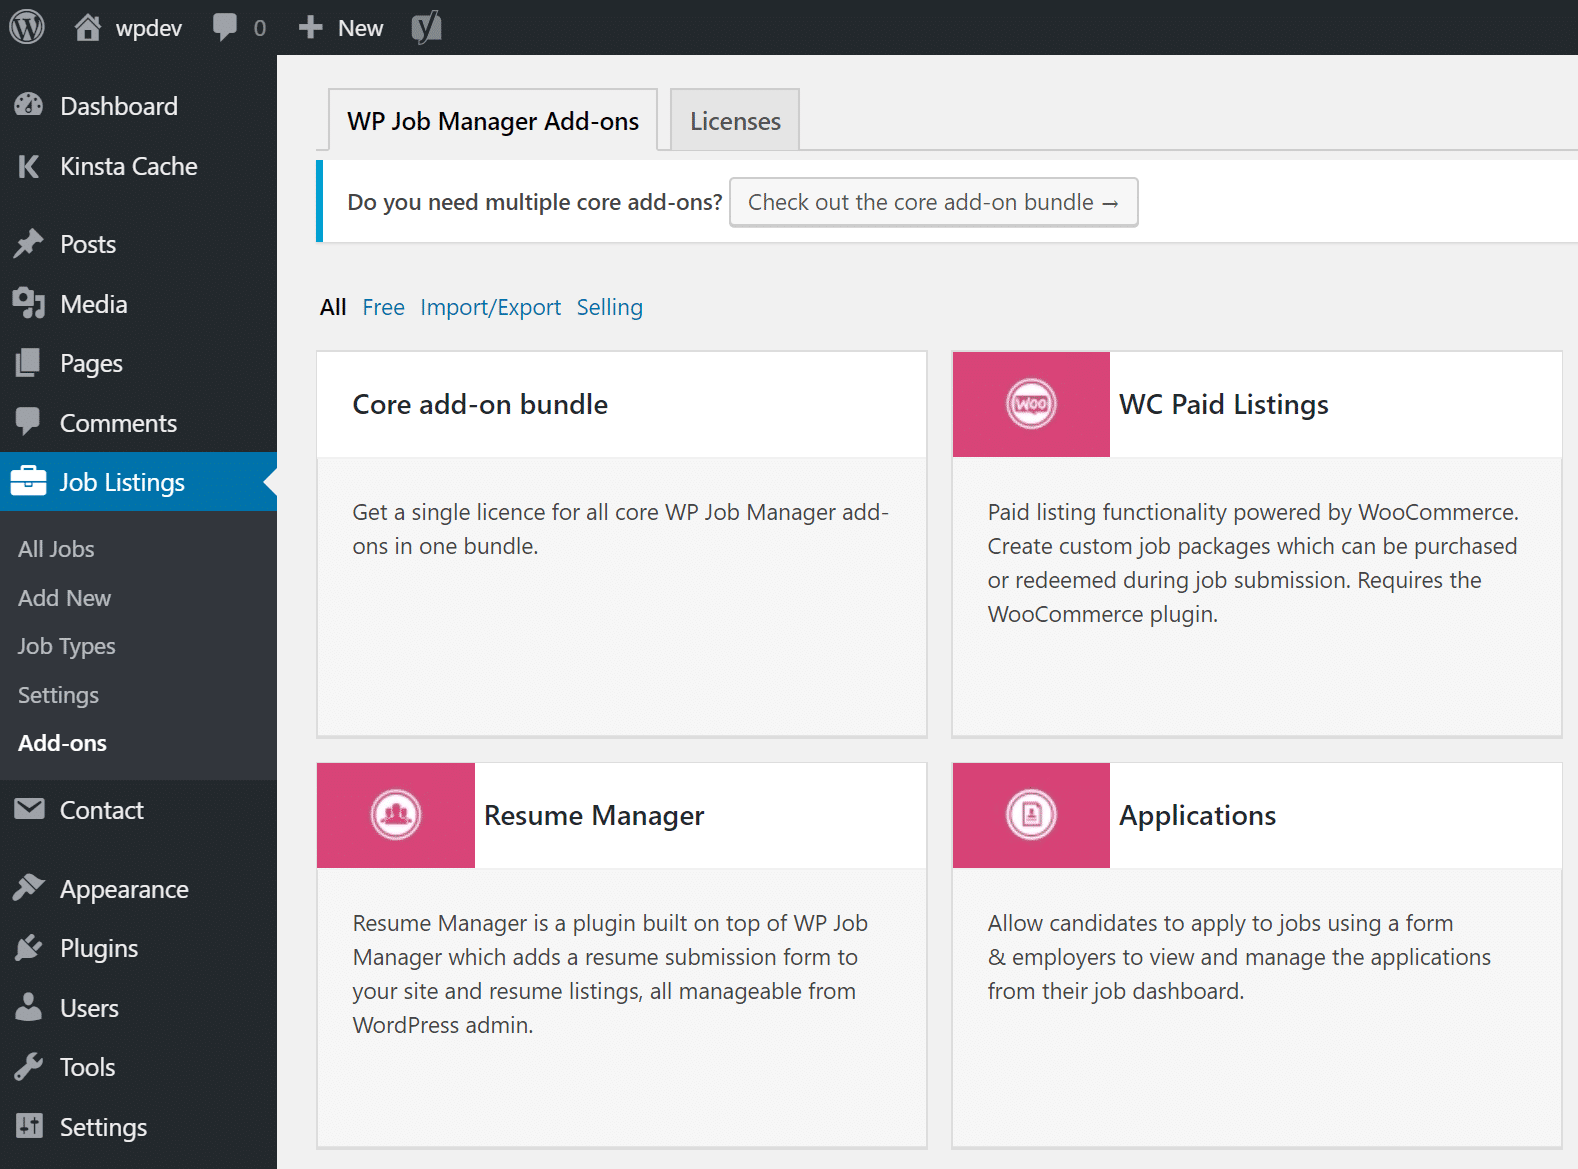
Let me run through a few of some of the more useful add-ons:
- Applications (from $39) – job hunters can fill in a form on the job listings page to apply for the role.
- Resume Manager (from $39) – job hunters can also submit their resume.
- WC Paid Listings (from $39) – Paid listing functionality powered by WooCommerce. Create custom job packages which can be purchased or redeemed during job submission.
- Indeed Integration (from $39) – fill your job board with jobs pulled from Indeed.
- Simple Paid Listings (from $19) – recruiters can pay for premium listings using PayPal or Stripe.
- Job Board Designer (from $39) – customize your job listings.
- Restrict Content Pro Integration (FREE) – only accept applications from subscribers.
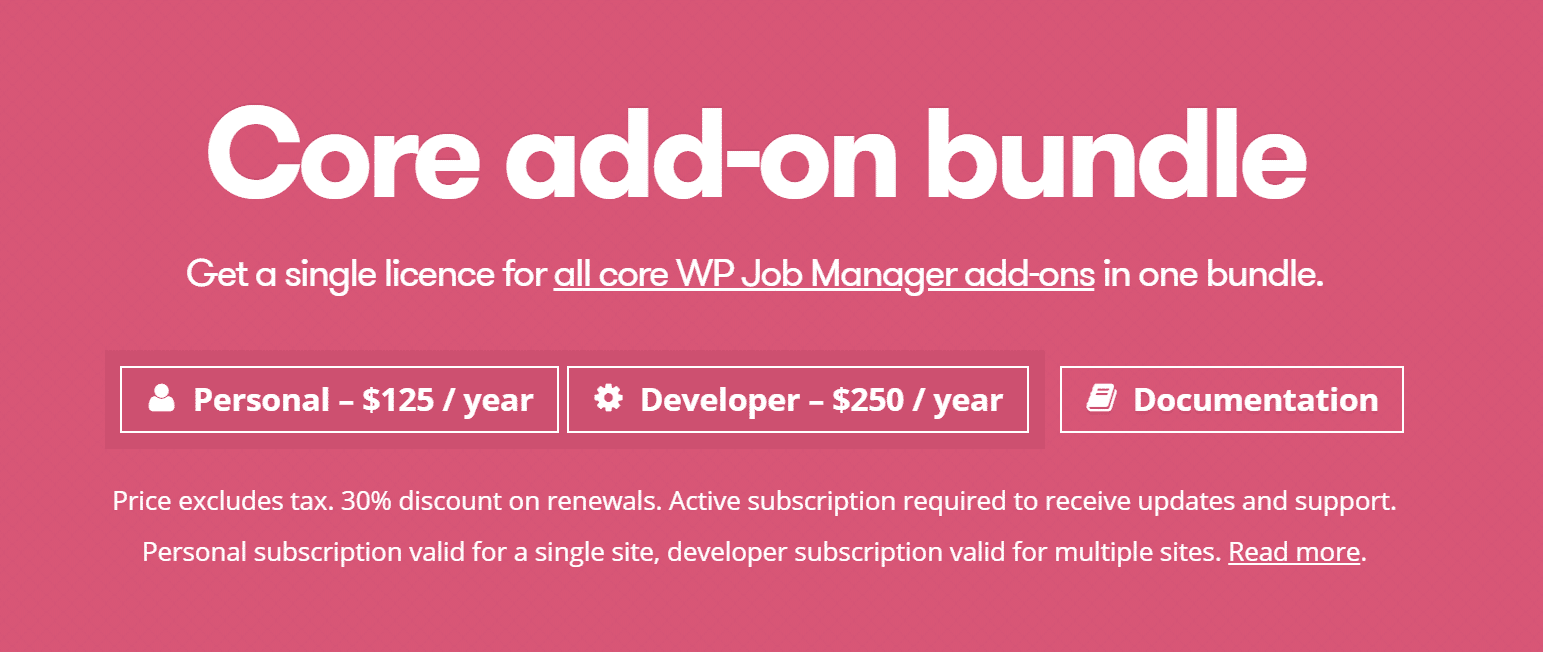
You can also buy a bundle of 11 add-ons. The core add-ons bundle is priced $125 – buying the add-ons individually would cost you $376.
Alternative Job Board Plugins
As with any WordPress solution, there are always alternatives you might want to check out. Here are a couple:
Summary
The WP Job Manager plugin is the ideal solution for anyone looking to add job board functionality to a WordPress website. The core plugin is completely free and supports all the basic functionality a small job board needs.
More importantly, though, it is incredibly easy to use – for both you and your visitors. If you follow this simple tutorial from start to finish, you really could have your job board setup and run in just 15 minutes or so.
Are you using the WP Job Manager plugin? Or perhaps you are using a different WordPress job board plugin solution? Share your experiences in the comments section below!
Categories
Subscribe Now
10,000 successful online businessmen like to have our content directly delivered to their inbox. Subscribe to our newsletter!Archive Calendar

| Sat | Sun | Mon | Tue | Wed | Thu | Fri |
|---|---|---|---|---|---|---|
| 1 | 2 | |||||
| 3 | 4 | 5 | 6 | 7 | 8 | 9 |
| 10 | 11 | 12 | 13 | 14 | 15 | 16 |
| 17 | 18 | 19 | 20 | 21 | 22 | 23 |
| 24 | 25 | 26 | 27 | 28 | 29 | 30 |
| 31 | ||||||
Recent Articles
-

Posted on : Jul 25
-

Posted on : Jul 07
-

Posted on : Apr 07
-

Posted on : Mar 19
Optimized my.cnf configuration for MySQL 8 (on cPanel/WHM servers)
Tags
- layer 7
- tweak
- kill
- process
- sql
- Knowledge
- vpn
- seo vpn
- wireguard
- webmail
- ddos mitigation
- attack
- ddos
- DMARC
- server load
- Development
- nginx
- php-fpm
- cheap vpn
- Hosting Security
- xampp
- Plesk
- cpulimit
- VPS Hosting
- smtp
- smtp relay
- exim
- Comparison
- cpu
- WHM
- mariadb
- encryption
- sysstat
- optimize
- Link Building
- apache
- centos
- Small Business
- VPS
- Error
- SSD Hosting
- Networking
- optimization
- DNS
- mysql
- ubuntu
- Linux