WordPress Revisions: How to Use and Optimize for best performance
- Category : WordPress
- Posted on : Feb 19, 2021
- Views : 5,842
- By : CentrioHost

Whenever you save a draft or update an already published WordPress page or post, the Content Management System (CMS) automatically creates a revision. When enabled, this feature can prevent you from losing important work. Unfortunately, over time, WordPress revisions can take up unnecessary storage space and end up hurting your site’s performance.
In this guide, we’ll introduce you to WordPress revisions and explain where to find them. Then we’ll walk you through how to use revisions and keep them from negatively impacting your site.
Let’s get started!
An Introduction to WordPress Revisions
WordPress revisions automatically record any changes you make to pages or posts on your website. A new copy of a page is created every 60 seconds by default, as well as every time you click on the Save Draft, Publish, or Update buttons.
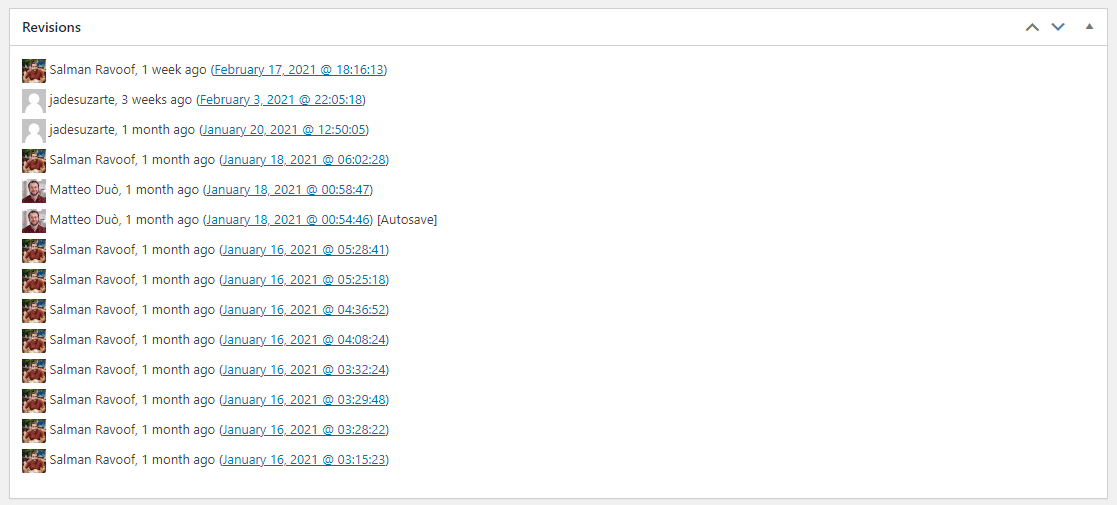
List of WordPress revisions of a post
WordPress revisions are helpful for any site owner. They serve as backups you can restore in the event of an unexpected disruption, such as closing your browser tab accidentally or having a power outage.
They also enable you to revert to older versions of your content. For example, you might learn that a post isn’t as performing as well as it used to, and you want to roll back some recent changes.
Revisions are also super helpful when you have a team working on your website’s content. In addition to letting you view what post/page edits were made, the WordPress revisions feature also records the username and timestamp of those changes. This can increase transparency and make collaborating on editorial work easier.
The Problem with WordPress Revisions
WordPress revisions can present a serious problem if you don’t manage them properly. Essentially, the more pages and posts you add to your website, the more revisions it’ll generate.
If you have a large website or make changes frequently, this can quickly lead to unnecessary database bloat. That’s because every time a revision is created, an additional row is added in the WordPress database’s wp_post table, with a post_type value of revision.
The larger your database is, the more storage space it’ll occupy. Unfortunately, this can slow your site down and lead to longer loading times, hampering your site’s user experience and search engine optimization (SEO).
Therefore, it’s critical to learn how to control revisions in WordPress to your advantage. Whether you want to delete revisions entirely, disable or limit them, or optimize your revisions database, you have many options at your disposal.
Where to Find Revisions in WordPress
Before discussing the different ways you can use and change the revisions settings in WordPress, it’s important first to understand where to find them. On the editor screen of your post or page, go to the right-hand menu and click on the Document tab.
If revisions are enabled, and changes have been made, you’ll see the number of revisions under the Status & visibility section.
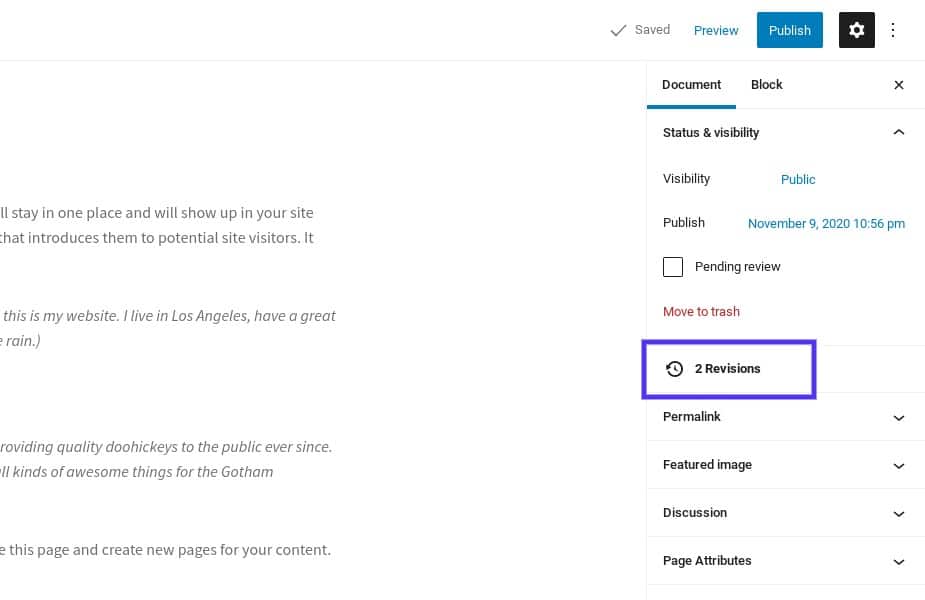
The WordPress revisions tool
Click on this to visit the Revisions page, where you can view all of the saved edits and compare any two revisions side-by-side. You’ll see two columns: the left displays the previous version of the post or page, and the right shows you the version you’ve selected.
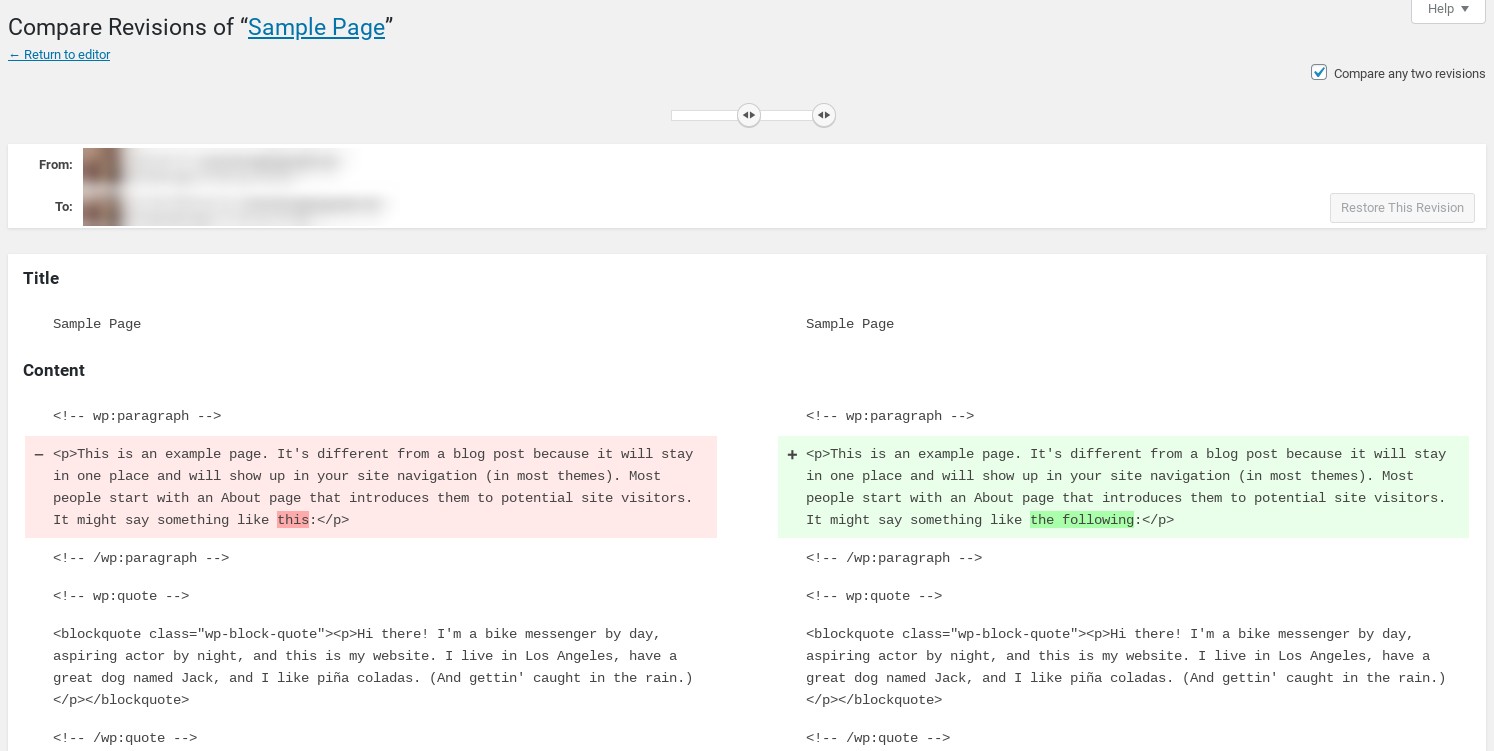
The WordPress Revisions page
You can use the revisions slider to browse through the various restore points. This system highlights the content that was added (plus sign and green) or removed (minus sign and red).
If you want to keep the existing version and return to the editor screen without making any changes, you can do so by simply clicking on either the article title or the Return to editor link at the top of the screen.
How to Revert to an Older Revision in WordPress
Sometimes you may want to undo changes made in WordPress. When this happens, WordPress revisions make doing so quick and easy.
By default, WordPress displays the revisions for a post or page sequentially. However, if you want to view or compare non-sequential changes, you can do so by selecting the Compare any two revisions option at the top of the screen:
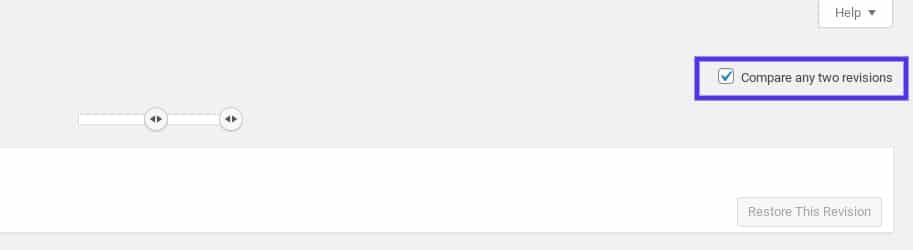
The option to compare WordPress revisions
Then select the version you want to compare it to. Whenever you’re done viewing and comparing revisions, you can restore an older version by clicking on Restore This Version.
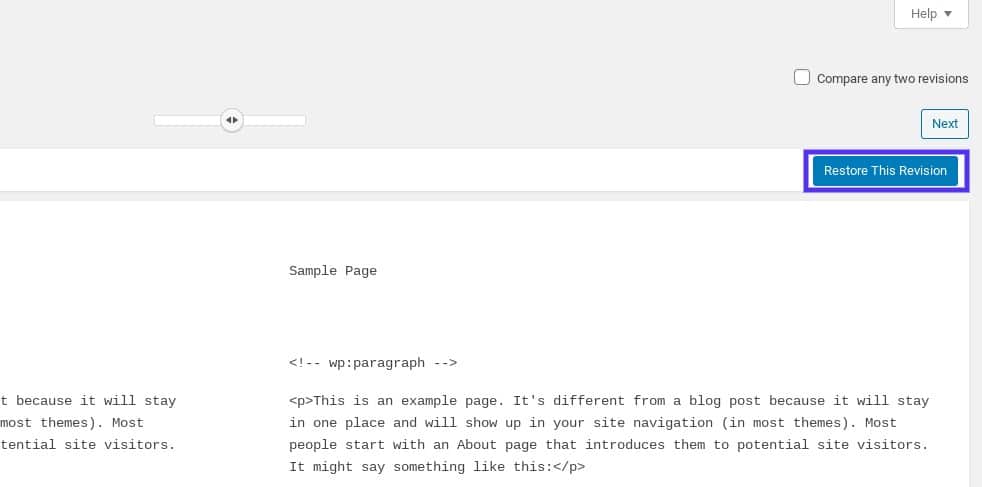
Reverting to an old revision in WordPress
Note that if you click this button, it will automatically restore the version you’re comparing against—the one shown in the revisions screen’s right-side column.
How to Enable WordPress Revisions
Typically, WordPress revisions are enabled by default. However, depending on your hosting provider or the process used to install WordPress, this feature may be disabled. It’s also possible that you or someone else on your team disabled it at some point.
Whatever the case, if you want to enable revisions in WordPress, you can do so manually by editing the wp-config.php file in your site’s root directory. You can do this via a Secure File Transfer Protocol (SFTP) client. If you’re not a Centriohost user and your host uses cPanel, you can use its File Manager tool instead.
Once you locate and open the file, search for the following line of code:
define('WP_POST_REVISIONS', false);Change the false value to true.
If there is no line like this, add the following above where it says “ABSPATH” and “/* That's all, stop editing! Happy publishing. */”:
define('WP_POST_REVISIONS', true);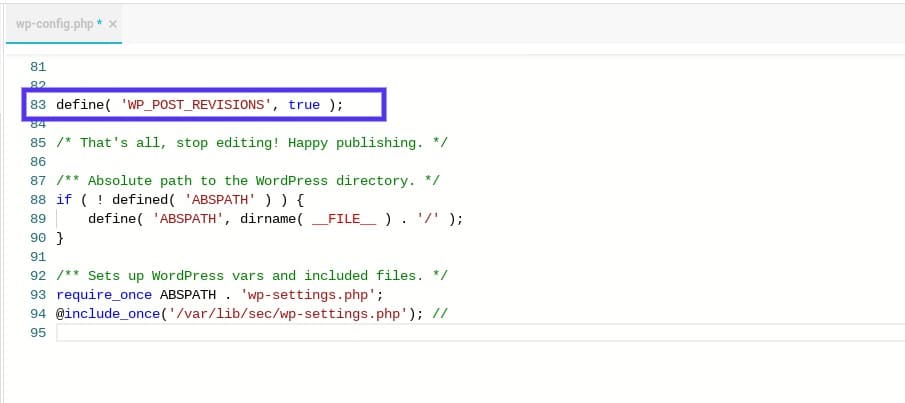
Enabling WordPress revisions manually
Don’t forget to save the file.
Now, when you log back into WordPress, you should see the revisions feature enabled. To ensure that it’s up and running, open the editor for any page or post and check for the Revisions option under the Document tab.
How to Disable WordPress Revisions
Conversely, you may want to disable revisions in WordPress altogether. Keep in mind that you can also keep this feature enabled and limit or delete revisions to minimize the amount of space they take up in your database. We’ll discuss how to do it in the next section.
However, if you find no purpose or use for this feature, you can turn it off completely. To do so, use the same method we discussed above, editing your site’s wp-config.php file. The only difference is that the value should be set to false rather than true.
If you’re not comfortable editing your wp-config.php file, you can also disable revisions in WordPress using a lightweight plugin such as Disable Post Revision. After you install and activate this tool, you can access it by going to Settings > Writing in your WordPress dashboard:
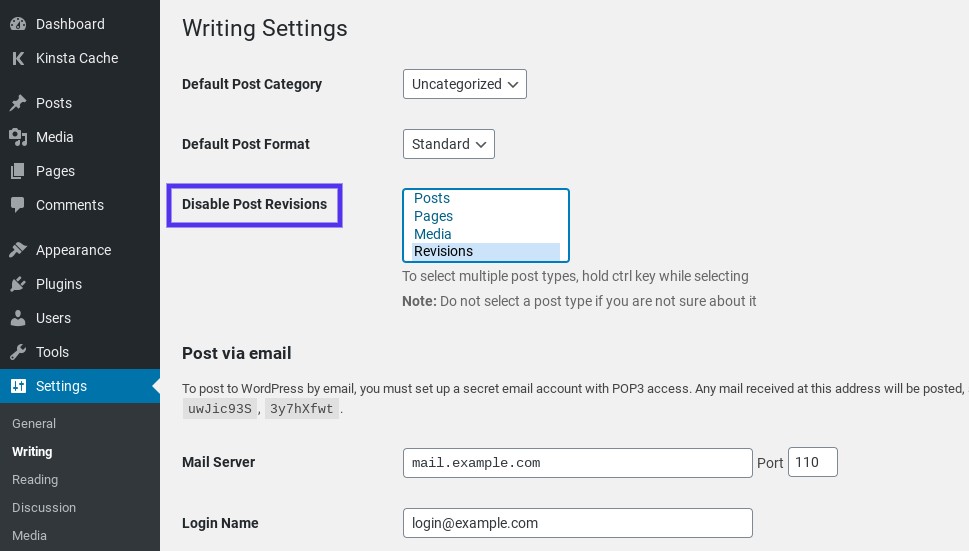
The Disable Post Revisions WordPress plugin settings
Select the post types that you want to disable revisions for, and then save your changes. That’s it!
How to Optimize the Revisions Database in WordPress
The longer you run your site, the more revisions you’re likely to have stored in your database. If you’ve spent years updating and editing your content, you’re naturally going to accumulate many revisions.
For example, if you have an older site, it’s not uncommon to have over 100 revisions on the oldest or frequently-updated pages. Let’s say that you have 800 pages and posts on your site. If each of those has 100 revisions, this amounts to more than 80,000 entries in your database. It’s a common issue in WooCommerce stores too.
Such a buildup can happen quickly and occurs behind the scenes. Luckily, aside from disabling revisions completely, there are a few methods you can use to optimize your WordPress revisions. These include:
- Deleting WordPress revisions
- Limiting WordPress revisions
In the following sections, we’ll walk you through how to perform each of these tasks, both manually and with a plugin.
If you’re working on a new website, you can skip to the next section on limiting WordPress revisions as you won’t have any existing ones to delete. However, if you have an existing site that’s been up and running for a while, cleaning up your revisions to delete any unused or outdated ones is worth the trouble.
How to Delete WordPress Revisions
You can use two methods to remove revisions from your site: manually or via a plugin. We recommend using a plugin because it’s quicker and doesn’t require you to modify your site’s files.
However, if you’re a developer and want a more advanced method, you can also delete revisions manually. We’ll discuss both methods below.
How to Delete WordPress Revisions Using a Plugin
If you want to delete your revisions in WordPress using a plugin, there are a few options to choose from.
For Centriohost users, it’s worth noting that some popular performance optimization plugins are on our banned list of plugins. They’re barred from our platform because they tend to cause problems with our server-level performance optimizations and security features.
We recommend using WP-Sweep.

The WP-Sweep WordPress plugin
WP-Sweep is a free, easy-to-use tool that will make cleaning up old revisions in your database quick and simple. To install it, navigate to Plugins > Add New in your WordPress dashboard. Search for the plugin, then select Install Now and Activate:
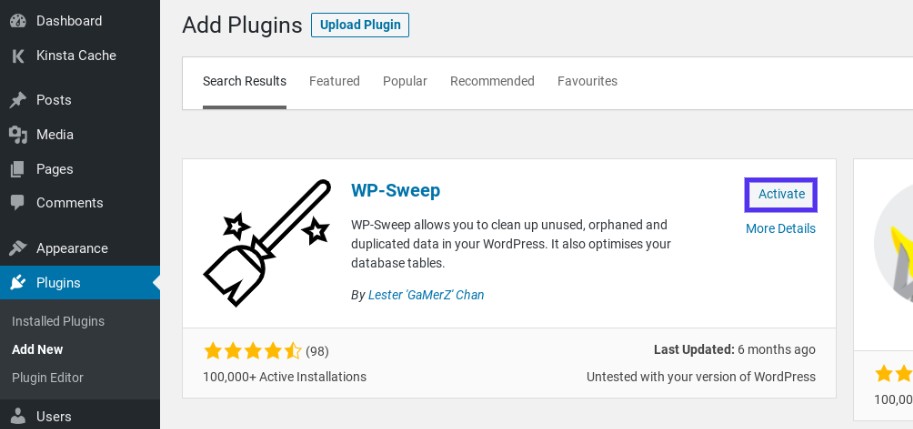
Activate the WP-Sweep WordPress plugin
Next, navigate to Tools > Sweep:
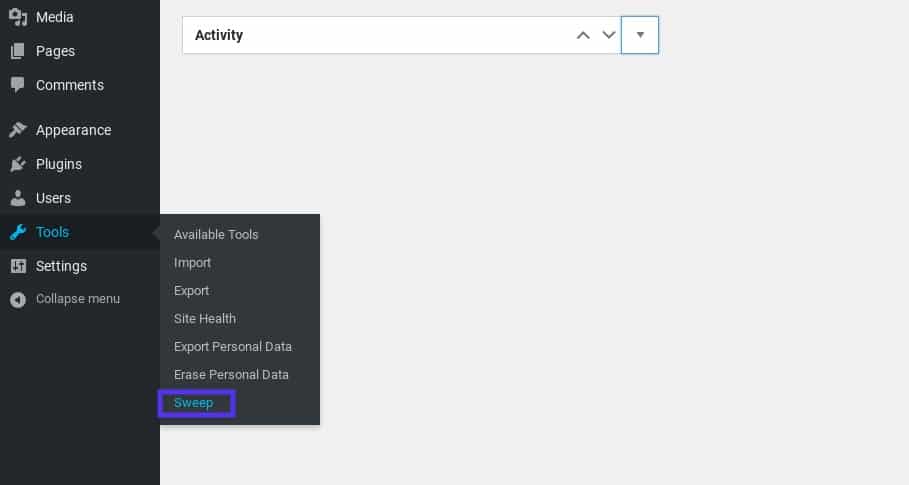
Finding the WP-Sweep plugin settings in WordPress
On this screen, you’ll see a list of revisions and the total amount that exists. If you click on Details, you can access a list of posts that will be affected.
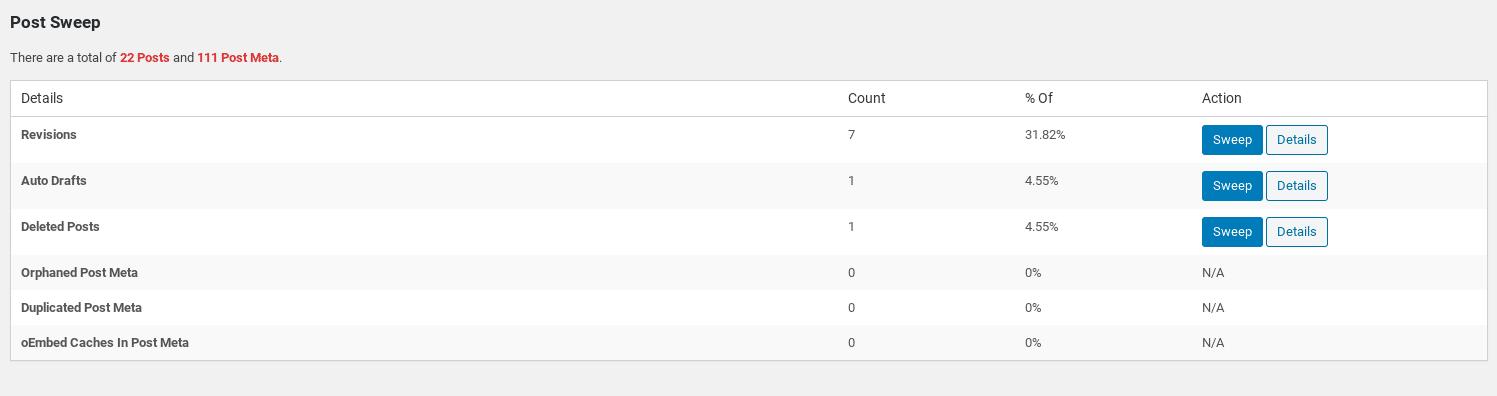
The WP-Sweep plugin screen
Once you’ve reviewed this information and are sure that nothing important will be deleted, click on the Sweep button. Repeat this process for every item on the list. As you ‘sweep’ through your revisions, a dialog box will display the number of revisions being processed.
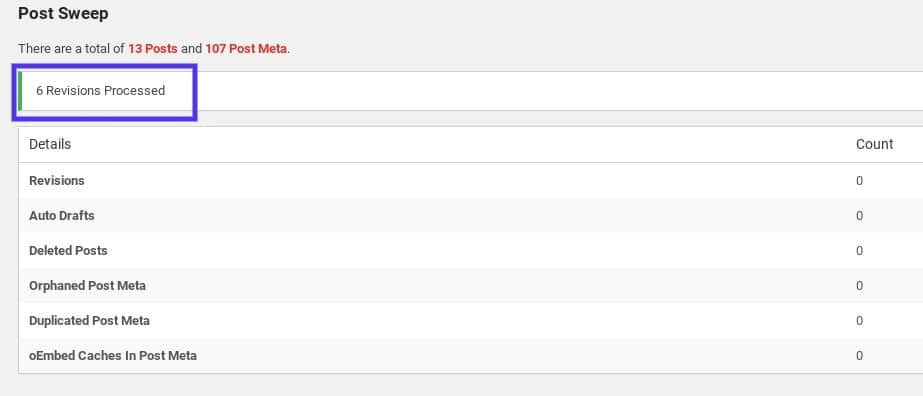
WordPress revisions processed using the WP-Sweep plugin
Note that for performance reasons, this plugin only displays 500 items at a time. If you have an older site, you can expect many more revisions to be listed than in our example, as we’re using a test site for this demonstration.
Tired of a slow host? Centriohost is built with speed and performance in mind. Check out our plans
How to Manually Delete WordPress Revisions
You can also manually delete WordPress revisions. There are two ways to do it: with the help of a plugin, or deleting entries directly from the database. We recommend using the second method only if you’re a developer and want to avoid installing another plugin.
For the first method, download and activate the free Simple Revisions Delete plugin. It doesn’t have an admin or settings page. To use it, visit the page/post editor, and you’ll find a Delete link beside each revision.
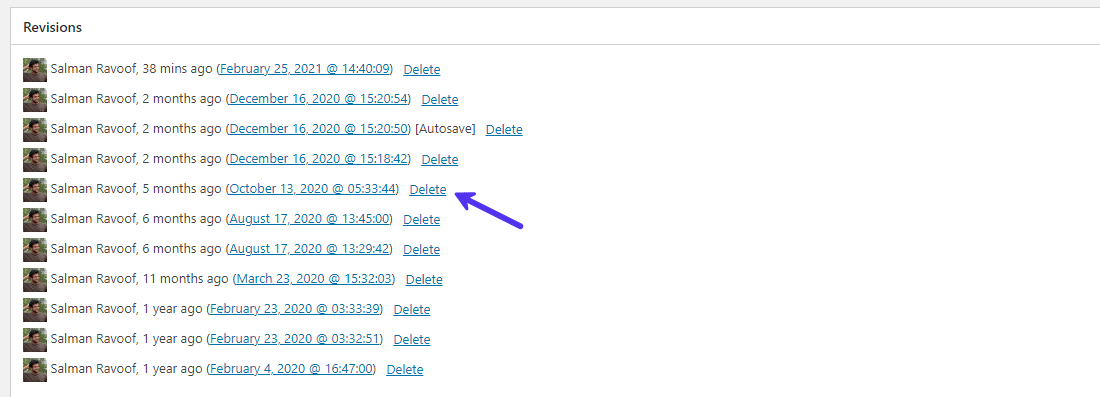
Using the ‘Simple Revisions Delete’ plugin
Now, you can verify and manually delete revisions you don’t need. It’s a good solution to micro-manage your revisions.
If you prefer the second, more advanced approach, then you can proceed by accessing phpMyAdmin and running an SQL query. It’s important to be careful with this method. There are many bad snippets of code floating around the WordPress repository forums. Some of them may end up deleting something important on your site. Or worse, they can bring down your site down altogether.
To safely delete post revisions in WordPress via a query, log into your phpMyAdmin account, select your WordPress database from the left-hand panel, and click on the SQL tab.
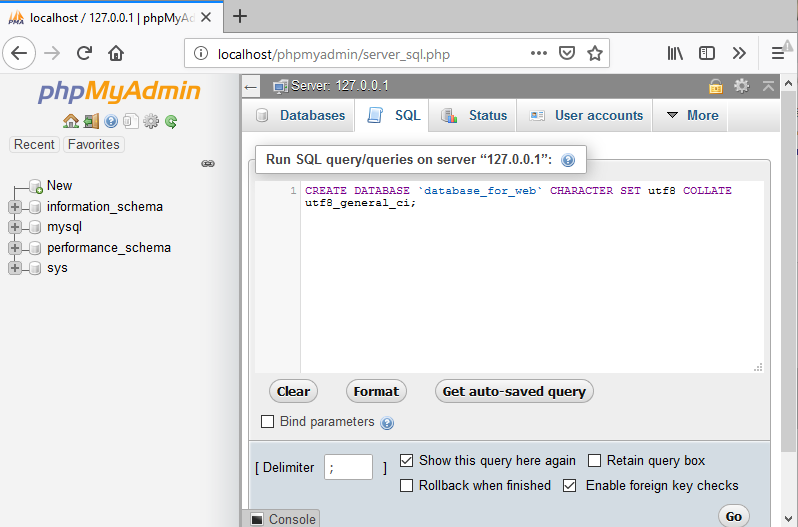
The SQL tab in phpMyAdmin
You can then enter a command to run on your WordPress database. In the command box, enter the following:
DELETE FROM wp_posts WHERE post_type=”revision”;You’ll need to replace wp_ with whatever you use as your WordPress database prefix. Then click on Go to run the command. Any revisions you had in your database will now be deleted.
Another option you might like if you’re a WordPress developer is to delete your post revisions with WP-CLI. Here is an example of a WP-CLI command you could use:
$ wp post delete $(wp post list --post_type='revision' --format=ids)You can read more about the wp post delete command in the WP-CLI documentation.
Keep in mind that deleting old revisions from your database won’t stop WordPress from creating them for future pages and posts. Therefore, it’s a smart idea to limit the number of saved revisions, so that they don’t get out of control moving forwards.
How to Limit Revisions in WordPress
By limiting the number of WordPress revisions you allow, you can minimize how often you’ll have to clean up your database. As with deleting WordPress revisions, you can either do this manually or by using a plugin.
How to Limit WordPress Revisions Using a Plugin
If you prefer to use a plugin to limit WordPress revisions, you can use the free WP Revisions Control plugin. This plugin enables you to limit the number of WordPress revisions or disable them altogether.
Once it’s installed and activated on your site, you can limit post revisions by navigating to Settings > Writing in your admin dashboard, and then clicking on the tab:
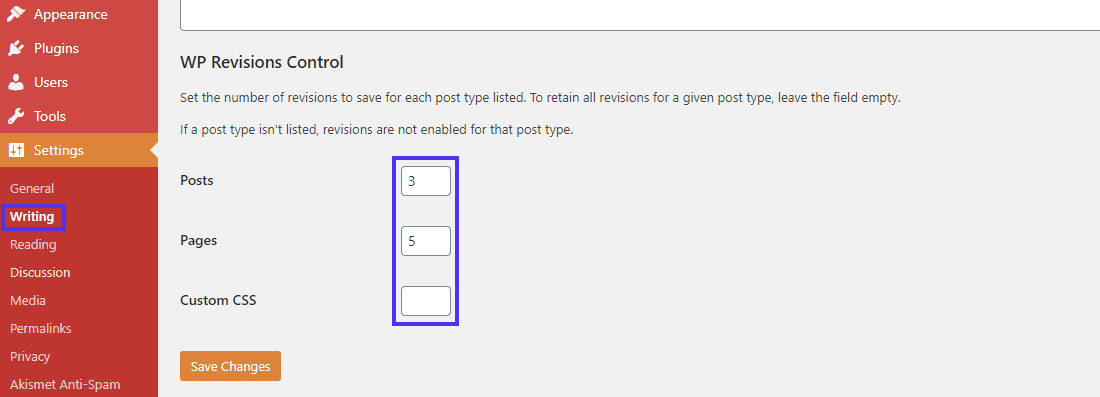
WP Revisions Control settings
Next, set the number of revisions for each post type. If you have any custom post type, you can also see it listed under here.
There’s no limit to how many revisions you can set. On the other hand, setting it to 0 will disable revisions for that post type altogether. When you’re done, click on the Save Changes button at the bottom of the screen, and you’re ready to go.
How to Limit Revisions in WordPress Manually
To manually set a limit on the revisions you allow in WordPress, you can edit the code in your wp-config.php file. As we mentioned earlier, depending on your host, you can do this via cPanel and File Manager or an SFTP client.
After opening your wp-config.php file, add the following line of code:
define('WP_POST_REVISIONS', 3);We’ve used 3 as an example value above, but you can change this number to reflect however many revisions you want your database to store per page or post. Please save the file when you’re done, and re-upload it to the server.
Summary
WordPress revisions are a helpful feature that can prevent you from losing work. They make it easier to restore older versions of pages and posts. However, when you have a large or well-established site, revisions can quickly accumulate and add unnecessary bloat to your database. Thus, they may end up hurting your site’s performance.
There are a variety of ways you can change how your site handles revisions, so they don’t negatively impact your site. This includes:
- Disabling the revisions feature by editing your site’s
wp-config.phpfile. - Deleting individual revisions manually via a plugin such as Simple Revisions Delete. Or bulk deleting revisions directly from the database through phpMyAdmin or WP-CLI, or by using a plugin such as WP-Sweep.
- Limiting revisions in WordPress by editing your
wp-config.phpfile, or by using a free plugin such as WP Revisions Control.
A WordPress site’s performance depends on its database. Start optimizing it today!
Do you have any questions about using and optimizing WordPress revisions? Let us know in the comments section below!
If you enjoyed this article, then you’ll love Centriohost’s WordPress hosting platform. Turbocharge your website and get 24/7 support from our veteran WordPress team. Our Cloud powered infrastructure focuses on auto-scaling, performance, and security. Let us show you the Centriohost difference! Check out our plans
Categories
Subscribe Now
10,000 successful online businessmen like to have our content directly delivered to their inbox. Subscribe to our newsletter!Archive Calendar

| Sat | Sun | Mon | Tue | Wed | Thu | Fri |
|---|---|---|---|---|---|---|
| 1 | 2 | |||||
| 3 | 4 | 5 | 6 | 7 | 8 | 9 |
| 10 | 11 | 12 | 13 | 14 | 15 | 16 |
| 17 | 18 | 19 | 20 | 21 | 22 | 23 |
| 24 | 25 | 26 | 27 | 28 | 29 | 30 |
| 31 | ||||||
Recent Articles
-

Posted on : Jul 25
-

Posted on : Jul 07
-

Posted on : Apr 07
-

Posted on : Mar 19
Optimized my.cnf configuration for MySQL 8 (on cPanel/WHM servers)
Tags
- layer 7
- tweak
- kill
- process
- sql
- Knowledge
- vpn
- seo vpn
- wireguard
- webmail
- ddos mitigation
- attack
- ddos
- DMARC
- server load
- Development
- nginx
- php-fpm
- cheap vpn
- Hosting Security
- xampp
- Plesk
- cpulimit
- VPS Hosting
- smtp
- smtp relay
- exim
- Comparison
- cpu
- WHM
- mariadb
- encryption
- sysstat
- optimize
- Link Building
- apache
- centos
- Small Business
- VPS
- Error
- SSD Hosting
- Networking
- optimization
- DNS
- mysql
- ubuntu
- Linux