How to Increase the WordPress Maximum Upload File Size
- Category : WordPress
- Posted on : Jun 16, 2019
- Views : 3,691
- By : Icarus M.
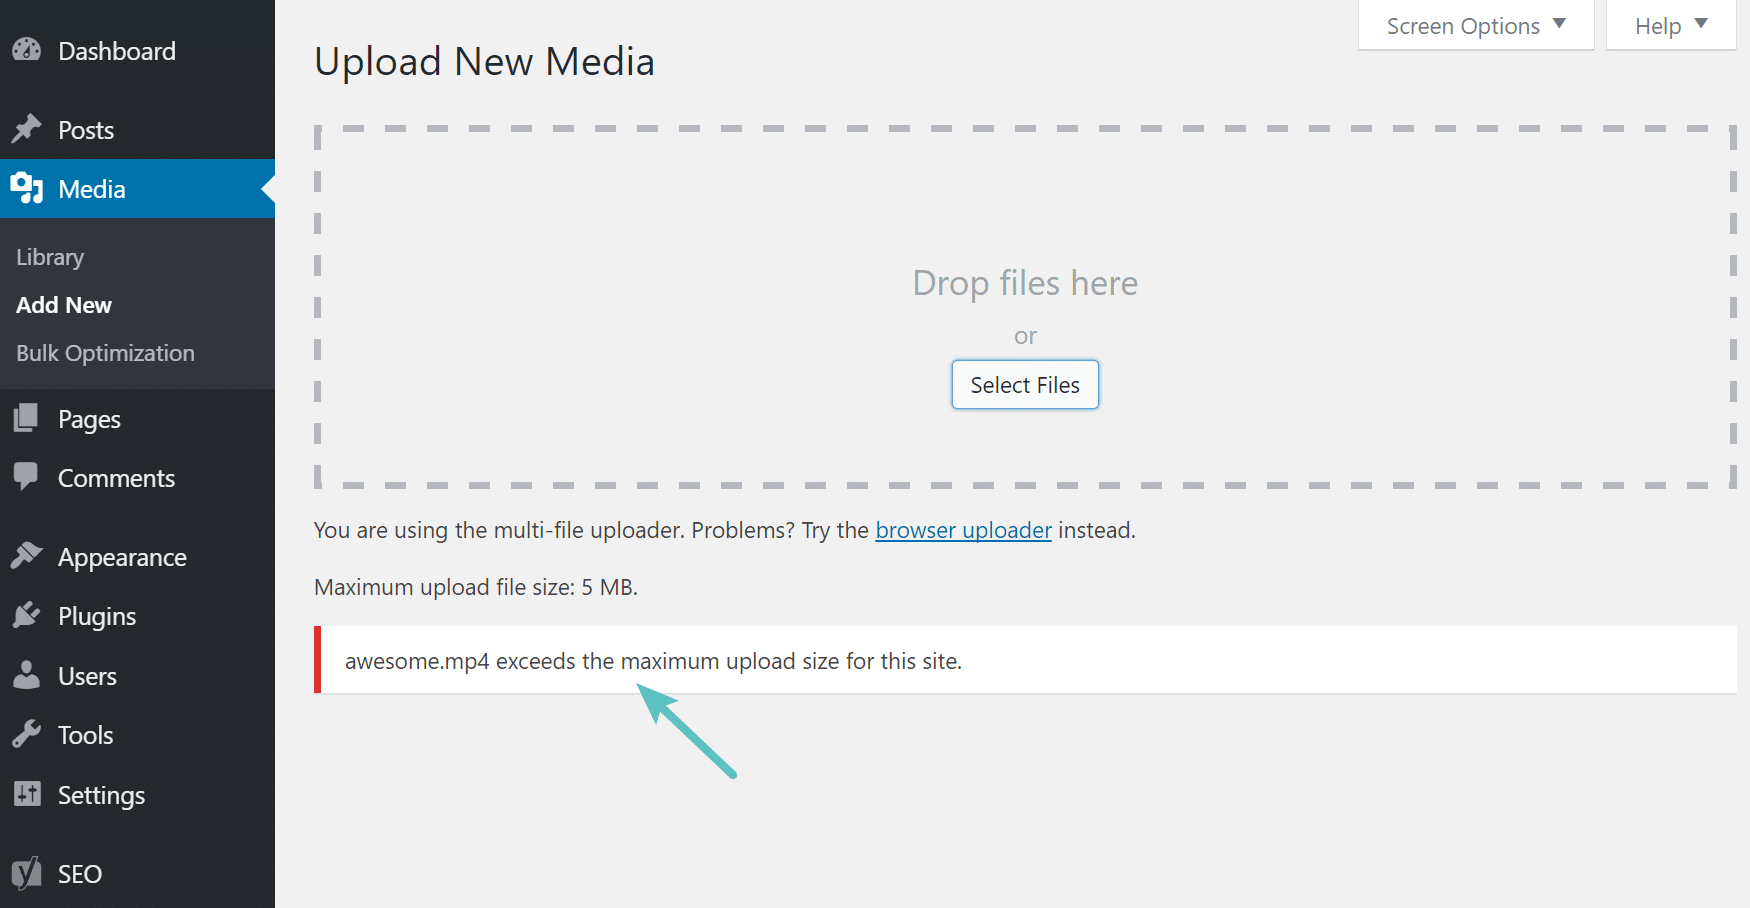
If you are reading this post, no doubt you have run into an issue uploading files to your WordPress site and are looking for a quick fix. The all too common “exceeds the maximum upload size for this site” error can be very frustrating. Many hosts keep this limit low by default. So in this post, we will dig into the root of the problem and provide you with some quick ways to resolve this issue and get back to uploading your files.
First of all, why in the world does this happen? Well, it’s important to understand that this is usually not a WordPress issue. In most cases, the WordPress maximum upload file size is a server-level setting which also means that unfortunately, you can’t resolve it from within WordPress.
This limit exists for security and efficiency’s sake. It prevents users from flooding your site with huge video uploads and grinding your servers to a halt. We think that’s fair enough, but nowadays a default upload of 2 or 5 MB (an amount many servers default to) just doesn’t cut it, let’s see how we can go about increasing it.
If you’re curious, the default upload size at Host SEO is 125 MB.
Increasing The WordPress Maximum Upload File Size
There are three basic ways you can go about resolving the WordPress maximum upload file size issue, as well as an alternative option. We’ll start with the two easiest ones, then move on to changing the server settings yourself, as there are a number of options there as well.
- Increase Upload Size Limit in a Multisite Install
- Ask Your Host For Help
- Modify Server Settings
- Utilize the WordPress upload_size_limit Filter
- Alternative Option – Upload Files Via FTP
Increase Upload Size Limit In a Multisite Install
If you are running a multisite installation you may be able to control the upload limit for your sites. Note: This can not circumvent the server-level settings. If the server is set to a limit of 5 MB and you set 10,000 KB (10 MB) in the network settings it will not work. If, however, the server is set to 20 MB and your network settings are set to 1,500 KB you will be able to resolve the issue by increasing the setting up to the 20,000 KB limit. Follow the steps below to increase the max upload size on your Multisite install. If you need to modify the server, skip down to modify server settings.
Step 1
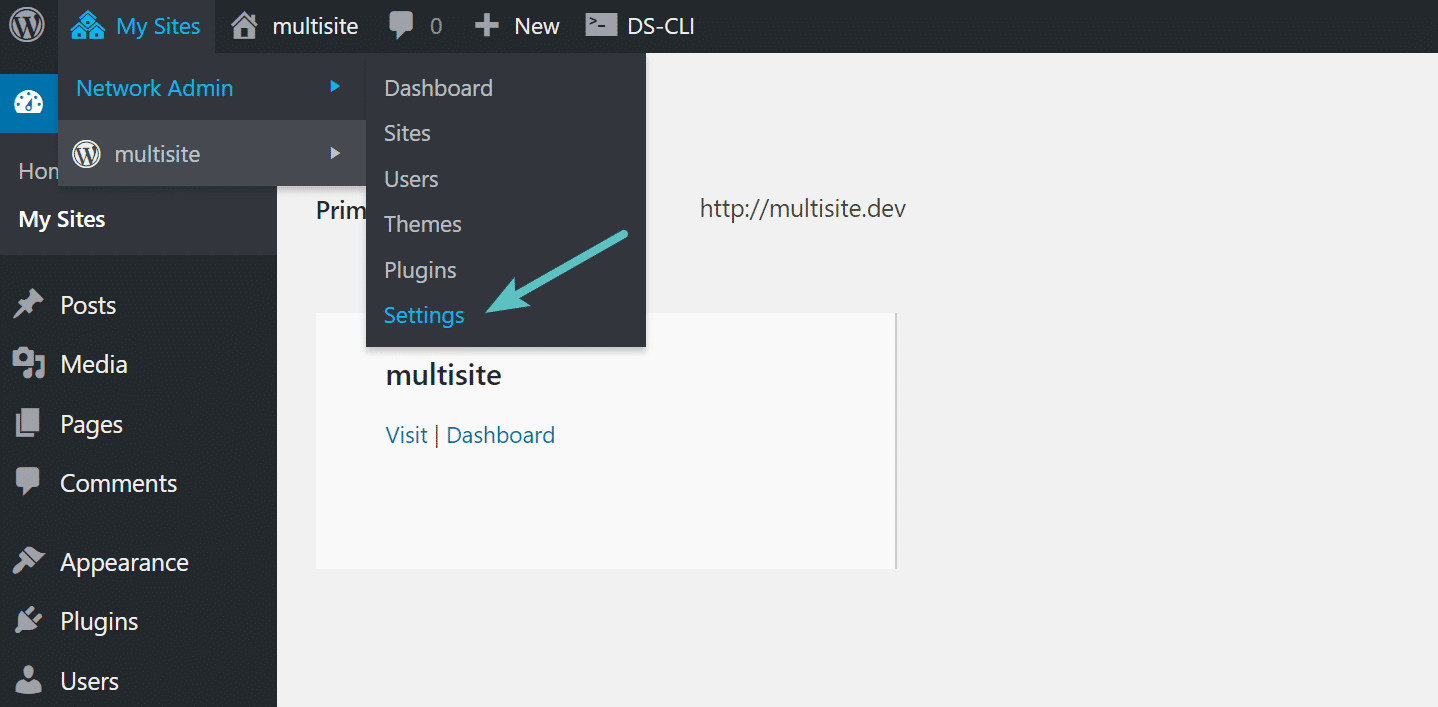
In your WordPress dashboard click into Network Admin and into Settings.
Step 2
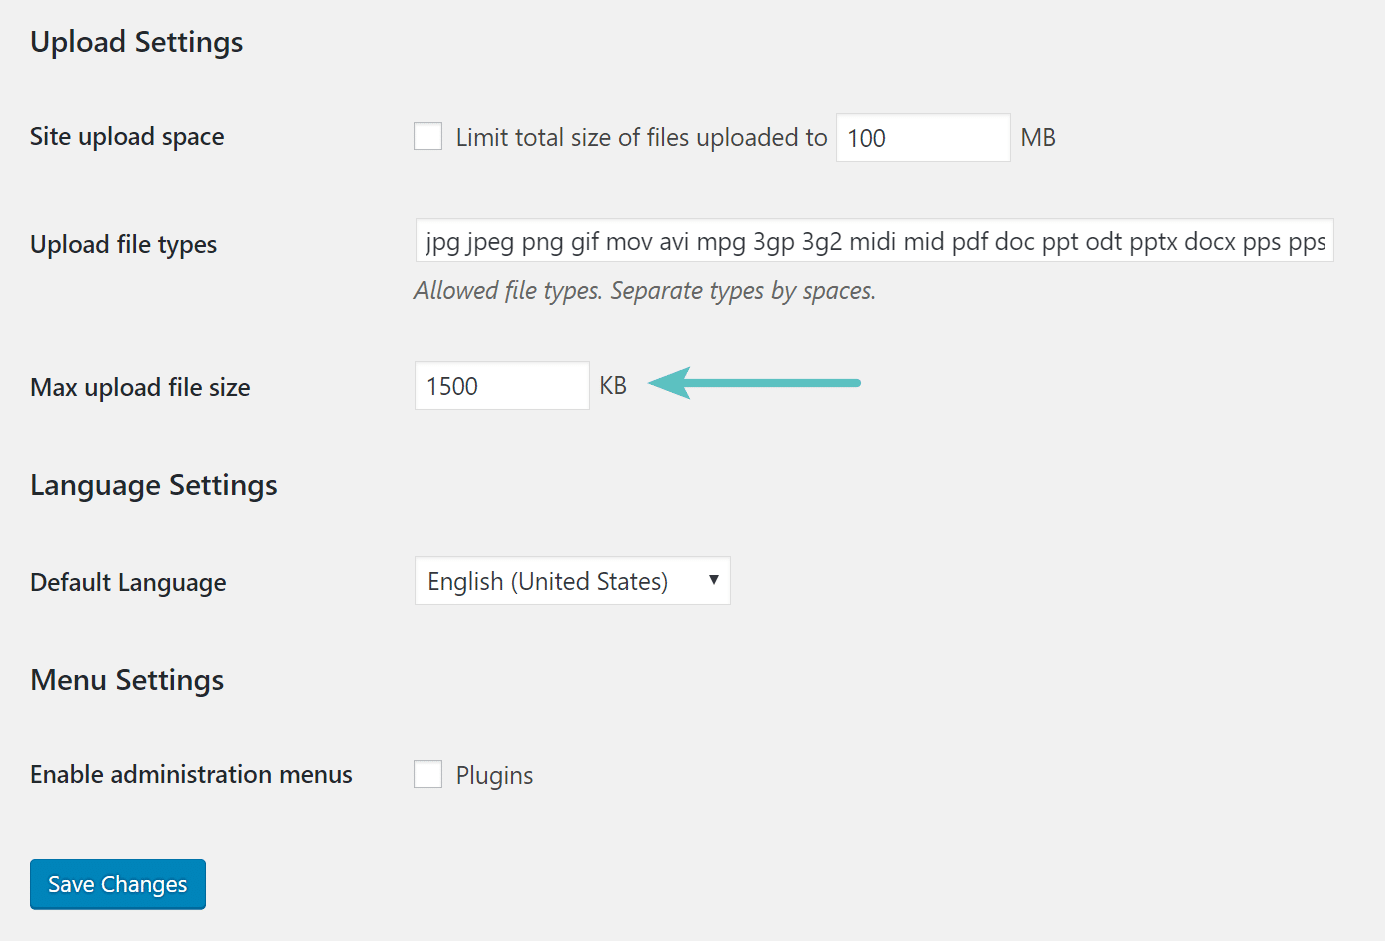
Scroll down and double check the “Max upload file size” settings. You can increase this to something higher than the default of 1500 KB (1.5 MB). Then click “Save Changes.”
Ask Your Host For Help
If you are having trouble with uploading files and size limits, one of the fastest solutions is to reach out to your host and ask for help. Many hosting companies have chat support which can help you out quickly in these situations. Increasing an upload limit is a trivial task for a tech support person, and they should be able to do it within a minute.
Modify Server Settings
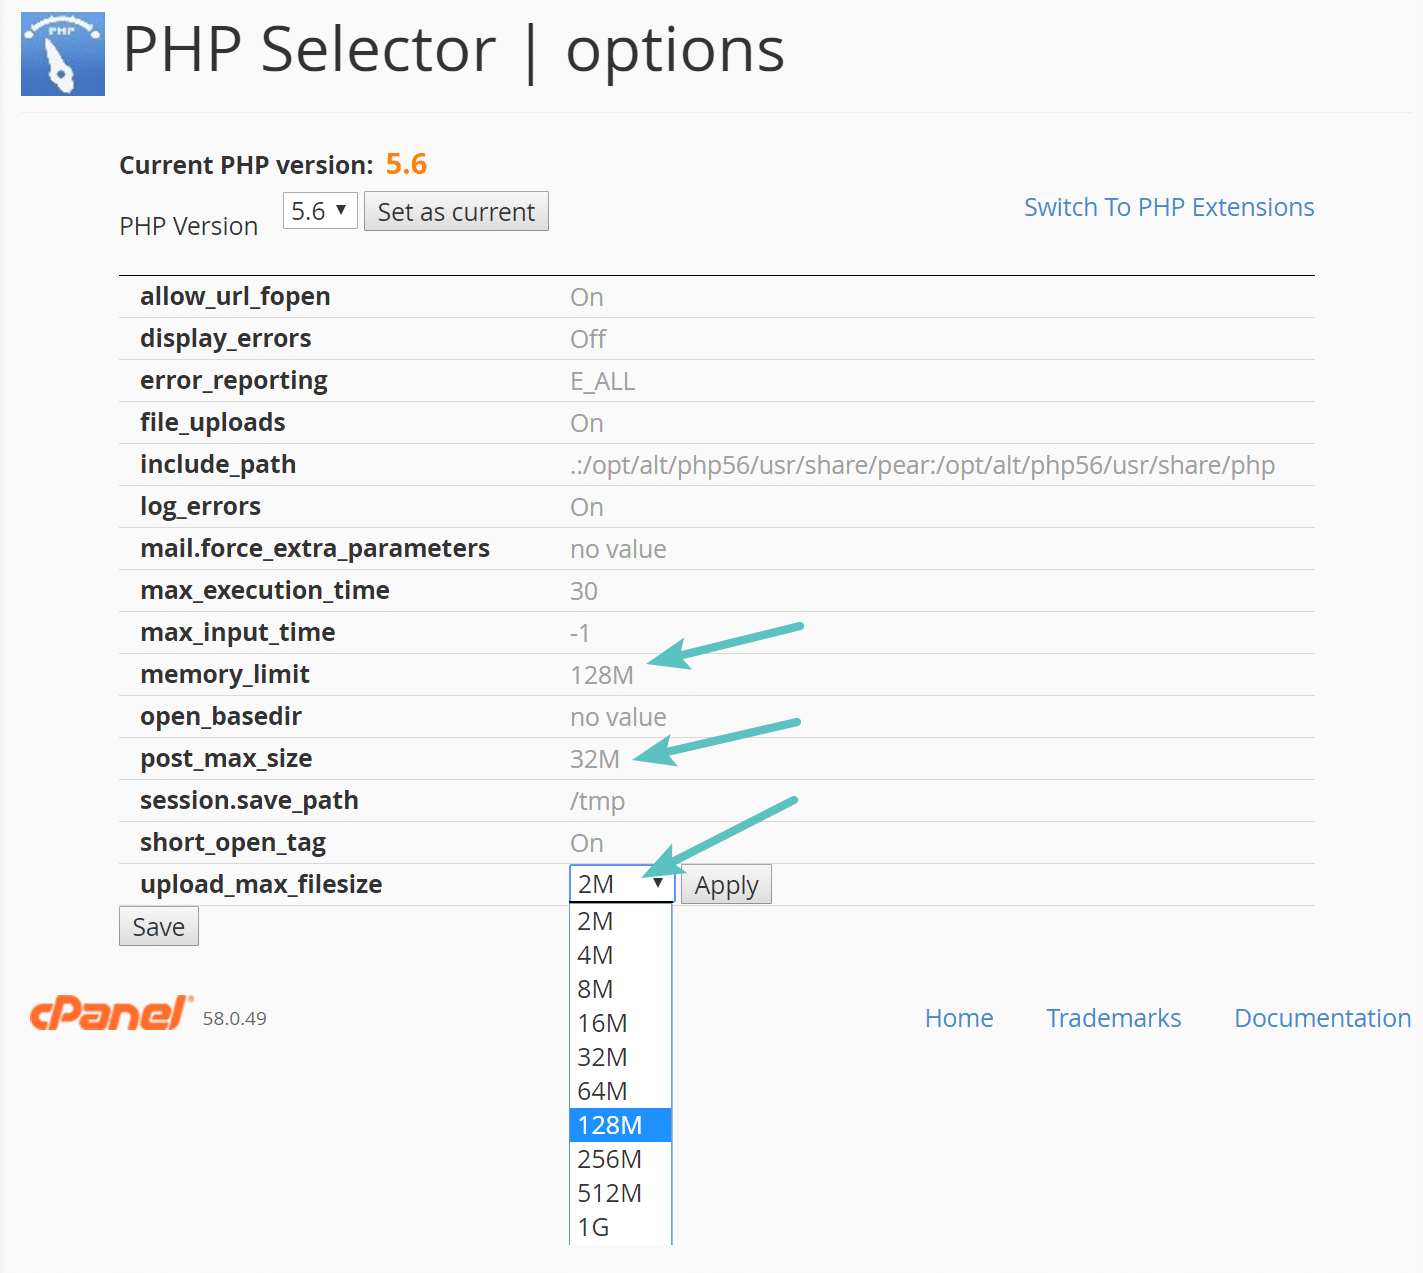
There are a lot of server settings that affect how uploads are handled in WordPress. Regretfully, many tutorials get this wrong because they change more settings than necessary. According to the PHP Documentation, the three directives that matter are:
- post_max_size
- upload_max_filesize
- memory_limit
The documentation also gives us pretty clear guidelines on how they should be set up:
[post_max_size] sets max size of post data allowed. This setting also affects file upload. To upload large files, this value must be larger than upload_max_filesize. If memory limit is enabled by your configure script, memory_limit also affects file uploading. Generally speaking, memory_limit should be larger than post_max_size.
We’ll need to set these three up to accommodate for our file sizes. If the largest file will be about 10 MB, we would recommend setting the upload_max_filesize to 12M (12 MB), the post_max_size to 13M and the memory_limit to 15M. Notice, they use M instead of MB. Uploads can contain a fair bit of text information in addition to the file itself so giving everything some breathing space is a good idea.
Now that we know what to modify, we just need to know how. There are five things you can try. Some of these may not work for you, depending on your server setup.
Option 1 – Change PHP Options in cPanel
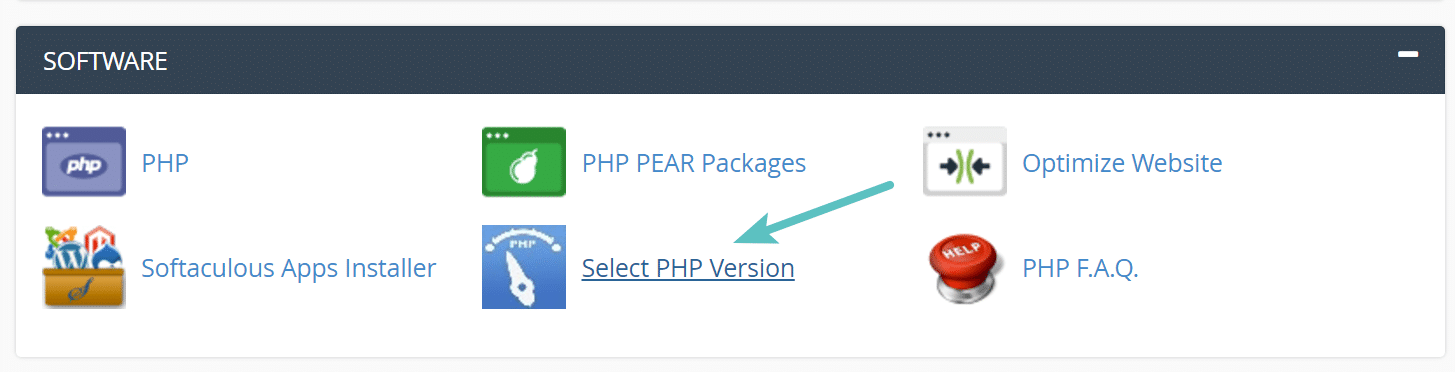
If you are running on a host that uses cPanel, you can easily change this from the UI. Under Software click on “Select PHP Version.”
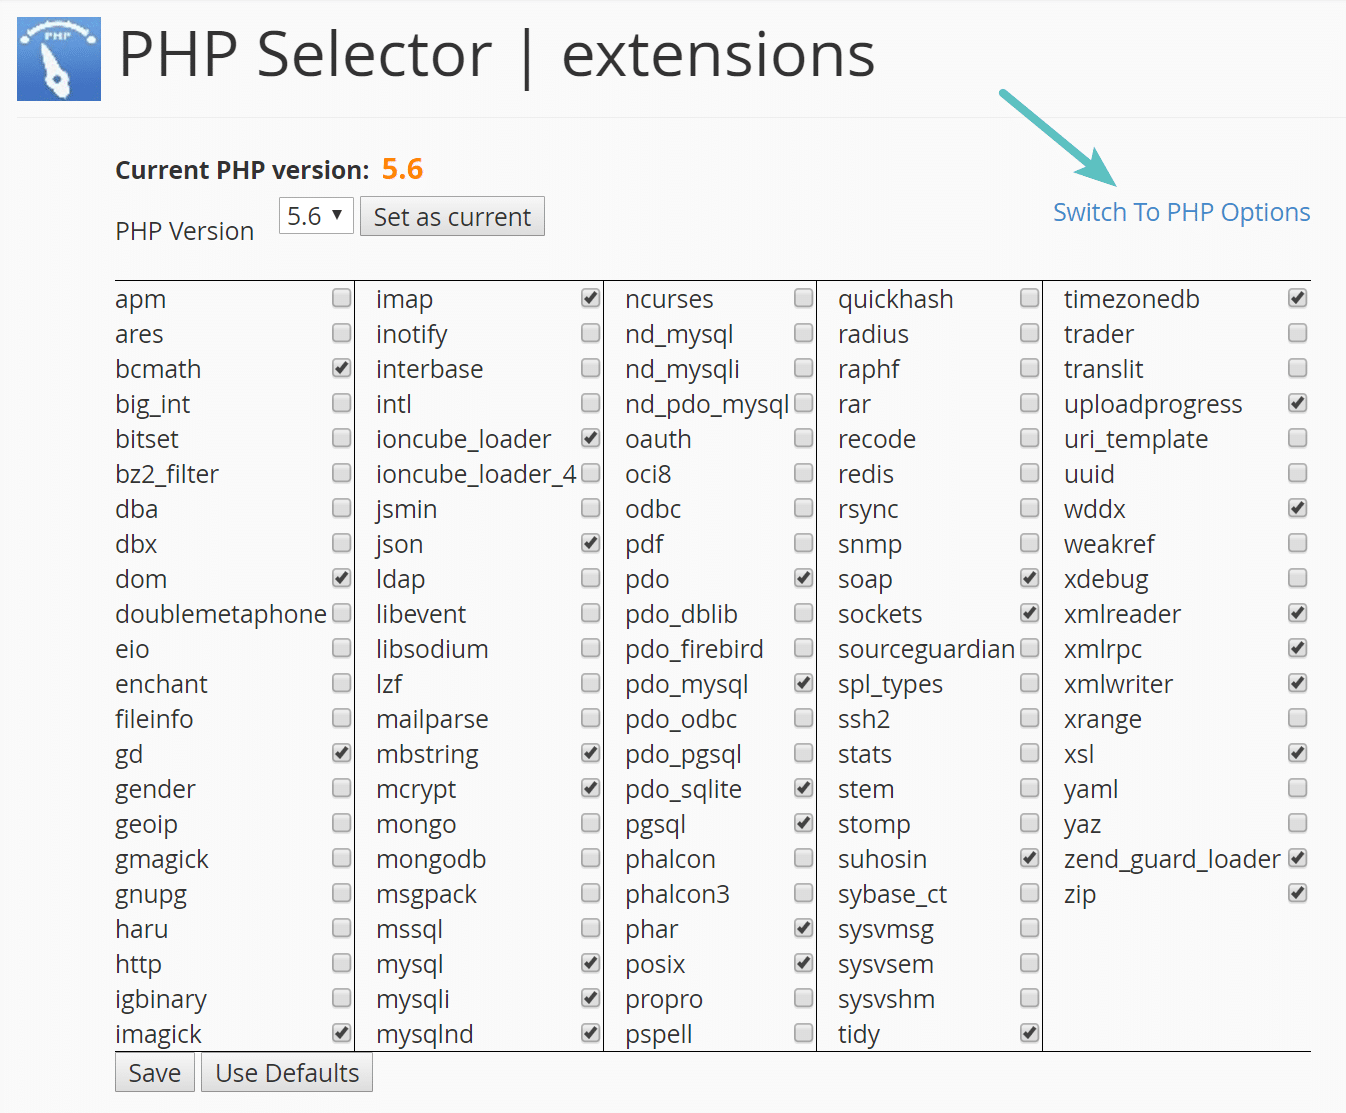
Click on “Switch to PHP Options.”
You can then click on each property and change its value. Then click on “Save.”
Option 2 – Create Or Modify php.ini Files
By default, php.ini files are the ones that govern how your server is set up. Due to restrictions in servers, you may not be able to use php.ini files, which is why the .htaccess method works more consistently, we’ll take a look at that next. To edit your php.ini file, login to your site via FTP or SSH, go to your site’s root directory and open or create a php.ini file.
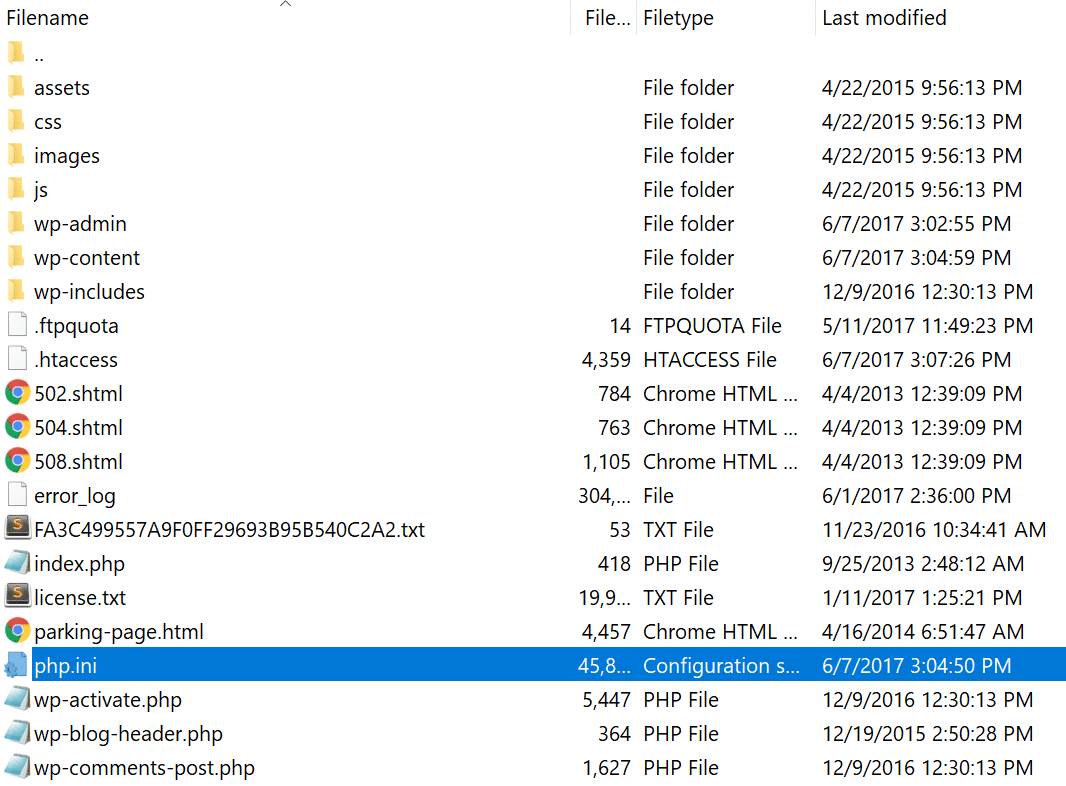
If the file was already there, search for the three settings and modify them if necessary. If you just created the file, or the settings are nowhere to be found you can paste the code below. You can modify of course the values to meet your needs.
upload_max_filesize = 12M
post_max_size = 13M
memory_limit = 15M
Some shared hosts might also require that you add the suPHP directive in your .htaccess file for the above php.ini file settings to work. To do this, edit your .htaccess file, also located at the root of your site, and add the following code towards the top of the file:
<IfModule mod_suphp.c>
suPHP_ConfigPath /home/yourusername/public_html
</IfModule>
Option 3 – Modify php.ini File in cPanel
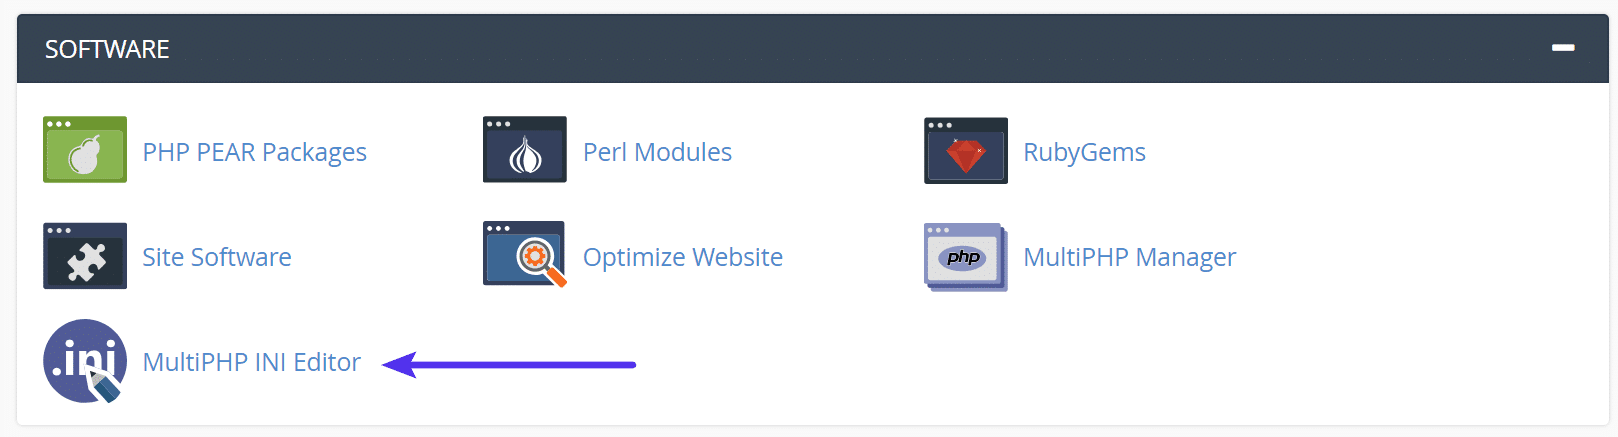
If you’re using cPanel, modifying the php.ini file can also sometimes be done via the MultiPHP INI Editor tool. Under Software click on “MultiPHP INI Editor.”
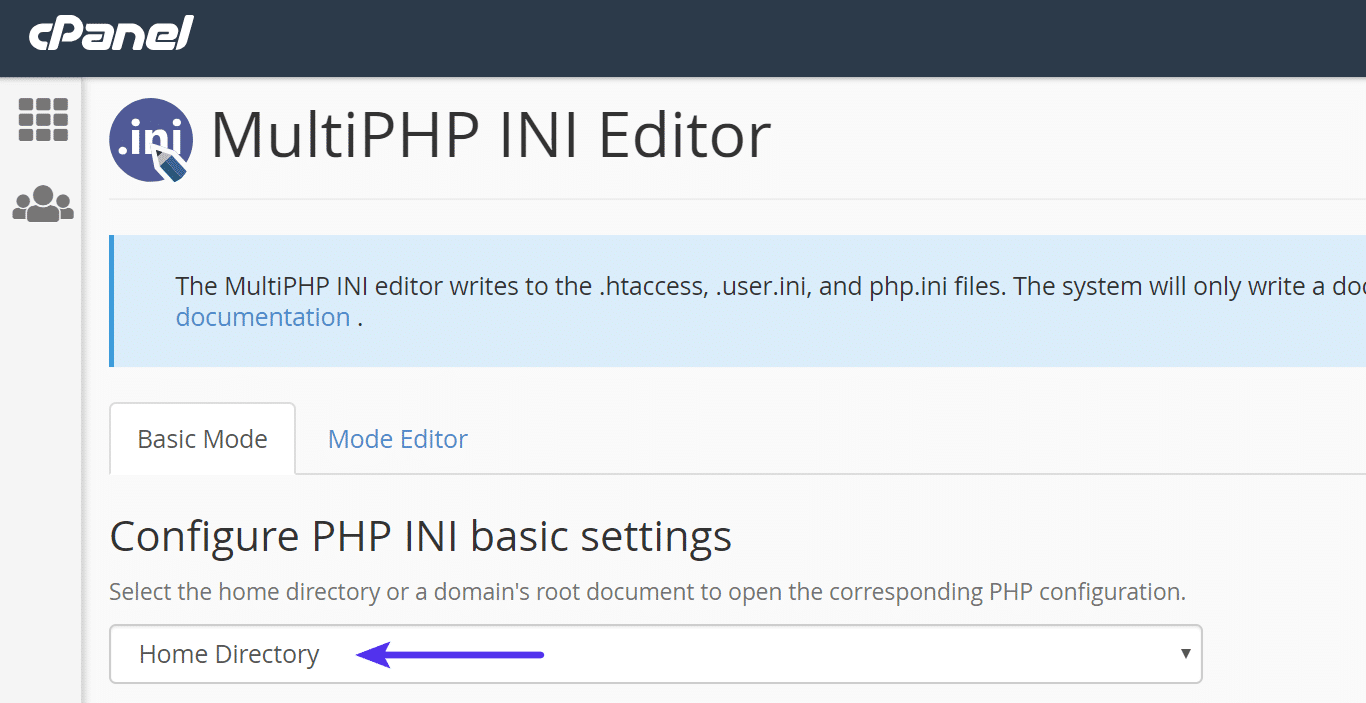
Select your home directory (domain root) from the drop-down.
Change the value of upload_max_filesize to something larger.
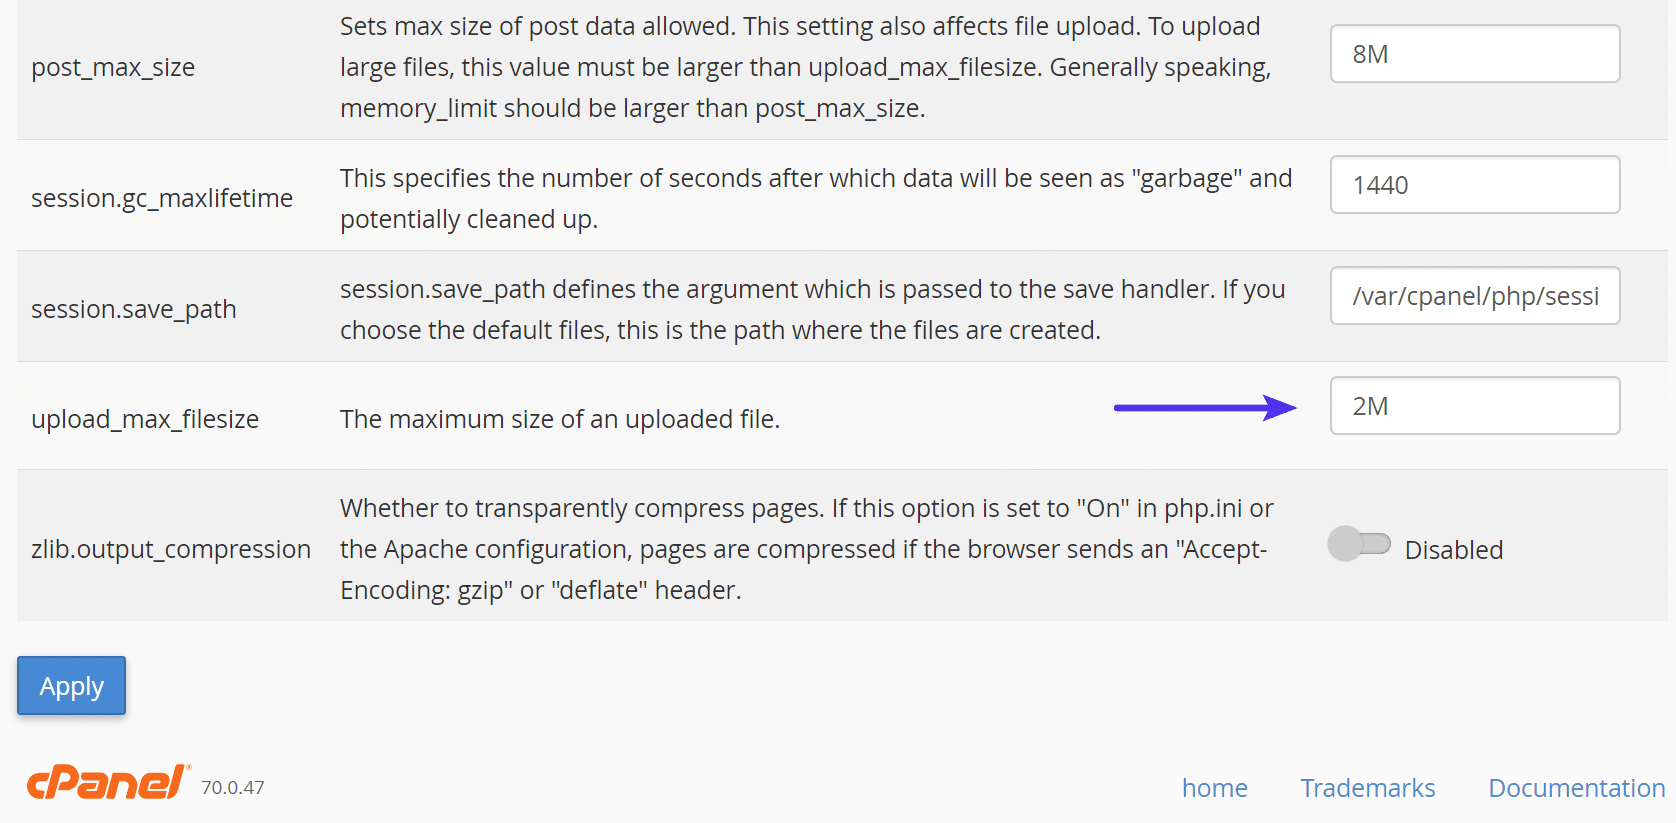
Option 4 – Create Or Modify .user.ini Files
If the above didn’t work for you, it could be that your host has the global settings locked down and instead have it configured to utilize .user.ini files. To edit your .user.ini file, login to your site via FTP or SSH, go to your site’s root directory and open or create a .user.ini file. You can then paste in the following code:
upload_max_filesize = 12M
post_max_size = 13M
memory_limit = 15M
Option 5 – Create Or Modify .htaccess Files
The .htaccess file is a special hidden file that contains various settings you can use to modify the server behavior, right down to a directory specific level. If the php.ini method above didn’t work, we suggest you try this next. First of all, login to your site via FTP or SSH, take a look at your root directory and see if there is a .htaccess file there.
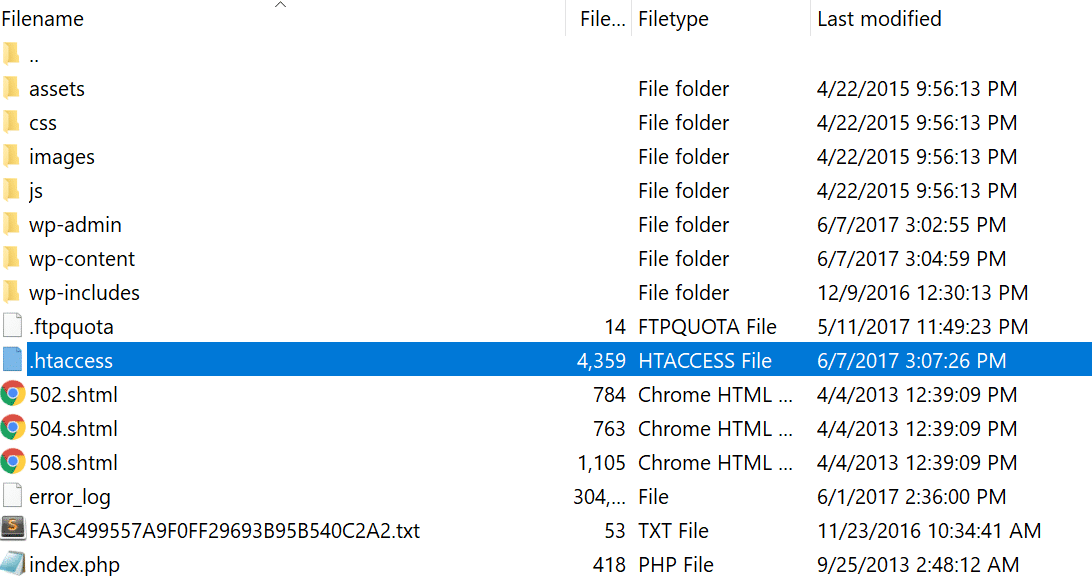
If there is you can edit that file to add the necessary code for increasing the upload limit.
php_value upload_max_filesize 12M
php_value post_max_size 13M
php_value memory_limit 15M
If you get an “internal server error” message with the method above it is most likely your server is running PHP in “CGI mode,” which means you can’t use the above commands in your .htaccess file.
Option 6 – Use The ini_set() PHP Function
The last option is not one we are fans of, but if all else fails you can give it a go. First, login to your site via FTP or SSH, and locate your wp-config.php file, which is typically in the root of your site.
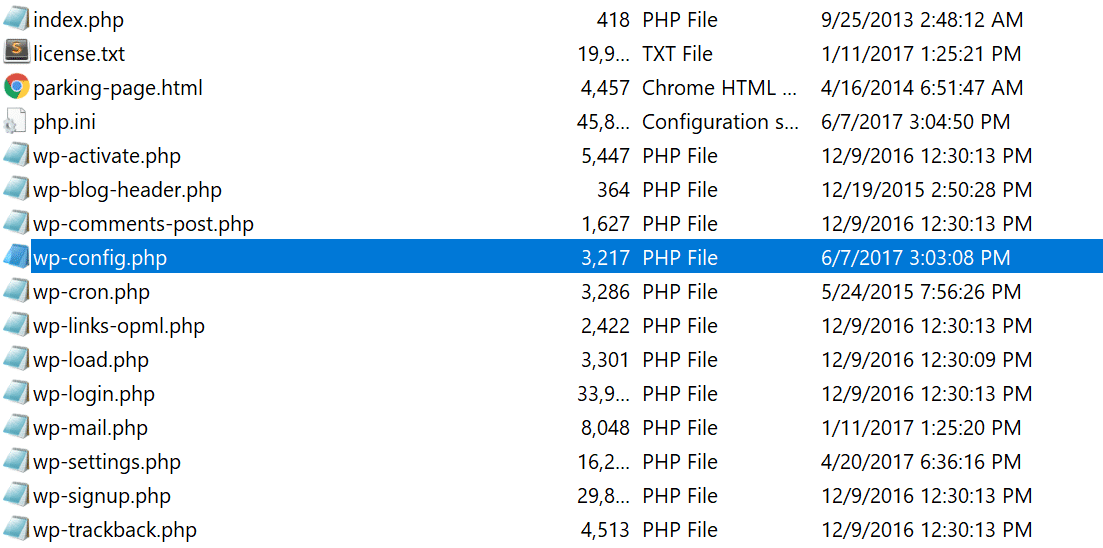
Add the following code to the wp-config.php file:
@ini_set( 'upload_max_size' , '12M' );
@ini_set( 'post_max_size', '13M');
@ini_set( 'memory_limit', '15M' );
In theory, you could try adding it to your theme’s functions file or your plugins main file, but this code really has no place in either. As a last resort or an interim solution, it could work though.
NGINX Setup
NGINX is an alternative web server software to good old Apache. It can be a lot faster than Apache which is why we use is on all of our servers here at Host SEO. If you are running your website on NGINX you’ll need to change your php.ini file as well as your NGINX config file.
We’ve already discussed how to modify a php.ini file so all we need is the code for the NGINX config:
http {
        client_max_body_size 13m;
}
Note that you’ll have a number of settings within the HTTP group. Only change the client_max_body_size parameter to make sure you don’t modify anything unintentionally. Last but not least, you’ll need to reload some services to make sure the changes are applied. Issue the following commands and you should be all done:
service php5-fpm restart
service nginx reload
If you are a Host SEO client, you don’t have access to your NGINX config. So feel free to reach out to our support team and they can quickly make the changes for you.
Utilize the WordPress upload_size_limit Filter
Another alternative way to increase the upload file size is to utilize the upload_size_limit filter which was introduced in WordPress 2.5. Below is an example of the code from Drew Jaynes.
/**
 * Filter the upload size limit for non-administrators.
 *
 * @param string $size Upload size limit (in bytes).
 * @return int (maybe) Filtered size limit.
 */
function filter_site_upload_size_limit( $size ) {
    // Set the upload size limit to 60 MB for users lacking the 'manage_options' capability.
    if ( ! current_user_can( 'manage_options' ) ) {
        // 60 MB.
        $size = 60 * 1024 * 1024;
    }
    return $size;
}
add_filter( 'upload_size_limit', 'filter_site_upload_size_limit', 20 );
Double Checking the Maximum Upload File Size
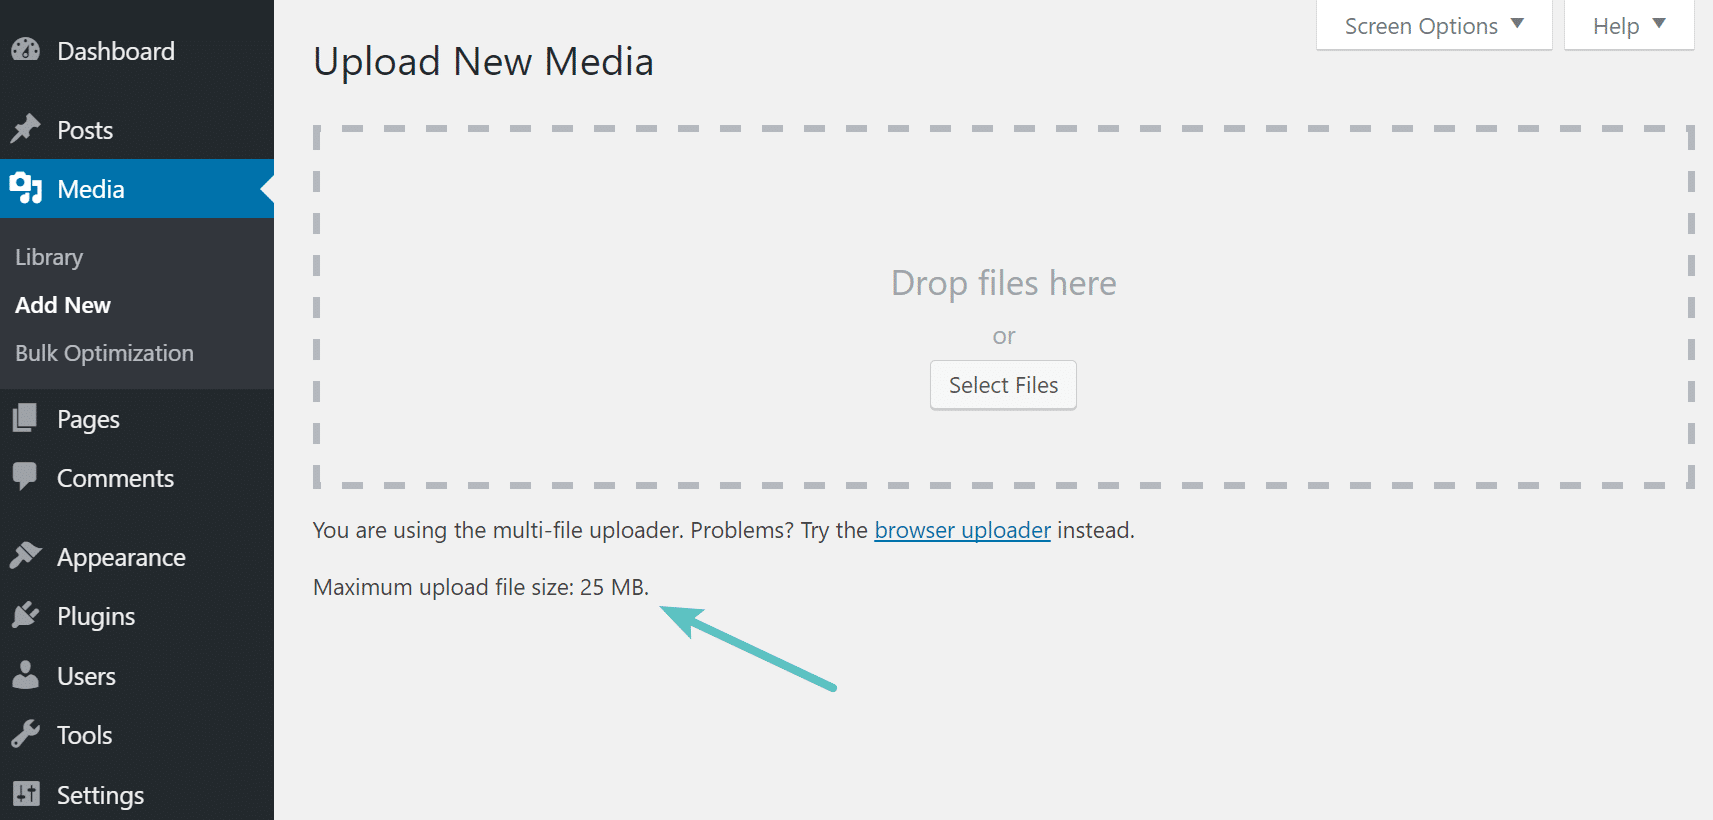
Checking if the above solutions worked is pretty easy. We like to go to the Media section and click on Add New. You should see a little message that says: “Maximum upload file size: 25 MB” for example. The numeric value should change as you modify the settings. As the beginning, we started with a 5 MB upload file size limit and as you can see below, we have now increased it to a 25 MB limit.
If you made changes to multiple places, we recommend going step-by-step and undo any changes that didn’t work. Both the .htaccess file and php.ini file are similar to the cascading properties of CSS. The post_max_size set in a child directory overwrites the same directive from a parent directory. This can lead to a lot of confusion if you’ve defined these directives everywhere in an attempt to “make sure it works”.
Alternative Option – Upload Files Via FTP
If you are struggling with your current host on getting your limits raised, you always have the option to upload your large files via FTP (SFTP) and then utilize the free Add From Server plugin. If you have a lot of large files, this is actually a faster method. Check out our in-depth tutorial on how to bulk upload files to WordPress media library via FTP.
Summary
As you can see, increasing the WordPress maximum upload file size isn’t too complex, it’s just a matter of knowing where to look and which commands to use. Hopefully, now you understand a little better on how to change and adjust the settings for your WordPress site. If you’ve had a particularly stubborn case of file size limits being stuck let us know how you managed to fix it, as each host and server can be set up differently.
Categories
Subscribe Now
10,000 successful online businessmen like to have our content directly delivered to their inbox. Subscribe to our newsletter!Archive Calendar

| Sat | Sun | Mon | Tue | Wed | Thu | Fri |
|---|---|---|---|---|---|---|
| 1 | 2 | |||||
| 3 | 4 | 5 | 6 | 7 | 8 | 9 |
| 10 | 11 | 12 | 13 | 14 | 15 | 16 |
| 17 | 18 | 19 | 20 | 21 | 22 | 23 |
| 24 | 25 | 26 | 27 | 28 | 29 | 30 |
| 31 | ||||||
Recent Articles
-

Posted on : Jul 25
-

Posted on : Jul 07
-

Posted on : Apr 07
-

Posted on : Mar 19
Optimized my.cnf configuration for MySQL 8 (on cPanel/WHM servers)
Tags
- layer 7
- tweak
- kill
- process
- sql
- Knowledge
- vpn
- seo vpn
- wireguard
- webmail
- ddos mitigation
- attack
- ddos
- DMARC
- server load
- Development
- nginx
- php-fpm
- cheap vpn
- Hosting Security
- xampp
- Plesk
- cpulimit
- VPS Hosting
- smtp
- smtp relay
- exim
- Comparison
- cpu
- WHM
- mariadb
- encryption
- sysstat
- optimize
- Link Building
- apache
- centos
- Small Business
- VPS
- Error
- SSD Hosting
- Networking
- optimization
- DNS
- mysql
- ubuntu
- Linux