HOW TO SET UP A WORDPRESS DEV ENVIRONMENT IN YOUR CENTOS 7 SERVER
- Category : Server Administration
- Posted on : Mar 21, 2017
- Views : 2,796
- By : Zane P.

WordPress
WordPress is the most popular CMS – Content Management System available. It is user-friendly and provides a vast array of free themes and plugins that essentially allow you to run any type of website you want. It is open source, and its technical core consists of PHP and MySql.
Today we will show you how to set up a fully-fledged WordPress dev environment using your cheap CentOS 7 server.
Prerequisites:
- CentOS 7 server installed and configured with non-root user and with sudo privileges.
- LAMP – (Linux, Apache, MySql and PHP) installed on CentOS 7 server
We will now walk you through the prerequisites.
Configuring a non-root user having sudo privileges in CentOS 7 server:
- Log into the server as root user. Upon log in you will be prompted for the root password as shown below-
- Use adduser command to add new user. Provide a new user name-
adduser <username>
- Provide new user’s password-
passwd <username>
- Confirm the password in the prompt as shown below. ReType the password.
- Use usermod command to add the new user to wheel group. In CentOS, by default, members of wheel group have sudo privileges-
usermod -aG wheel <username>
- You can test sudo access to the user by using-
su – <username>
This way you can check for sudo access. In case sudo access is not working, then you will see an error message in the console.
Installing Apache:
Apache is one of the most popular web servers and it is a great choice for hosting a website. To install Apache, we need to use the following command:
sudo yum install httpd
Once Apache is downloaded and installed, you can start Apache using:
sudo systemctl start httpd.service
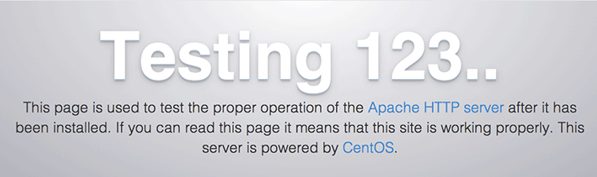
To check the installation has been done properly, you can check by typing the server’s public IP address in the browser as – http://<server_IP_address>
You can find your server IP address by using hostname -i
You will be able to see a page as shown below-
Once Apache is installed properly, you can change Apache to start at boot by using the following command-
sudo systemctl enable httpd.service
Installation of MySQL (MariaDB):
- To install the database use yum command as shown below-
sudo yum install mariadb-server mariadb - Once the installation is complete, we can start database by using the following command-
sudo systemctl start mariadb - To remove some of the dangerous defaults and enhance security features use:
sudo mysql_secure_installation - This will prompt an interactive command prompt. Press ENTER and proceed with each prompt. This will enable default values and remove certain users, databases, as well as disable remote root logins
- To enable the database to start up at boot:
sudo systemctl enable mariadb.service
Installation of PHP:
- To install PHP along with php-mysql package use-
sudo yum install php php-mysql - Once PHP is installed, we need to restart Apache webserver in order for it to work with PHP. Apache web server can be restarted as shown below-
sudo systemctl restart httpd.service - You can install additional modules of PHP. To see the list of modules and libraries available type-
yum search php- - To get description about each module you can use this command-
yum info <package name> - An example of this is shown here:
yum info php-soap - In case you wish to install this package then you can use-
sudo yum install php-soap
Testing PHP and Apache Web server:
To test PHP, you will have to write a basic PHP script – test.php. In Apache, this should be placed in “web root”. For CentOS 7, this will be placed at location /var/www/html/.
You will create the file as-
sudo vi /var/www/html/test.php
Open the file, add a simple but valid PHP script, and save the file–
<?php phpinfo(); ?>
In case you have a firewall running, then use the following commands to allow http and https traffic-
sudo firewall-cmd –permanent –zone=public –add-service=http
sudo firewall-cmd –permanent –zone=public –add-service=https
sudo firewall-cmd –reload
Finally, to test that PHP is working, we can open the browser and type-
http://<your_server_IP>/test.php
In case this works as expected, then you will be able to see a web page displaying PHP information.Once these prerequisites are done and configured, as a next step we will proceed to install and configure WordPress.
CREATE MYSQL DATABASE AND USER FOR WORDPRESS:
We have already installed MariaDB. Login using root account-
mysql -u root -p
You will be prompted for a password. Create a Database as-
CREATE DATABASE testwordpress;
Once the database is created, create a new test user-
CREATE USER testwordpressuser@localhost IDENTIFIED BY ‘password’;
Grant all privileges to the user and flush privileges –
GRANT ALL PRIVILEGES ON testwordpress.* TO testwordpressuser@localhost IDENTIFIED BY ‘password’;
FLUSH PRIVILEGES;
WORDPRESS INSTALLATION:
Before installing WordPress, we require one PHP module which is needed for resizing images in WordPress. This module needs to be installed. This can be installed as shown below-
sudo yum install php-gd
Restart Apache so that Apache can recognize this module-
sudo service httpd restart
Now we can download WordPress by using-
cd~
wget http://wordpress.org/latest.tar.gz
Extract the archive using-
tar xzvf latest.tar.gz
Once extracted you will have a wordpress directory in your home directory. To finish the installation, transfer these files to Apache document root as shown below-
sudo rsync -avP ~/wordpress/ /var/www/html/
rsync will safely copy all the contents. Once this is done, we need one folder for WordPress to store uploaded files. You can use mkdir-
mkdir /var/www/html/wp-content/uploads
Once the folder is created, we need to provide correct ownership and permissions. To grant ownership to Apache’s user and group use the following-
sudo chown -R apache:apache /var/www/html/*
With the above changes, the Apache web server can now create/modify WordPress files and also allow you to upload content to the server.
CONFIGURE WORDPRESS MANUALLY AND USING WEB INTERFACE:
The key configuration file for WordPress is wp-config.php. A sample file exists during installation. Copy this file-
cd /var/www/html
cp wp-config-sample.php wp-config.php
Open this file in text editor-
nano wp-config.php
You need to modify changes for the database settings in the section- MySQL settings. Replace DB_NAME, DB_USER, and DB_PASSWORD
The modified file should have the created Database credentials-
/** The name of the database for WordPress */
define(‘DB_NAME’, ‘testwordpress’);
/** MySQL database username */
define(‘DB_USER’, ‘testwordpressuser’);
/** MySQL database password */
define(‘DB_PASSWORD’, ‘password’);
These are only fields which needs to be edited. You can now save your changes.
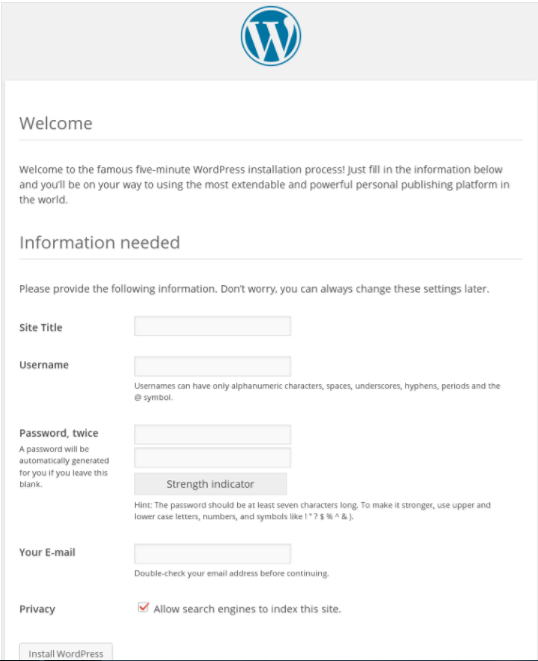
Now to complete the installation, we will make use of the web interface. In the browser, use the IP address or Domain name as shown-
http://<server_domain_name_or_server_IP>
First, select a language for installation. After clicking on continue, you can see a configuration page as shown below-
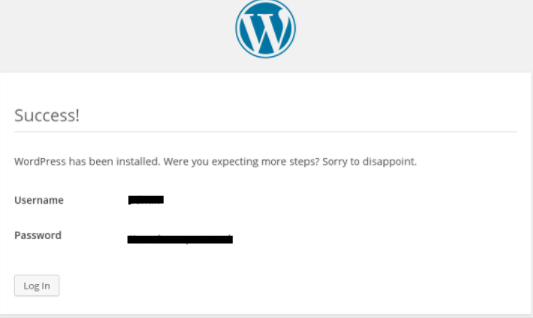
After filling all the information and clicking on install WordPress button, you will be able to see the following message-
Log in and you will be able to see the WordPress dashboard-
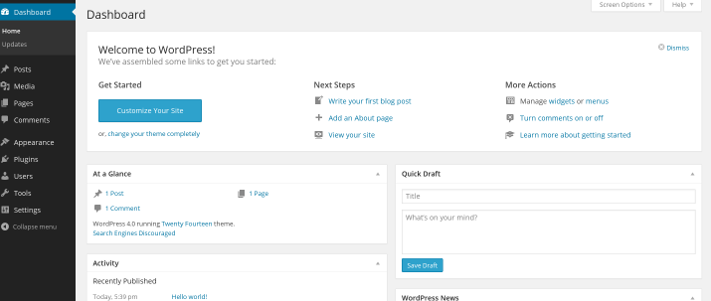
CONCLUSION: This finishes the setup of WordPress dev environment on your CentOS 7 server. From here on you can start using your VPS for WordPress development purposes.
Categories
Subscribe Now
10,000 successful online businessmen like to have our content directly delivered to their inbox. Subscribe to our newsletter!Archive Calendar

| Sat | Sun | Mon | Tue | Wed | Thu | Fri |
|---|---|---|---|---|---|---|
| 1 | 2 | 3 | 4 | 5 | ||
| 6 | 7 | 8 | 9 | 10 | 11 | 12 |
| 13 | 14 | 15 | 16 | 17 | 18 | 19 |
| 20 | 21 | 22 | 23 | 24 | 25 | 26 |
| 27 | 28 | 29 | 30 | |||
Recent Articles
-

Posted on : Jul 25
-

Posted on : Jul 07
-

Posted on : Apr 07
-

Posted on : Mar 19
Optimized my.cnf configuration for MySQL 8 (on cPanel/WHM servers)
Tags
- layer 7
- tweak
- kill
- process
- sql
- Knowledge
- vpn
- seo vpn
- wireguard
- webmail
- ddos mitigation
- attack
- ddos
- DMARC
- server load
- Development
- nginx
- php-fpm
- cheap vpn
- Hosting Security
- xampp
- Plesk
- cpulimit
- VPS Hosting
- smtp
- smtp relay
- exim
- Comparison
- cpu
- WHM
- mariadb
- encryption
- sysstat
- optimize
- Link Building
- apache
- centos
- Small Business
- VPS
- Error
- SSD Hosting
- Networking
- optimization
- DNS
- mysql
- ubuntu
- Linux