Elastic Load Balancing With EC2 instances
- Category : Linux Helpline (Easy Guide)
- Posted on : Feb 05, 2019
- Views : 2,768
- By : Tadashi P.
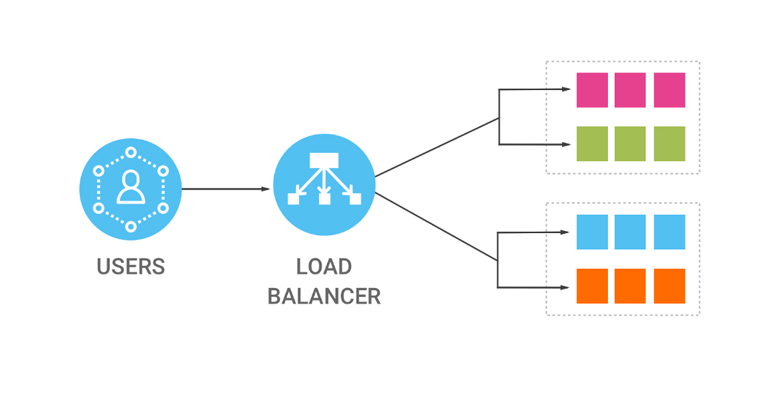
A load balancer receives the incoming requests from clients and transferred that’s requests to its registered targets in Availability Zones.Each targets contains EC2 instances. The load balancer always reviewing the health status of its registered targets and ensures that clients request transfer to healthy targets. If the load balancer detects an unhealthy target or EC2 instances, it stops routing the requests to that target or instances,
In order to connect the Amazon EC2 instance, you need to create .pem key pair for a each instance.it can be created via Amazon Ec2 console. Suppose, you have already key pair in your hand.Then, you not need to create new one. You can easily use that old key pair to new instance.
To create and launch a new EC2 instance
1.login to your Amazon EC2 console at https://console.aws.amazon.com/ec2/.
2.Click on Launch Instance options in EC2.
3.Choose an Amazon Machine Image (AMI) : you can see there top AMI provided by AWS. Each AMI is template that contains software configuration for launching instance
4.Choose an Instance Type : Amazon provides many instance type as per our requirements. The instance type variation depends on CPU number , memory, storage capacity, and networking capacity, So, you need to select on as per your running application on new instance. The defaults one is t2.micro ( 1 cpu, iGb memory..etc)
5.Configure Instance Details : we can manually configured our instance configuration. Also, amazon provides a option to configured the multiple instances with same AMI. All instances are launched on virtual private network(vpc). You are able to configured it in custom way. If not, Amazon EC2 will take defaults vpc with subnets while try to create a new instances.
6.Add Storage :The defaults volume size is depends on instance type that you have selected. If you need to add more, you can add it as per our needs.
7.Add Tags.It like a instance name that will help us to identifying the instance in easily.
8.Configure Security Group: The Security Group acts as instance firewall that control all traffic to new instances. For proper working of instance , you needs to add all required rule in it thats means, you needs to open ports in security groups.
8. Review Instance Launch: you can see the summary details of new instances configuration that you are wish to launch.
9. Click to launch option and download .pem key pair to connect instances from terminal
To configure the load balancer in AWS, we needs to configured the two instance with t2.micro instance type. Now, we have done it using above steps.
Instance1:
IP:18.222.192.75
Hostname: www.example.com
keypair:example.pem
Instance2:
IP:18.222.230.136
Hostname: www.text.com
keypair:text.pem
To access your instance1:
# chmod 400 example.pem
# ssh -i "example.pem" ec2-user@ec2-18-222-192-75.us-east-2.compute.amazonaws.com
# sudo su -
To access your instance2:
# chmod 400 text.pem
# ssh -i "text.pem" ec2-user@ec2-18-222-230-136.us-east-2.compute.amazonaws.com
# sudo su -
After accessing of your current instance, Please install Apache software package and enabled it on port no 80. we have suggested you to create a sample index page and confirmed that that sample page is loading fine while you are browsing your server ip in local browser. Also, you need to check Apache error log if you are facing any issue.
# yum install httpdAs like we early said, we have installed it and created sample index page for both instance like “HELLO WORLD , HELLO FRIEND”. Both pages are loading fine with out any issue.
To configure Load balancer for EC2 instance
1. login to aws console at https://console.aws.amazon.com/ec2/. and select a load balance creation options.
2.Select load balancer type: Elastic Load Balancing supports three types of load balancers: Application , Network and Classic Load Balancers.Application load balancer has flexible feature set for your web applications with HTTP and HTTPS traffic. So, we have select that to configure.
3.Configure Load Balancer: please provide a new load balancer name, enabled Listeners ports like https and select a vpn network. If you are not configured in custom way, it will automatically takes defaults vpc network configuration . You can select only one subnet per Availability Zone. We recommended you to select subnet same as in instance’s subnet.
4.Configure Security Groups: it same as in firewall rule to control the load balancer traffic. Its will be a better option to select load balancer security group same as the security groups’s of each instances.
5.Configure Routing and Register Targets: please create new targets group and registered the both instance to this targets group and create load balancer
After successfully create load balancer, you may try to browse your load balancer URL name in private window random-ally, you can see the two instance index page will change in each refresh. Thats means load balancer is properly configured for each instance.
Categories
Subscribe Now
10,000 successful online businessmen like to have our content directly delivered to their inbox. Subscribe to our newsletter!Archive Calendar

| Sat | Sun | Mon | Tue | Wed | Thu | Fri |
|---|---|---|---|---|---|---|
| 1 | 2 | 3 | ||||
| 4 | 5 | 6 | 7 | 8 | 9 | 10 |
| 11 | 12 | 13 | 14 | 15 | 16 | 17 |
| 18 | 19 | 20 | 21 | 22 | 23 | 24 |
| 25 | 26 | 27 | 28 | 29 | 30 | 31 |
Recent Articles
-

Posted on : Jul 25
-

Posted on : Jul 07
-

Posted on : Apr 07
-

Posted on : Mar 19
Optimized my.cnf configuration for MySQL 8 (on cPanel/WHM servers)
Tags
- layer 7
- tweak
- kill
- process
- sql
- Knowledge
- vpn
- seo vpn
- wireguard
- webmail
- ddos mitigation
- attack
- ddos
- DMARC
- server load
- Development
- nginx
- php-fpm
- cheap vpn
- Hosting Security
- xampp
- Plesk
- cpulimit
- VPS Hosting
- smtp
- smtp relay
- exim
- Comparison
- cpu
- WHM
- mariadb
- encryption
- sysstat
- optimize
- Link Building
- apache
- centos
- Small Business
- VPS
- Error
- SSD Hosting
- Networking
- optimization
- DNS
- mysql
- ubuntu
- Linux