How to install Vesta control panel in RHEL 7 or Centos 7
- Category : Linux Helpline (Easy Guide)
- Posted on : Mar 24, 2019
- Views : 2,810
- By : Zane P.

Introduction
This article will help you to install and configure Vestacp hosting control panel in your server or vps. You can setup a basic hosting web server with the following software.
Web server – apache
FTP server – proftpd
Email Servers – Exim + dovecot + spamassassin + clamav
Dns server – Bind
Firewall – Iptables
Database server – mysql
This control panel also can be installed with nginx+phpfpm or nginx+apache. The web server and other software choice is yours.
You can use this document to setup your server or we can provide you an one time installation at a cost of 50 USD. We also provide 24×7 technical support for Vesta cp hosting control panel. Our support engineers are experts in this control panel. So if you need a support service you can order a server management plans from here
Requirements
You may need an operating system RHEL 7 or Centos 7 in your dedicated or vps server. Please make sure to set a hostname for your server and its dns is pointing to the IP address of the server . I also here use a test email address(admin@yourdomain.com) and password ( changeme ). My setting for the server as follows,
Hostname : centos7.centriohost.com
email : admin@yourdomain.com
password : changeme
Install Vesta control panel
You may need to login to your server via ssh after that please down load the script and execute it as shown in below:
# cd /usr/local/src/
# wget -c  http://vestacp.com/pub/vst-install.sh
# sh  vst-install.sh --nginx no --apache yes --phpfpm no --vsftpd no --proftpd yes --exim yes --dovecot yes --spamassassin yes
--clamav yes --named yes --iptables yes --fail2ban no --mysql yes --postgresql no --remi no --quota no --hostname centos7.centriohost.com
--email admin@yourdomain.com --password changeme
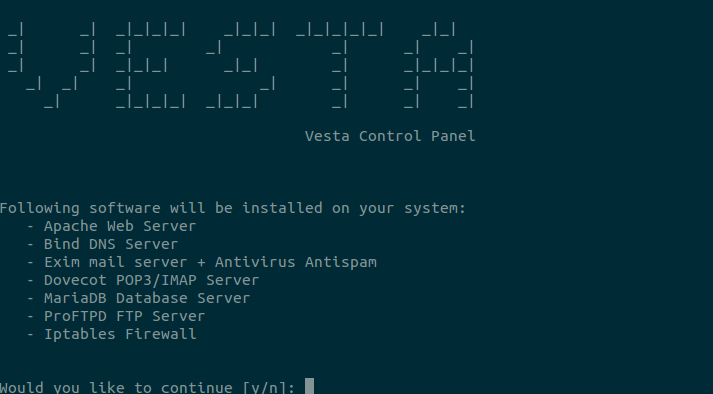
The above command will show a screen shot which will give the software selection menu as shown below,

The installation may take 10 t0 20 minute as per your server network speed and hardware configuration, because the installer script is going to download and install a lot of software packages from repositories. So after finishing the execution you can see the admin logins of the control panel. You may need to login to port 8083 using https and with the given user name and password form the installation screen.
I got the following logins to my server
=======================================================

 _|      _|  _|_|_|_|    _|_|_|  _|_|_|_|_|    _|_|
 _|      _|  _|        _|            _|      _|    _|
 _|      _|  _|_|_|      _|_|        _|      _|_|_|_|
   _|  _|    _|              _|      _|      _|    _|
     _|      _|_|_|_|  _|_|_|        _|      _|    _|


Congratulations, you have just successfully installed Vesta Control Panel

    https://192.168.1.100:8083
    username: admin
    password: changeme

We hope that you enjoy your installation of Vesta. Please feel free to contact us anytime if you have any questions.
Thank you.

--
Sincerely yours
vestacp.com team
Admin panel logins
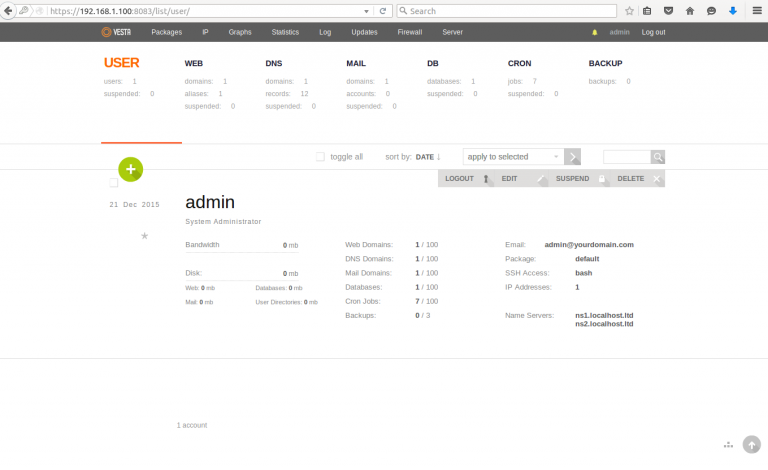
You may need to open your browser and copy paste the above given url and need to manually accept the openssl warning too as it is not a real ssl certificate. Now you can see an admin panel as showing below.

Add a domain in vestacp
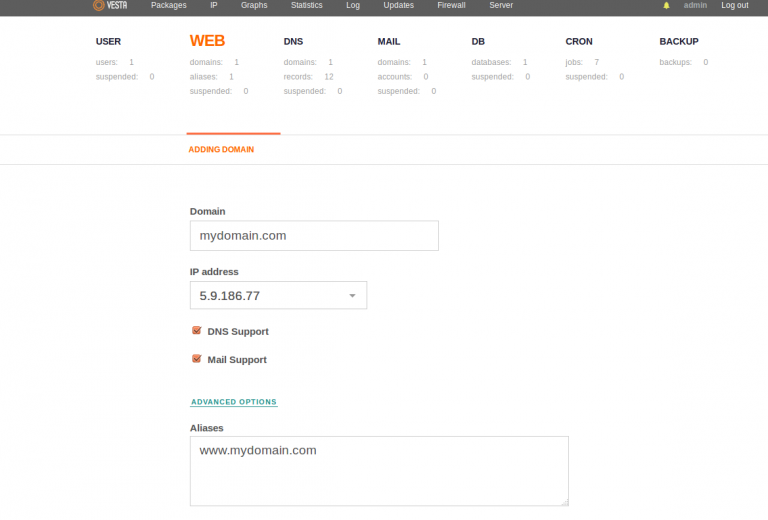
From the admin panel go to WEB -> Domains and click the “plus” button. It will show a screen sort as follows.

You may give the domain name and select the suitable options and press the add button. You can see the domain has been created successfully with showing it in the list.
Create an email account in vestacp
You can create and email account in vestacp from Admin -> Mail , then select the domain and click the “ADD ACCOUNT”. This will ask for the email account and password.
Uninstall Vestacp
It is easy to remove vestacp control panel. Please execute the following commands.
# systemctl stop vesta
# yum remove vesta*
# rm -rf /usr/local/vesta
Please make sure to delete the data and admin details too. It will be good to simply reload the OS , if you are going to install another control panel.
Conclusion
Vesta is not a professional hosting control panel. It lacks a lot of features that required in hosting. But you can use it for personal use. It is an easy to manage hosting control panel.
Categories
Subscribe Now
10,000 successful online businessmen like to have our content directly delivered to their inbox. Subscribe to our newsletter!Archive Calendar
| Sat | Sun | Mon | Tue | Wed | Thu | Fri |
|---|---|---|---|---|---|---|
| 1 | 2 | 3 | 4 | 5 | 6 | |
| 7 | 8 | 9 | 10 | 11 | 12 | 13 |
| 14 | 15 | 16 | 17 | 18 | 19 | 20 |
| 21 | 22 | 23 | 24 | 25 | 26 | 27 |
| 28 | ||||||
Recent Articles
-

Posted on : Jul 25
-

Posted on : Jul 07
-

Posted on : Apr 07
-

Posted on : Mar 19
Optimized my.cnf configuration for MySQL 8 (on cPanel/WHM servers)
Tags
- layer 7
- tweak
- kill
- process
- sql
- Knowledge
- vpn
- seo vpn
- wireguard
- webmail
- ddos mitigation
- attack
- ddos
- DMARC
- server load
- Development
- nginx
- php-fpm
- cheap vpn
- Hosting Security
- xampp
- Plesk
- cpulimit
- VPS Hosting
- smtp
- smtp relay
- exim
- Comparison
- cpu
- WHM
- mariadb
- encryption
- sysstat
- optimize
- Link Building
- apache
- centos
- Small Business
- VPS
- Error
- SSD Hosting
- Networking
- optimization
- DNS
- mysql
- ubuntu
- Linux


